Build a drone: canopy and electronics
The canopy covers the electronics between the plates. It is a loft, a solid stretched through a series of outlines, and a code component makes the outlines because each one differs from the last in five numbers. The honeycomb on its sides is not geometry cut into it: it is a set of wires, drawn on their own over the canopy. The hatch on top carries the bitbybit logo, read from a STEP file that a fetch text component downloads, the way any model from another CAD program can come into a graph.
-
The canopy is lofted through five rounded rectangles that narrow and rise; a code component makes the sections, and the loft closes them into a solid that sits on the top plate. It is painted midnight blue.
-
Add typescript editor as canopy sections: hidden, with the code below.
-
Add loft as canopy loft: make solid on, hidden.
-
Wire canopy sections › result into canopy loft › shapes.
-
Add translate as canopy: translation [0, 16, 0], hidden.
-
Wire canopy loft › result into canopy › shape.
-
Add pbr metallic roughness as paint material: name paint, base color #1f2b4d, metallic 0.1, roughness 0.25, z offset 2, in the Materials group.
-
Add options occt shape as paint look: precision 0.05, draw two sided off, edge colour #f2f2f2, edge width 6, in the Materials group.
-
Wire paint material › result into paint look › faceMaterial.
-
Add draw any async as paint in the Materials group.
-
Wire paint look › result into paint › options.
-
Wire canopy › result into paint › entity.
-
Press Add a comment, double-click the comment and write:
Canopy
Lofted through five rounded rectangles that narrow as they rise. A honeycomb of hexagons is traced on its sides, and a hatch closes the top.
-
Select the comment, canopy sections, canopy loft and canopy, press Group selected components and title the group Canopy.
const start = async (inputs: any, index: number) => {const sections = [[0, 140, 90, 26, 4], [12, 132, 84, 24, 6], [22, 110, 70, 19, 9], [29, 76, 48, 13, 10], [32, 52, 36, 10, 10]];const wires = [];for (const [y, length, width, radius, forward] of sections) {const rectangle = await bitbybit.occt.shapes.wire.createRectangleWire({ width, length, center: [0, y, forward], direction: [0, 1, 0] });wires.push(await bitbybit.occt.fillets.fillet2d({ shape: rectangle, radius }));}return wires;}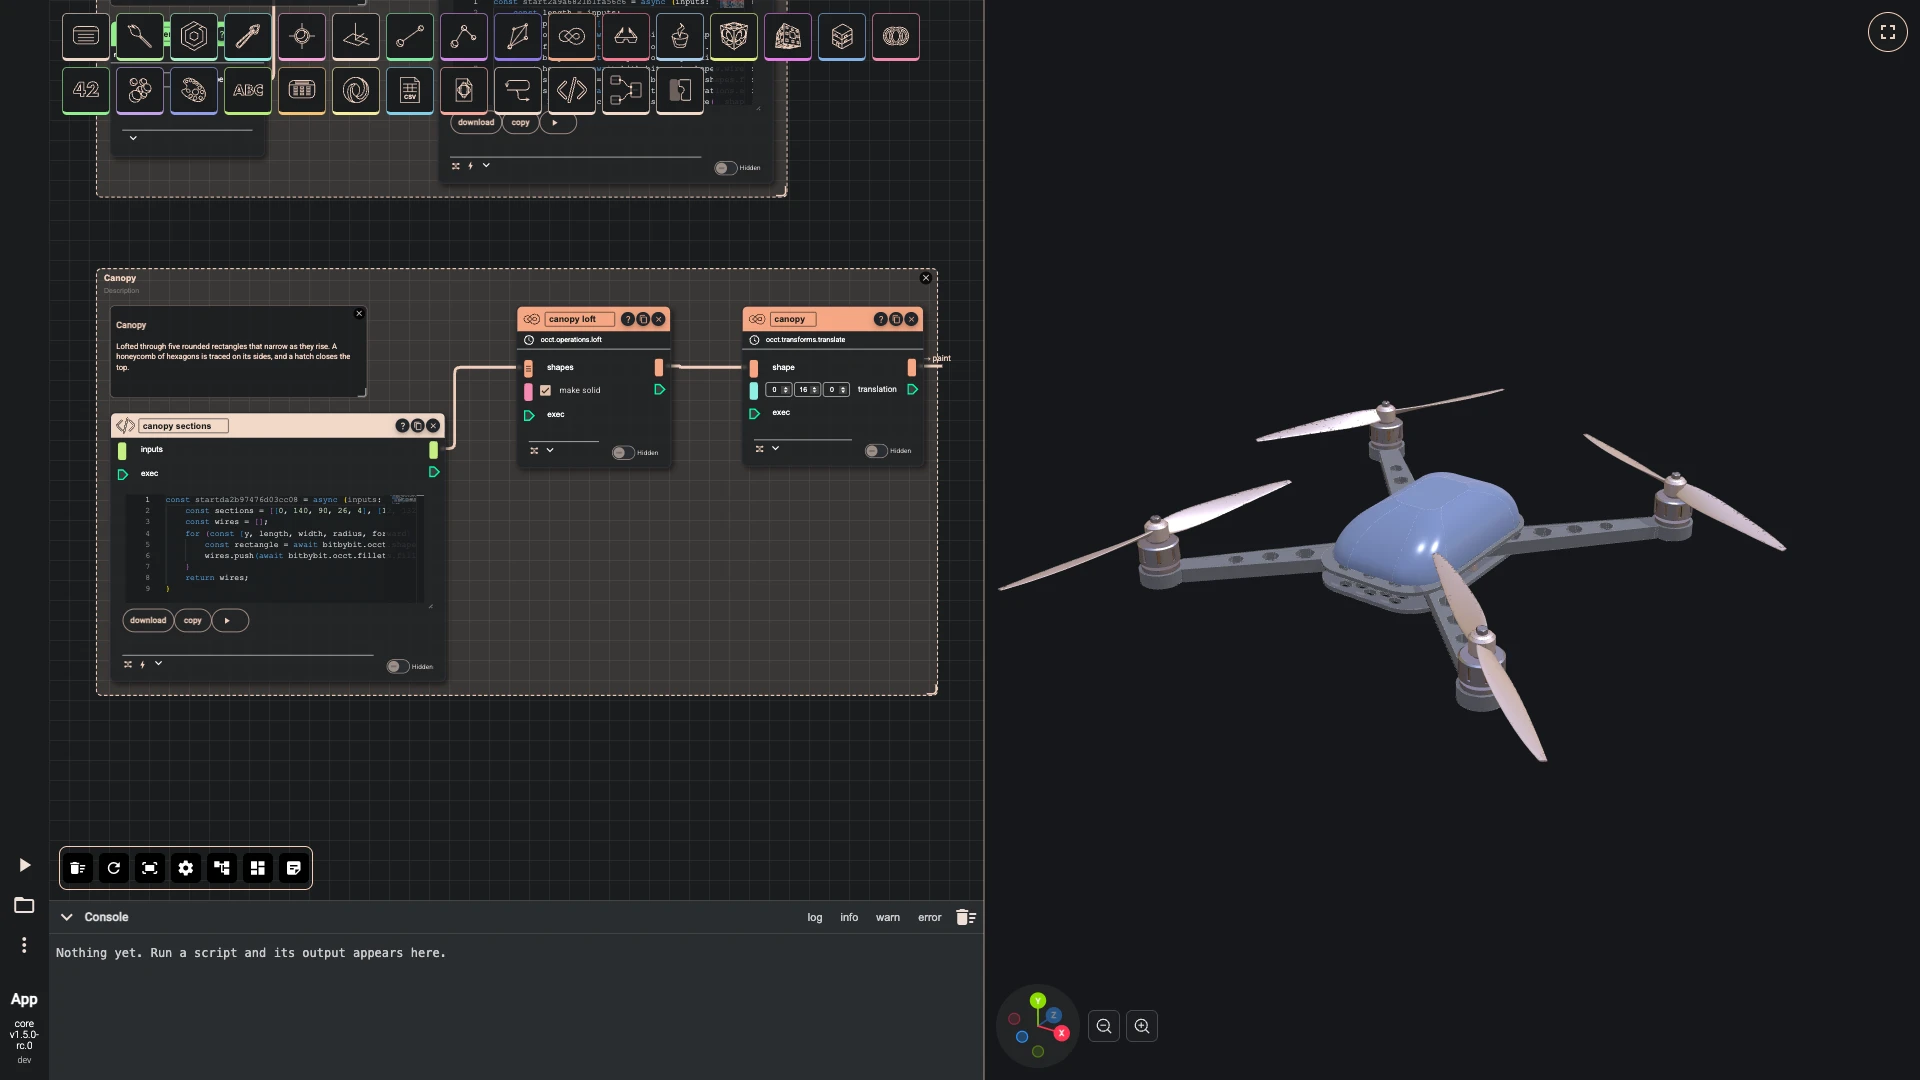
-
-
A honeycomb is traced on the canopy's sides: a code component takes the loft, grows it a little, and divides each side face into hexagon wires, eight across the long sides and five across the short ones. A draw of its own shows the wires as white lines, over the canopy's own material.
- Add typescript editor as honeycomb: hidden, in the Canopy group, with the code below.
- Wire canopy loft › result into honeycomb › inputs.
- Add translate as honeycomb on canopy: translation [0, 16, 0], hidden, in the Canopy group.
- Wire honeycomb › result into honeycomb on canopy › shape.
- Add options occt shape as honeycomb look: precision 0.05, draw two sided off, edge colour #f2f2f2, edge width 8, in the Materials group.
- Wire paint material › result into honeycomb look › faceMaterial.
- Add draw any async as honeycomb in the Materials group.
- Wire honeycomb look › result into honeycomb › options.
- Wire honeycomb on canopy › result into honeycomb › entity.
const start = async (inputs: any, index: number) => {const canopy = inputs;const centre = (await bitbybit.occt.analysis.measure.tightBoundingBox({ shape: canopy })).center;const grown = await bitbybit.occt.transforms.scale3d({ shape: canopy, scale: [1.02, 1.02, 1.02], center: [centre[0], 0, centre[2]] });const faces = await bitbybit.occt.shapes.face.getFaces({ shape: grown });const areas = await bitbybit.occt.shapes.face.getFacesAreas({ shapes: faces });const largestSide = Math.max(...areas.slice(0, -2));const wires = [];for (const [i, face] of faces.entries()) {const normal = await bitbybit.occt.shapes.face.normalOnUV({ shape: face, paramU: 0.5, paramV: 0.5 });if (Math.abs(normal[1]) > 0.9) {continue;}const across = areas[i] > largestSide * 0.7 ? 8 : 5;wires.push(...await bitbybit.occt.shapes.face.subdivideToHexagonWires({ shape: face, nrHexagonsU: across, nrHexagonsV: 3, flatU: false, scalePatternU: [0.8], scalePatternV: [0.8], filletPattern: [0.35], offsetFromBorderU: 0.05, offsetFromBorderV: 0.08 }));}return bitbybit.occt.shapes.compound.makeCompound({ shapes: wires });}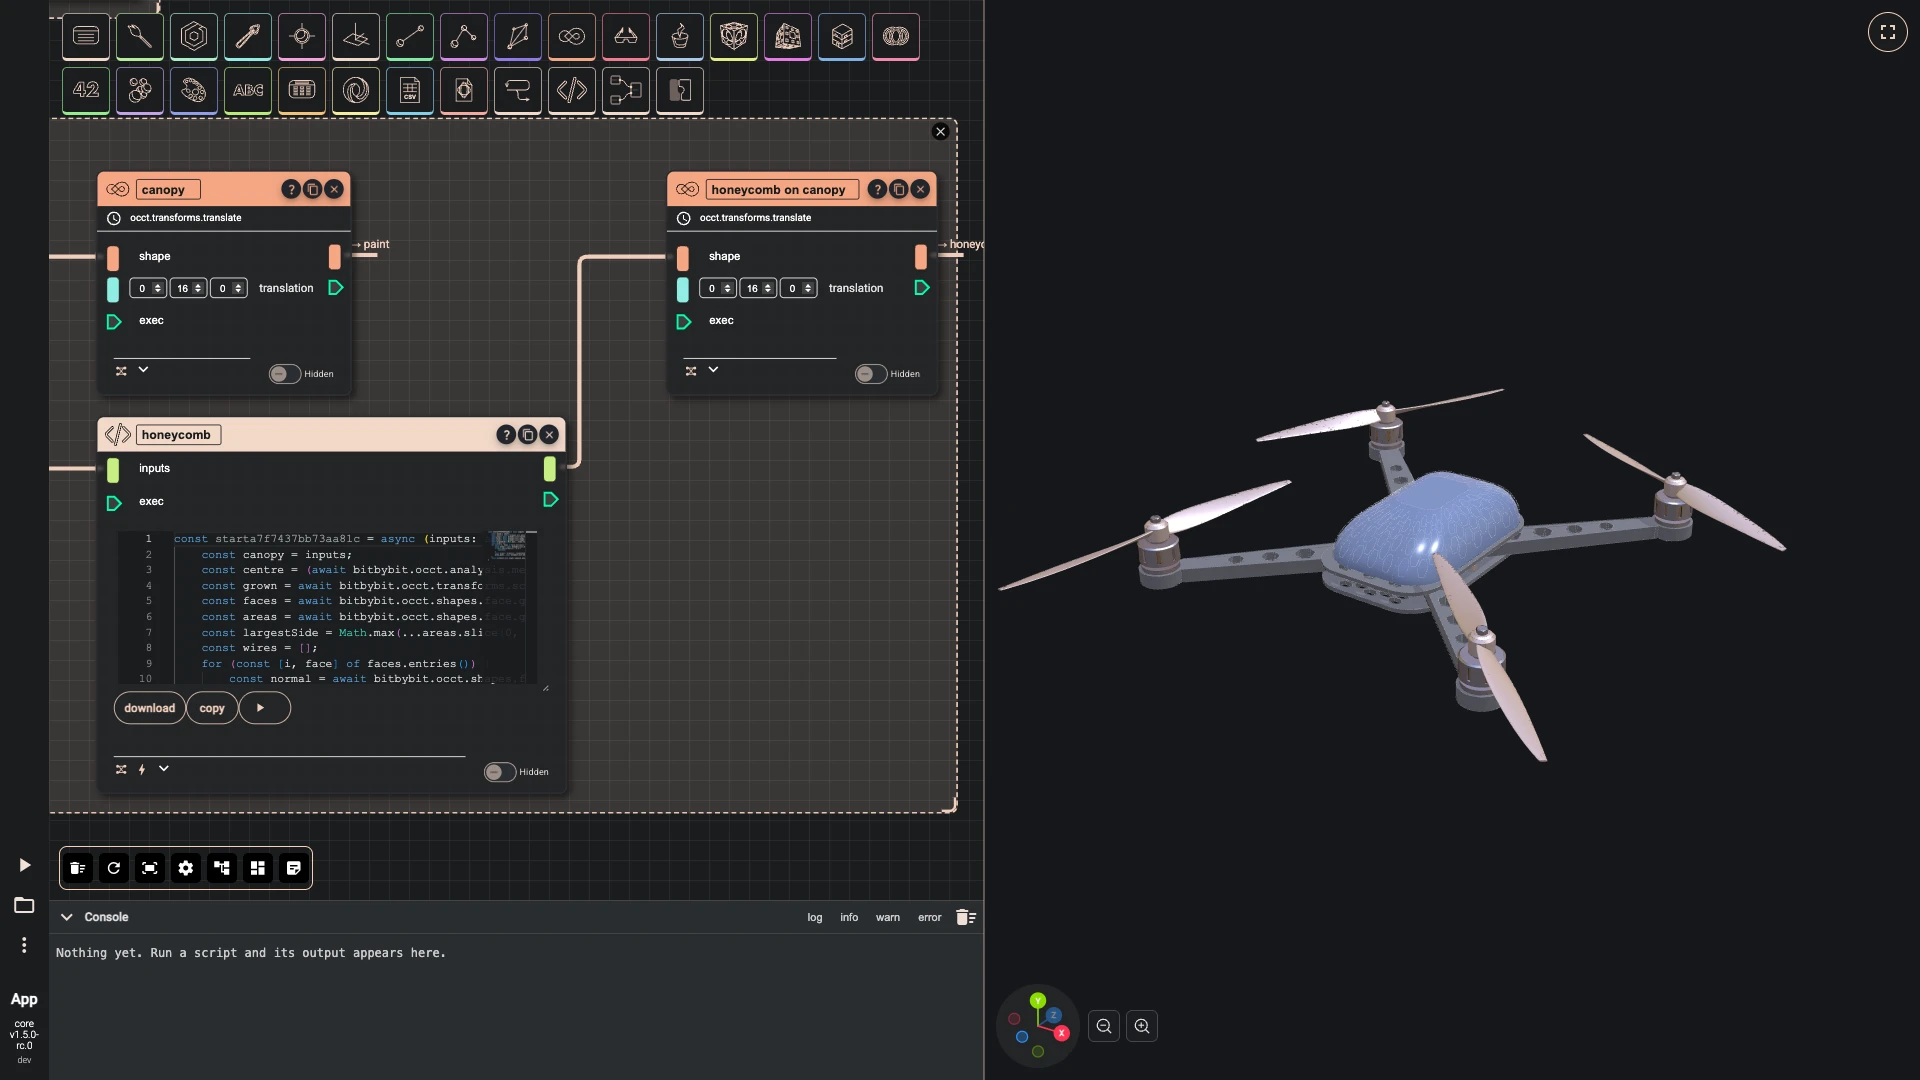
-
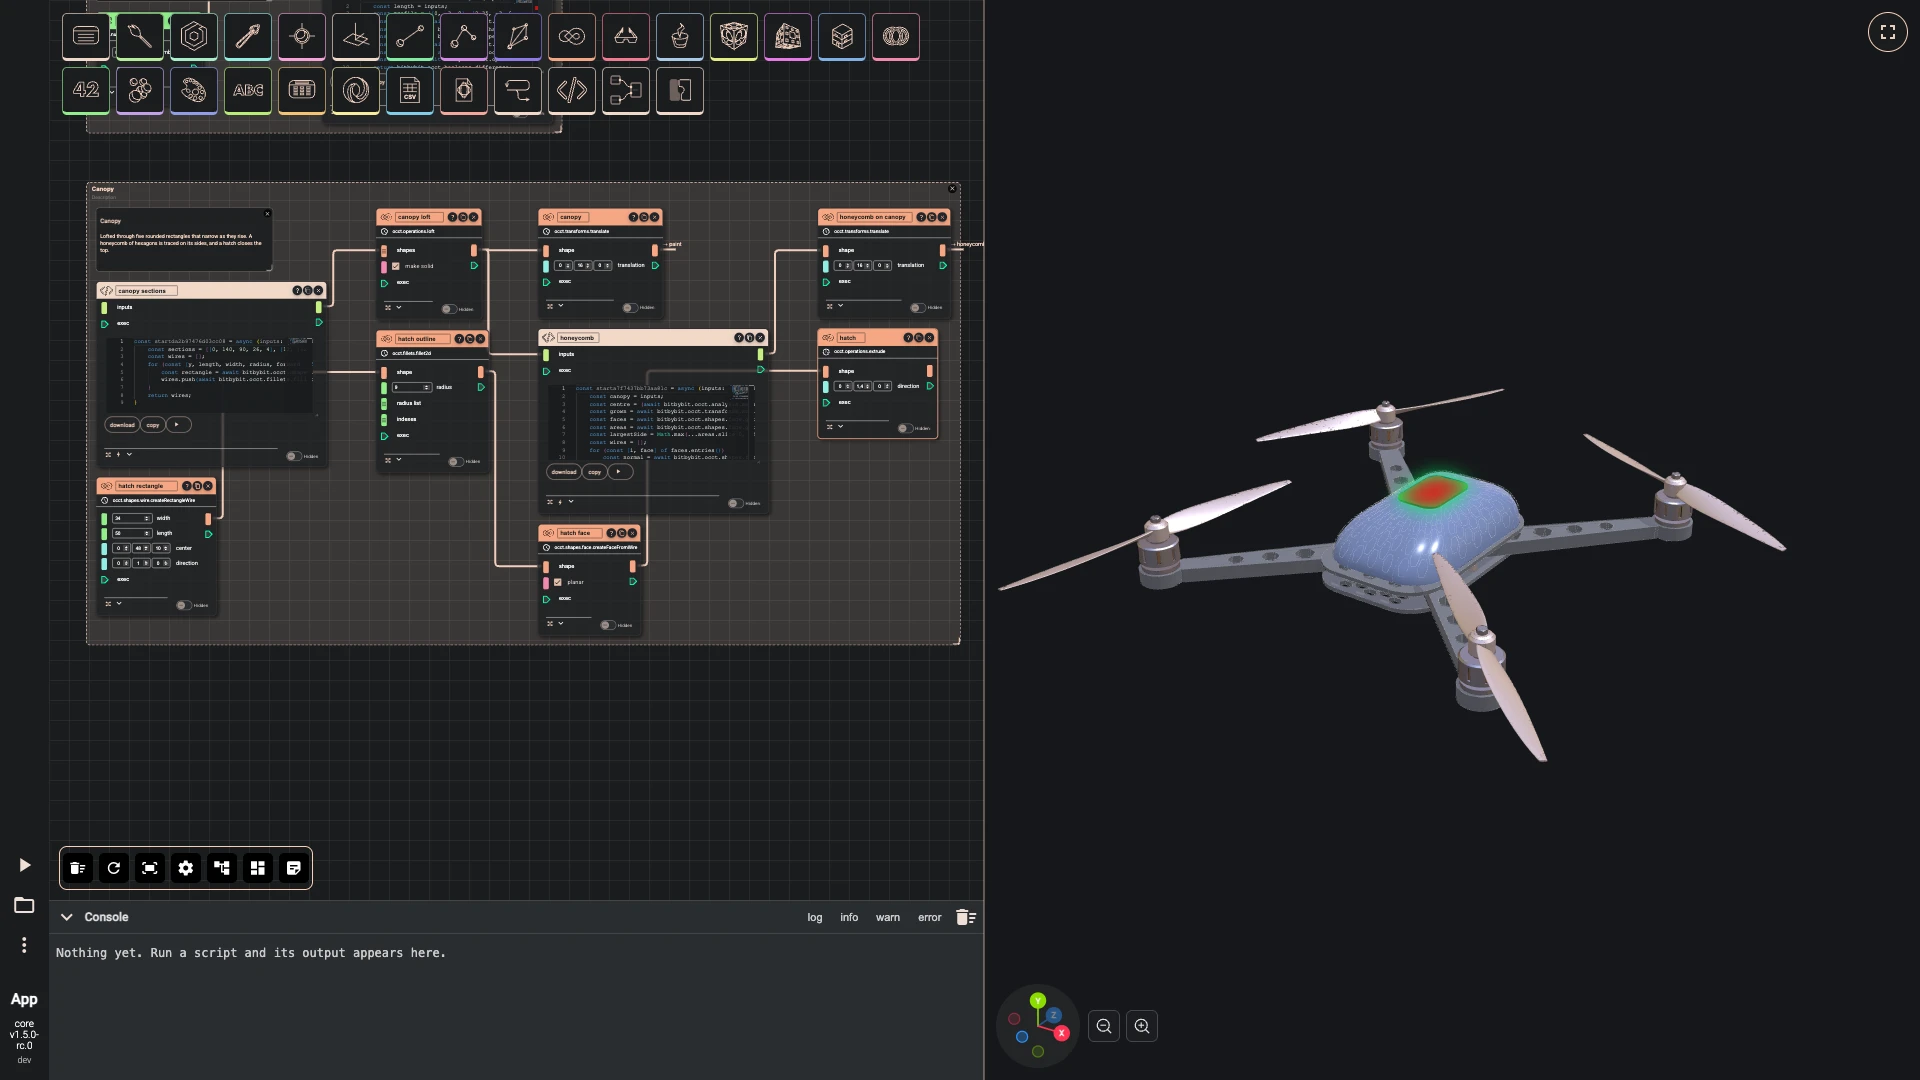
A hatch closes the top: a rounded rectangle on the canopy's crown, made into a face and extruded 1.4 millimetres. It is drawn in the next step, once the logo is cut into it.
- Add rectangle wire as hatch rectangle: width 34, length 50, center [0, 48, 10], hidden, in the Canopy group.
- Add fillet 2d as hatch outline: radius 9, hidden, in the Canopy group.
- Wire hatch rectangle › result into hatch outline › shape.
- Add face from wire as hatch face: planar on, hidden, in the Canopy group.
- Wire hatch outline › result into hatch face › shape.
- Add extrude as hatch: direction [0, 1.4, 0], hidden, in the Canopy group.
- Wire hatch face › result into hatch › shape.
-
The bitbybit logo goes on the hatch. A fetch text component downloads the logo's STEP file and load STEP reads it into a shape; a code component mirrors it, scales it to 26 millimetres and centres it on the hatch. Extruded, the logo is cut through the hatch, and a copy a little smaller, extruded 1.1 millimetres, sits in the cut as a white emblem.
-
Add fetch text as logo file: url https://git-cdn.bitbybit.dev/latest/assets/logo/logo-faces.stp.
-
Add load step or iges from text as logo shape: file type step, adjust zto y on, hidden.
-
Wire logo file › result into logo shape › text.
-
Add typescript editor as logo on the hatch: hidden, with the code below.
-
Wire logo shape › result into logo on the hatch › inputs.
-
Add extrude as logo cut: direction [0, 1.7, 0], hidden.
-
Wire logo on the hatch › result into logo cut › shape.
-
Add create list as logo cut-outs.
-
Wire logo cut › result into logo cut-outs › listElements.
-
Add difference as hatch with logo: hidden.
-
Wire hatch › result into hatch with logo › shape.
-
Wire logo cut-outs › list into hatch with logo › shapes.
-
Wire hatch with logo › result into paint › entity.
-
Add scale 3d as emblem faces: scale [0.96, 1, 0.96], center [0, 47.9, 10], hidden.
-
Wire logo on the hatch › result into emblem faces › shape.
-
Add extrude as emblem: direction [0, 1.1, 0], hidden.
-
Wire emblem faces › result into emblem › shape.
-
Add pbr metallic roughness as emblem material: name emblem, base color #f4f4f4, metallic 0.2, roughness 0.5, z offset 2, in the Materials group.
-
Add options occt shape as emblem look: precision 0.05, draw two sided off, edge colour #0d0e10, edge width 4, in the Materials group.
-
Wire emblem material › result into emblem look › faceMaterial.
-
Add draw any async as emblem in the Materials group.
-
Wire emblem look › result into emblem › options.
-
Wire emblem › result into emblem › entity.
-
Press Add a comment, double-click the comment and write:
Logo
The bitbybit logo, read from a STEP file on the CDN, scaled to 26 mm and centred on the hatch: cut through the hatch, and set into the cut a little smaller as a white emblem.
-
Select the comment, logo file, logo shape, logo on the hatch, logo cut, logo cut-outs, hatch with logo, emblem faces and emblem, press Group selected components and title the group Logo.
const start = async (inputs: any, index: number) => {const mirrored = await bitbybit.occt.transforms.mirrorAlongNormal({ shape: inputs, origin: [0, 0, 0], normal: [1, 0, 0] });const size = (await bitbybit.occt.analysis.measure.tightBoundingBox({ shape: mirrored })).size;const scaled = await bitbybit.occt.transforms.scale({ shape: mirrored, factor: 26 / Math.max(size[0], size[2]) });const box = await bitbybit.occt.analysis.measure.tightBoundingBox({ shape: scaled });return bitbybit.occt.transforms.translate({ shape: scaled, translation: [-box.center[0], 47.9 - box.min[1], 10 - box.center[2]] });}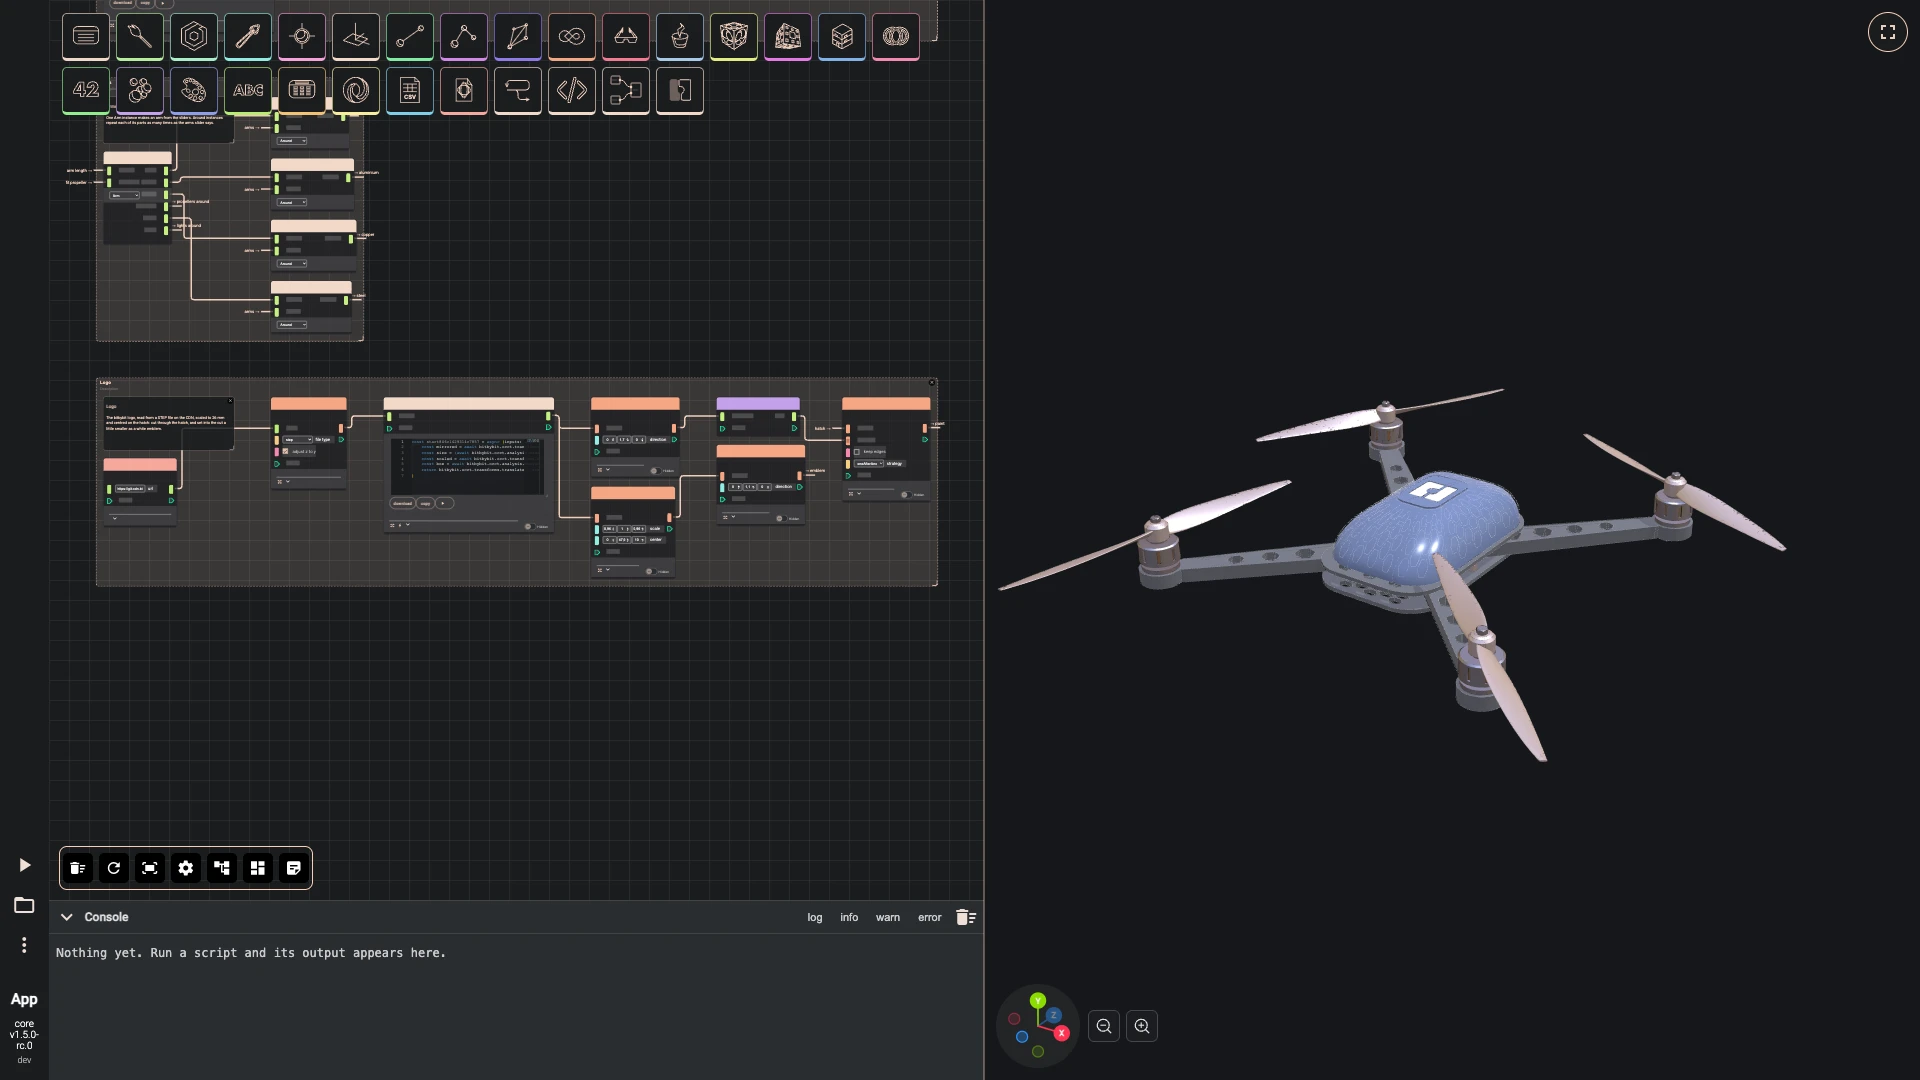
-
-
The GPS stands on a mast behind the canopy, built from nodes because it is a few simple shapes: two cylinders, the puck's edges rounded, the two joined. The two antennas angle down and back from the bottom plate; a code component makes them, because a short loop places the pair.
-
Add cylinder as GPS mast: radius 2.5, height 34, center [0, 16, -70], direction [0, 1, 0], hidden.
-
Add cylinder as GPS puck: radius 11, height 6, center [0, 50, -70], direction [0, 1, 0], hidden.
-
Add fillet edges as rounded puck: radius 1.5, hidden.
-
Wire GPS puck › result into rounded puck › shape.
-
Add create list as GPS parts.
-
Wire GPS mast › result into GPS parts › listElements.
-
Wire rounded puck › result into GPS parts › listElements.
-
Add union as GPS: hidden.
-
Wire GPS parts › list into GPS › shapes.
-
Add typescript editor as antennas: hidden, with the code below.
-
Add pbr metallic roughness as polymer material: name polymer, base color #2a2d31, metallic 0.05, roughness 0.4, z offset 2, in the Materials group.
-
Add options occt shape as polymer look: precision 0.05, draw two sided off, edge colour #f2f2f2, edge width 6, in the Materials group.
-
Wire polymer material › result into polymer look › faceMaterial.
-
Add draw any async as polymer in the Materials group.
-
Wire polymer look › result into polymer › options.
-
Wire GPS › result into polymer › entity.
-
Add pbr metallic roughness as rubber material: name rubber, base color #111214, metallic 0, roughness 0.92, z offset 2, in the Materials group.
-
Add options occt shape as rubber look: precision 0.05, draw two sided off, edge colour #f2f2f2, edge width 4, in the Materials group.
-
Wire rubber material › result into rubber look › faceMaterial.
-
Add draw any async as rubber in the Materials group.
-
Wire rubber look › result into rubber › options.
-
Wire antennas › result into rubber › entity.
-
Press Add a comment, double-click the comment and write:
Electronics
The GPS sits on a mast behind the canopy, clear of the frame, and two antennas angle down and back from the bottom plate.
-
Select the comment, GPS mast, GPS puck, rounded puck, GPS parts, GPS and antennas, press Group selected components and title the group Electronics.
const start = async (inputs: any, index: number) => {const rod = await bitbybit.occt.shapes.solid.createCylinder({ radius: 1.5, height: 42, center: [0, 0, 0], direction: [0, 1, 0] });const tip = await bitbybit.occt.shapes.solid.createSphere({ radius: 1.5, center: [0, 42, 0] });const antenna = await bitbybit.occt.booleans.union({ shapes: [rod, tip], keepEdges: false });const tilted = await bitbybit.occt.transforms.rotate({ shape: antenna, axis: [1, 0, 0], angle: 225 });const pair = [];for (const x of [-14, 14]) {pair.push(await bitbybit.occt.transforms.translate({ shape: tilted, translation: [x, 0, -67] }));}return bitbybit.occt.shapes.compound.makeCompound({ shapes: pair });}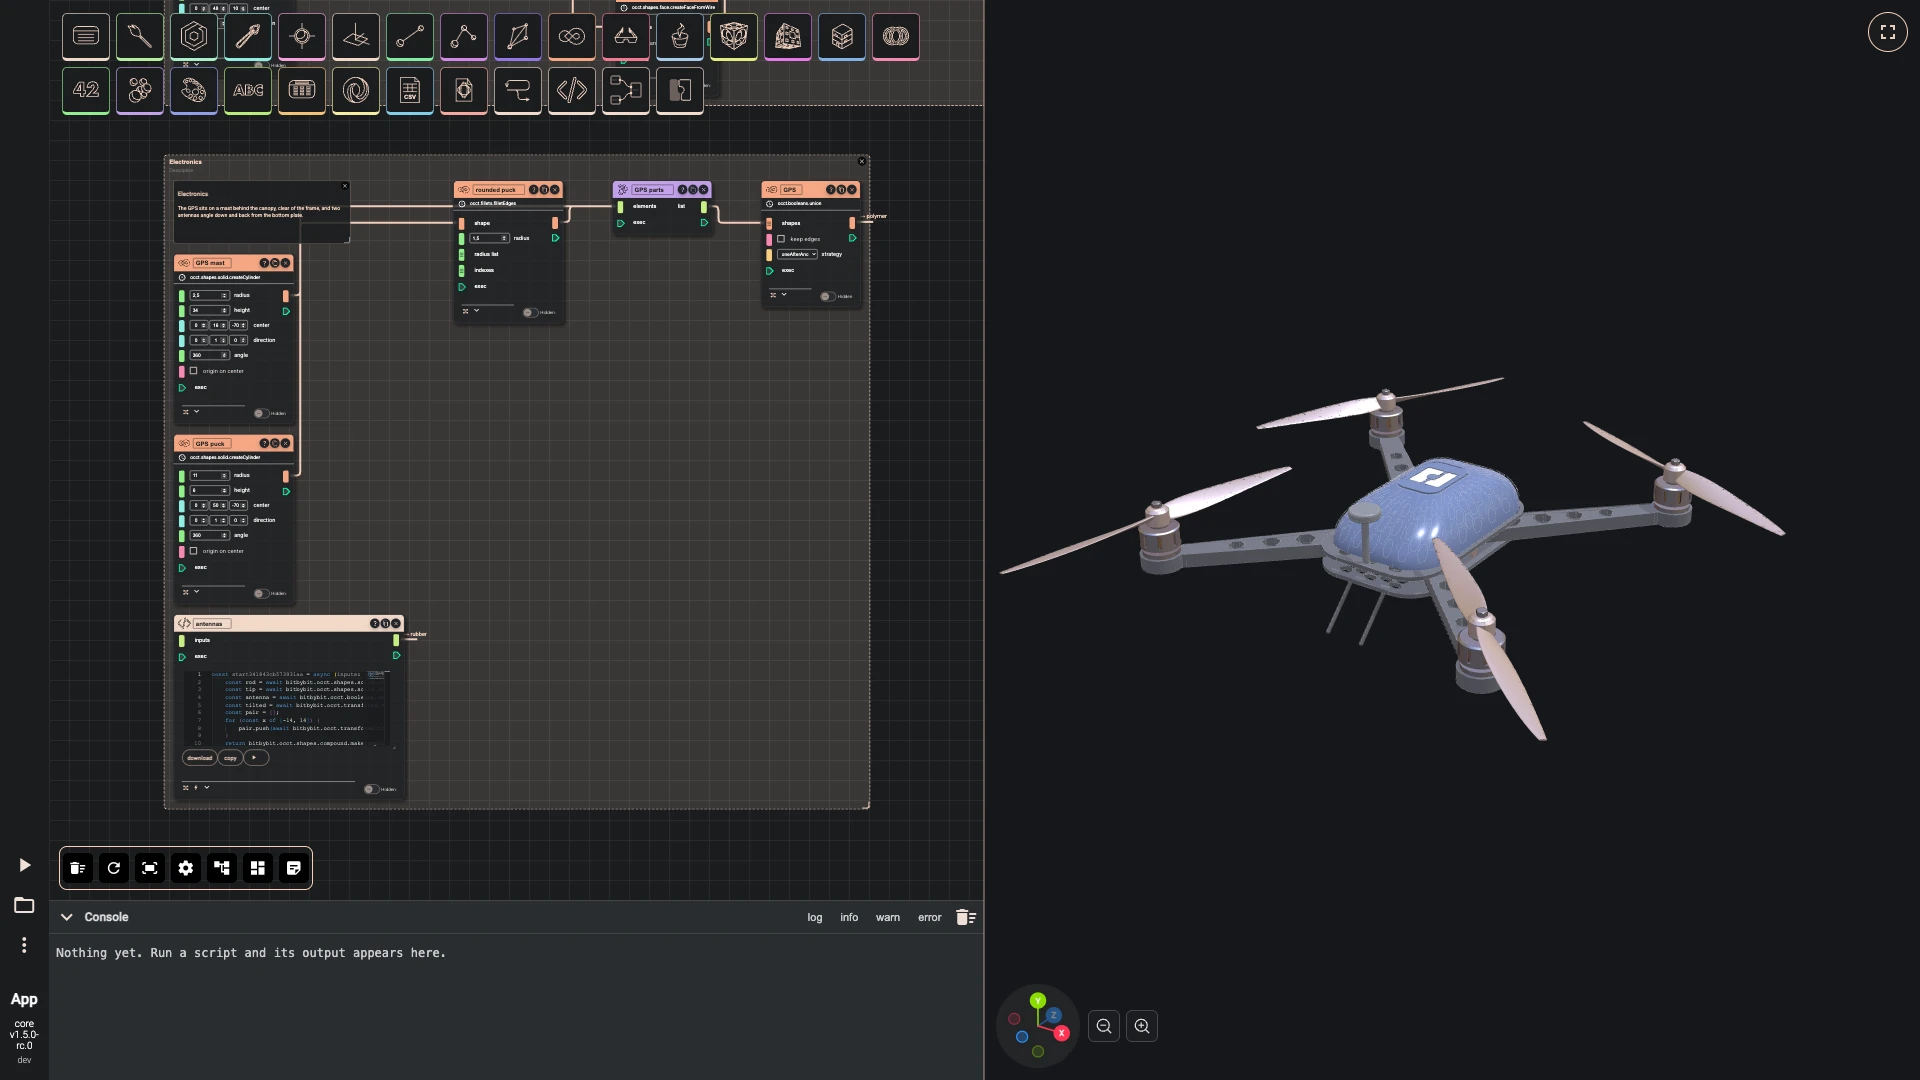
-
Next: landing gear.
Verified against the product in October 2026