Edit a Configurator With an AI Agent
Everything you build in Composer is one configuration: a JSON file you can download, change outside Composer and load back in. An AI agent such as Claude can take on much of the typing. It can price every option from your price list, turn your parts list into parts, or write the conditions you describe in words. Composer stays the place where the result is checked, tested and published.
This tutorial prices the boat from Build the Catamaran Configurator with an agent, then covers what changes when the product is your own.
An agent can make mistakes that look right: a price on the wrong option, a part included under the wrong condition, a quantity that is off by one, a rule that hides the wrong choice. Composer catches what breaks the schema and the setup problems it can see, but not a configuration that is valid and wrong. A mistake nobody notices reaches your orders as a wrong price, a wrong product or a wrong build.
It is your responsibility to test every possibility before you publish: try each choice and each combination that changes the price, the parts or what is shown, and read the breakdown every time. Then place test orders before shoppers can, as Test mode and Going live describe.
How the round trip works
- Download the configuration from Composer.
- Give the file to the agent with a brief: what to change, and the rules it has to keep.
- Import the agent's file into Composer and read what Composer reports about it.
- Try it in Play, then save and publish as usual.
The agent learns the format from the configuration's schema, which lists every field a configuration can have and says what each one means. It is published at https://s.bitbybit.dev/assets/viewer-scene-schema.json, and a file you download from Composer names it on its first line.
Composer checks what comes back the same way it checks your own edits. The JSON view checks the file against the schema as you look at it. Setup problems finds what the schema cannot see, such as a rule that names a control that no longer exists. Publishing checks it all again, together with your plan and the products in your store.
What you need
- An AI agent that can read and write files, such as Claude Code, or a chat assistant you can attach a file to. The catamaran's file is small enough for either. A configuration whose models carry their full parsed structure can run to several megabytes, and that is work for an agent that edits files rather than a chat window.
- For the steps below, any plan for the prices and the panel, and Pro for the parts. Leave out step 5 of the brief if you are not on Pro.
Before you hand anything over
Take a backup. On the project's page in the app, press Create backup. Importing a file replaces the whole configuration and starts the undo history again, so Undo cannot take you back to your earlier work, but Restore on the backup can.
Know what you are sending. The file goes to whoever runs the agent. It carries your prices, the IDs of the products you linked, the part numbers on your parts and the addresses of your models and pictures. It carries nothing about your shoppers. Check your provider's settings for whether your conversations are used to train its models.
Moving a configuration in and out
The right of the bottom bar holds the way in and out.

The two arrows 1 switch between the form and the JSON view, as Ctrl + J does. The four buttons after Files 2 are, from left to right:
- Import a scene config or project file (.json) loads a file in, in place of the configuration you have open.
- Download scene config (.json) saves the configuration as a file. This is the file you give an agent.
- Download project file (scene + editor state) adds your camera and what you had hidden while working. That is for backups, not for an agent.
- Copy scene config to clipboard copies the same configuration as text, for pasting into a chat.
If your agent answers in a chat window with the whole configuration as text, you can paste it instead of importing a file: in the JSON view, select everything with Ctrl + A and paste over it. The 3D view follows what you paste, and the checks below apply to it the same way.
Reading a configuration
The JSON view shows the configuration as text, beside the 3D view. Its first line names the schema 1.
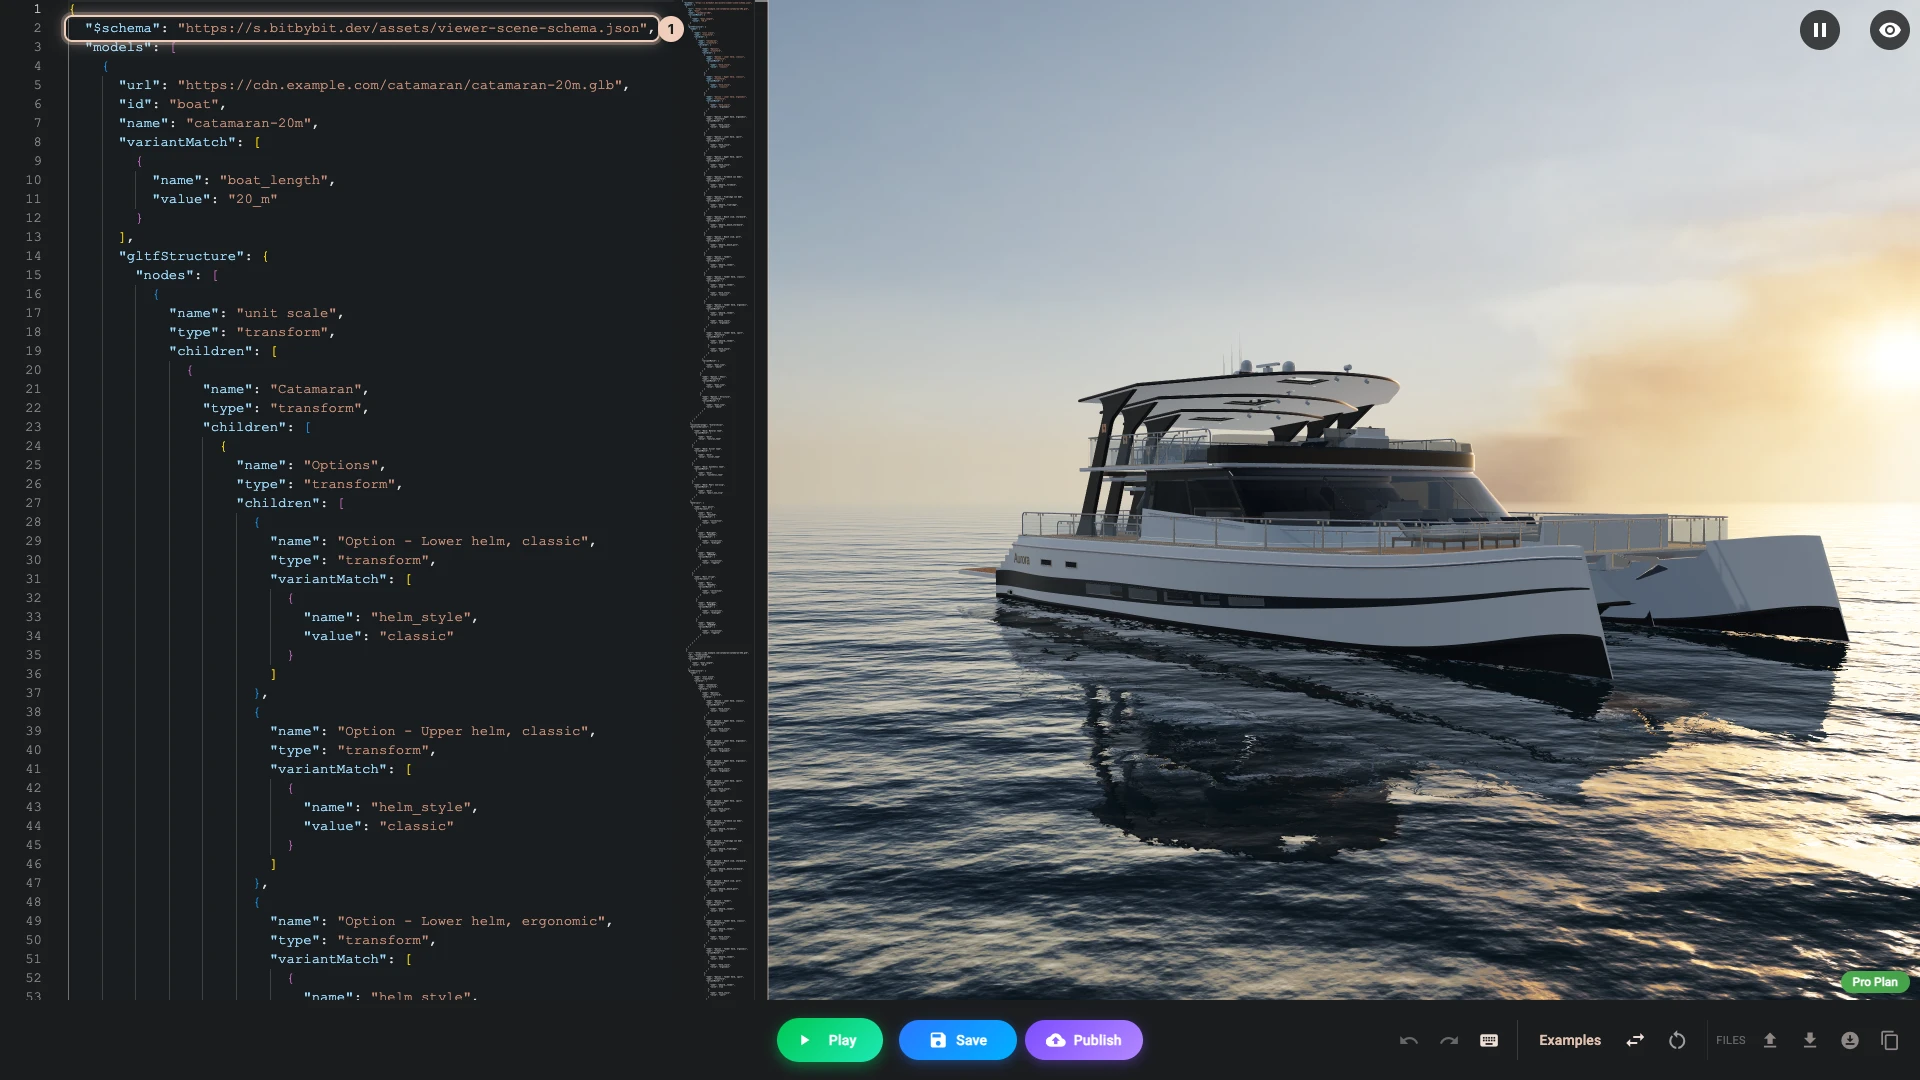
Below that line, the configuration follows Composer's own sections:
| In the file | In Composer |
|---|---|
models, with each model's parsed structure under gltfStructure | Models |
arcRotateCamera, skybox, environment, the lights, sceneVariants and loadingSettings | Scene |
gui.controls | GUI, Controls |
gui.elements and gui.areas | GUI, Layout |
gui.pricing, with the parts in gui.pricing.parts | GUI, Pricing and Parts |
gui.cartOverview | GUI, Cart Overview |
logic | Logic |
navigation, dimensions, personalization and scripting | The sections of the same names |
Every control is one entry in gui.controls. This is the Length control once the agent has priced it:
{
    "key": "boat_length",
    "label": "Length",
    "type": "radio",
    "options": [
        {
            "label": "15 m",
            "value": "15_m"
        },
        {
            "label": "20 m",
            "value": "20_m",
            "isDefault": true,
            "priceDelta": 3450000
        },
        {
            "label": "25 m",
            "value": "25_m",
            "priceDelta": 7400000
        }
    ],
    "optionDisplay": "pill",
    "renderMode": "rendered",
    "orderProperty": {
        "include": true
    }
}
labelis what the shopper reads.keyis the name rules and conditions use for the control.- Each option has a
labelfor the panel and avaluethat conditions match. priceDeltais what choosing the option adds. An option with neither a price nor a linked product adds nothing.
The prices and parts that belong to the whole boat sit in gui.pricing. The anchor is included only while boat_length is 25_m:
{
    "enabled": true,
    "basePrice": 1490000,
    "parts": [
        {
            "id": "owners_manual",
            "label": "Owner's manual",
            "sku": "CAT-DOC-01"
        },
        {
            "id": "anchor_40_kg",
            "label": "Anchor, 40 kg",
            "sku": "CAT-ANC-40",
            "variantMatch": [
                {
                    "name": "boat_length",
                    "value": "25_m"
                }
            ]
        }
    ]
}
To find something in a long file, click into the JSON view and press Ctrl + F. Search for a label, a key or a price.
Price the catamaran
These steps do with an agent what Price it does by hand, apart from the two things that need your store or your eye: the extras linked to real products, and the PDF.
1. Get the file
Download chapter 7's file. It holds everything the tutorial built before pricing.
Download the file this chapter starts from (50 KB)2. Give the agent the file and the brief
Copy the brief below as it is, and give it to the agent together with the file.
The file catamaran-7-show-it-off.json is a 3D Bits configurator for a Shopify product: a scene config made in 3D Bits Composer. Its JSON Schema is at https://s.bitbybit.dev/assets/viewer-scene-schema.json, and the descriptions in it say what each field means. Read the parts of the schema you need before you change anything.

Rules:
- Change only what this brief asks for. Keep every other value, id, key and option value exactly as it is.
- Controls and options are named here the way the shopper sees them. Find them in the file by their labels.
- Do not invent product IDs, web addresses, model part names or anything else that is not in this brief or the file. A new item that needs an id gets a short, readable one.
- Do not change "models" or "scripting".
- Prices are plain numbers in the shop's currency, with no currency sign.
- The result must be valid against the schema. Save it as catamaran-priced.json, then list what you changed.

Task:
1. Turn pricing on, with a base price of 1490000.
2. Charge these options, and leave every other option without a price:

   | Control | Option | Adds |
   |---|---|---|
   | Length | 20 m | 3450000 |
   | Length | 25 m | 7400000 |
   | Collection | Midnight | 65000 |
   | Collection | Noir | 95000 |
   | Planks | Silver teak | 38000 |
   | Helm | Ergonomic | 12000 |
   | Helm | Sport | 28000 |

3. Add a price element that shows the price breakdown, and an add to cart button under it, both in the zone pinned to the bottom of the main panel.
4. Make the configuration's table in the cart open when the cart page loads.
5. Add two parts that are only recorded, with no product and no price of their own: "Owner's manual", part number CAT-DOC-01, always included; and "Anchor, 40 kg", part number CAT-ANC-40, included only when the length is 25 m.
Read the list of changes the agent gives you. It should name the pricing, seven option prices, two new elements, the cart setting and two parts, and nothing else.
3. Bring it back
-
Open Composer and load chapter 7's file, or open any project you can overwrite. Switch to the JSON view with the two arrows in the bottom bar, or
Ctrl+J. Importing while you are in the JSON view shows you the file exactly as the agent wrote it. -
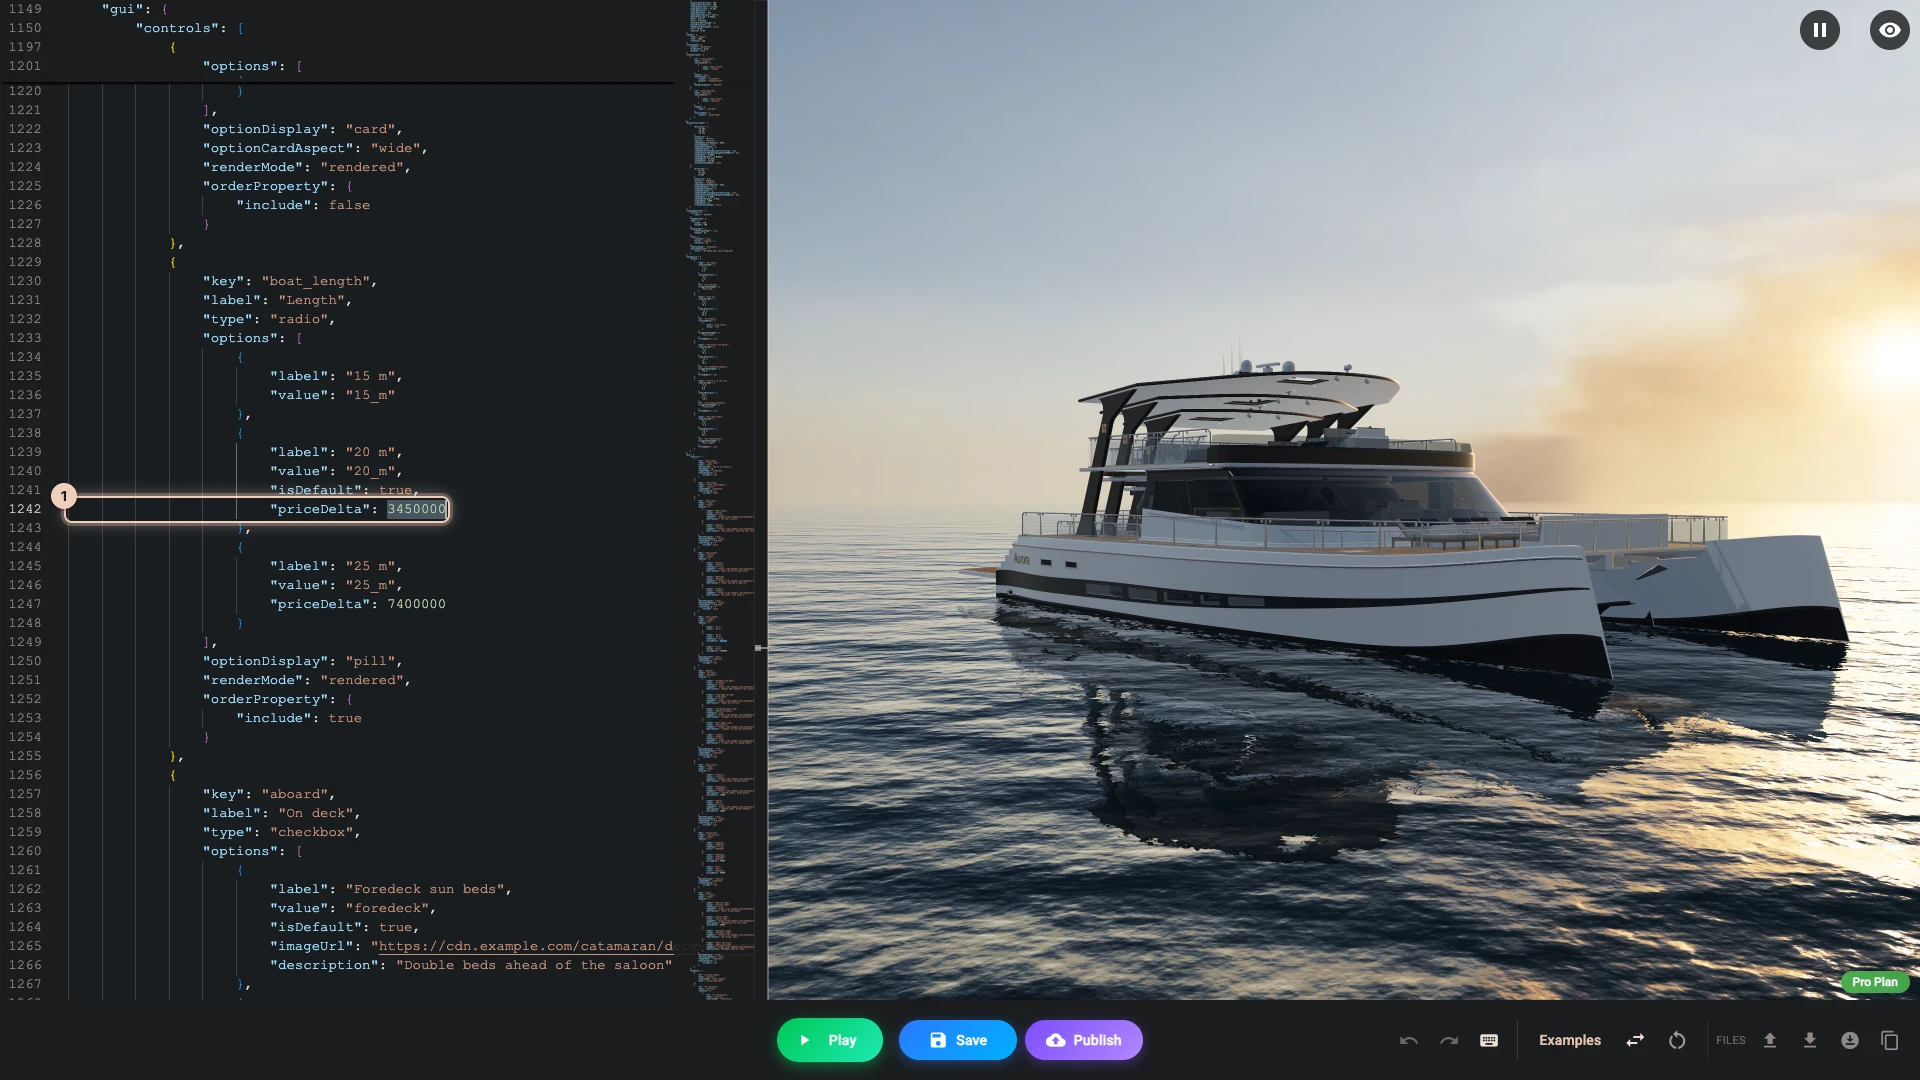
Press Import a scene config or project file (.json) and pick the agent's file. If nothing changes, the file is not valid JSON and Composer has kept what you had: ask the agent to fix the file. Otherwise, search for a price you asked for to see where it landed 1.
-
Read the bottom bar. Fix in UI appears when the file breaks the schema, and Setup problems when it has a problem the schema cannot see. Each shows how many problems it holds, and opens a list in which picking an entry takes you to the place it is about. Fix the problems yourself, or paste the messages back to the agent, until both bars are gone.
Here the agent wrote
pricewhere the schema expectspriceDelta. Fix in UI lists it 1, and the JSON view underlines it.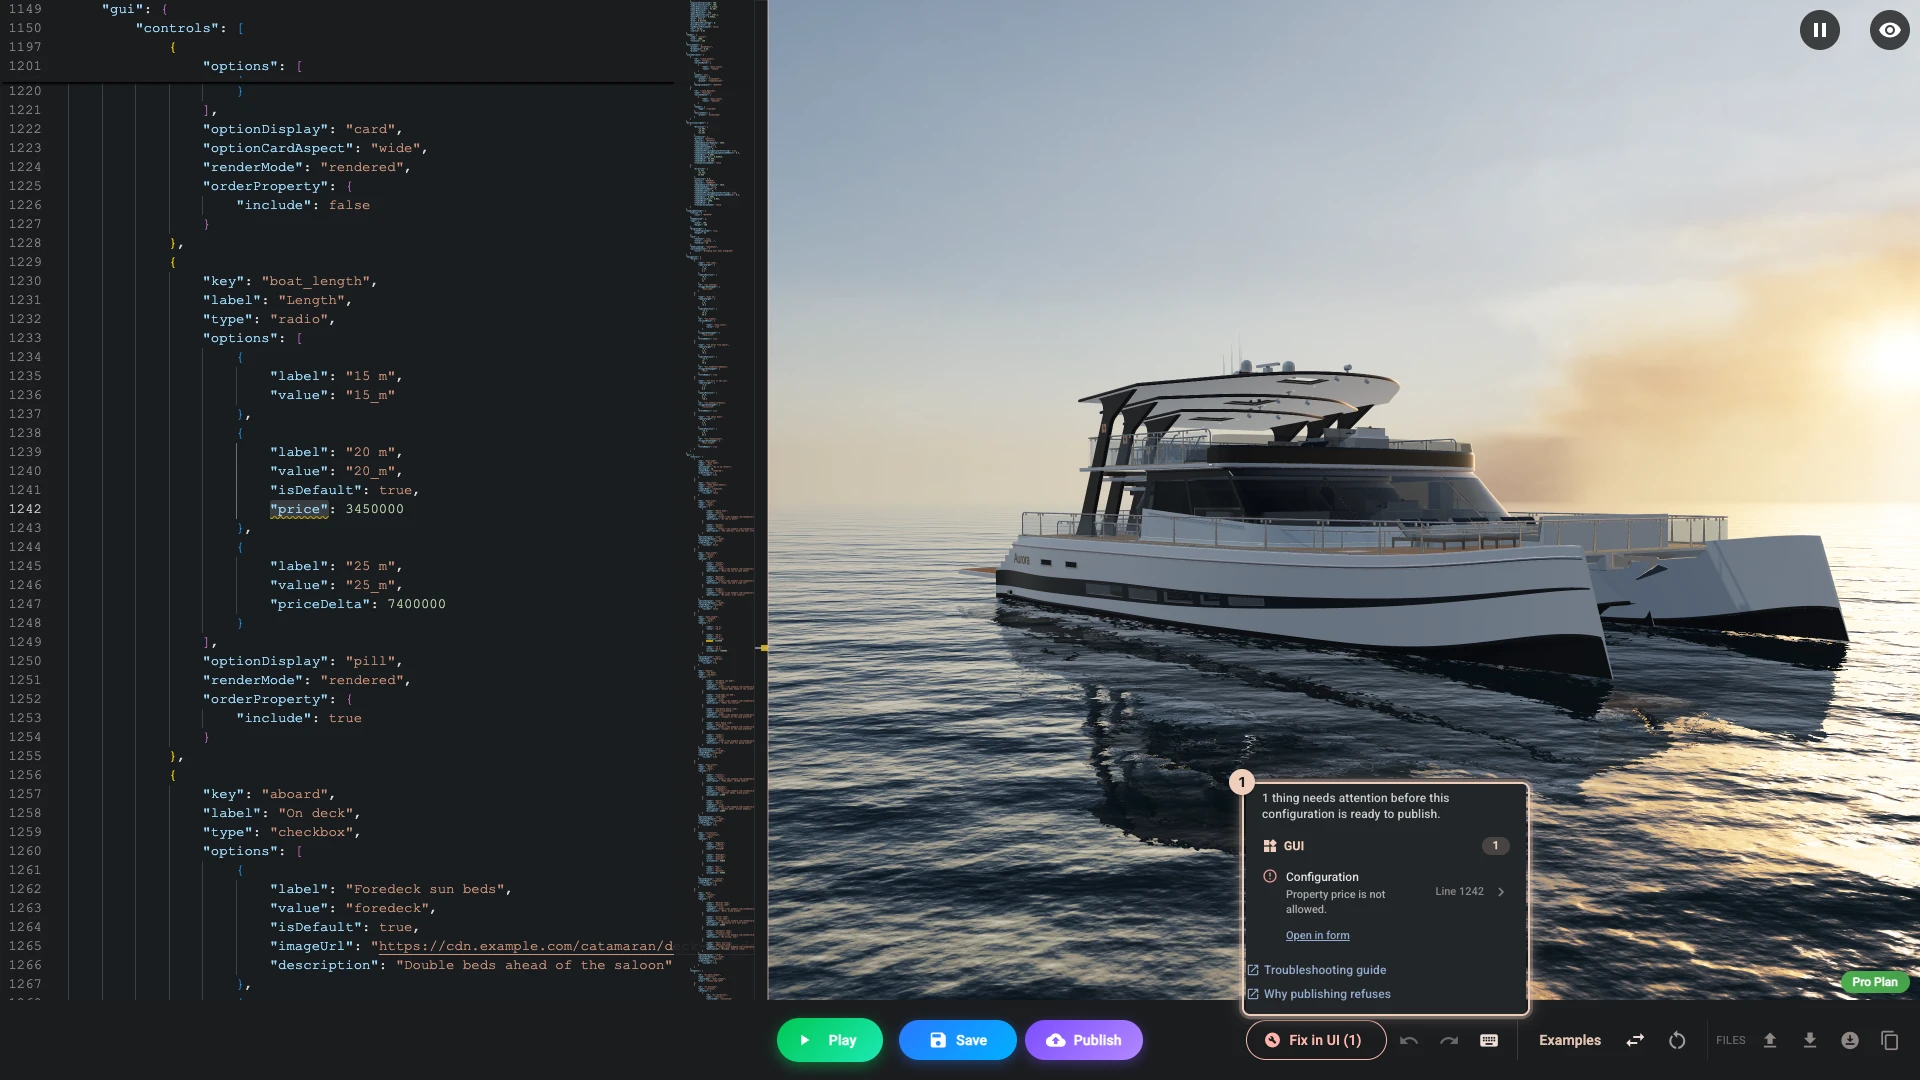
Do this before you switch back to the form. The form holds only the fields it knows, so a field the schema rejects, like this
price, is dropped without a word when you switch.
4. Try it
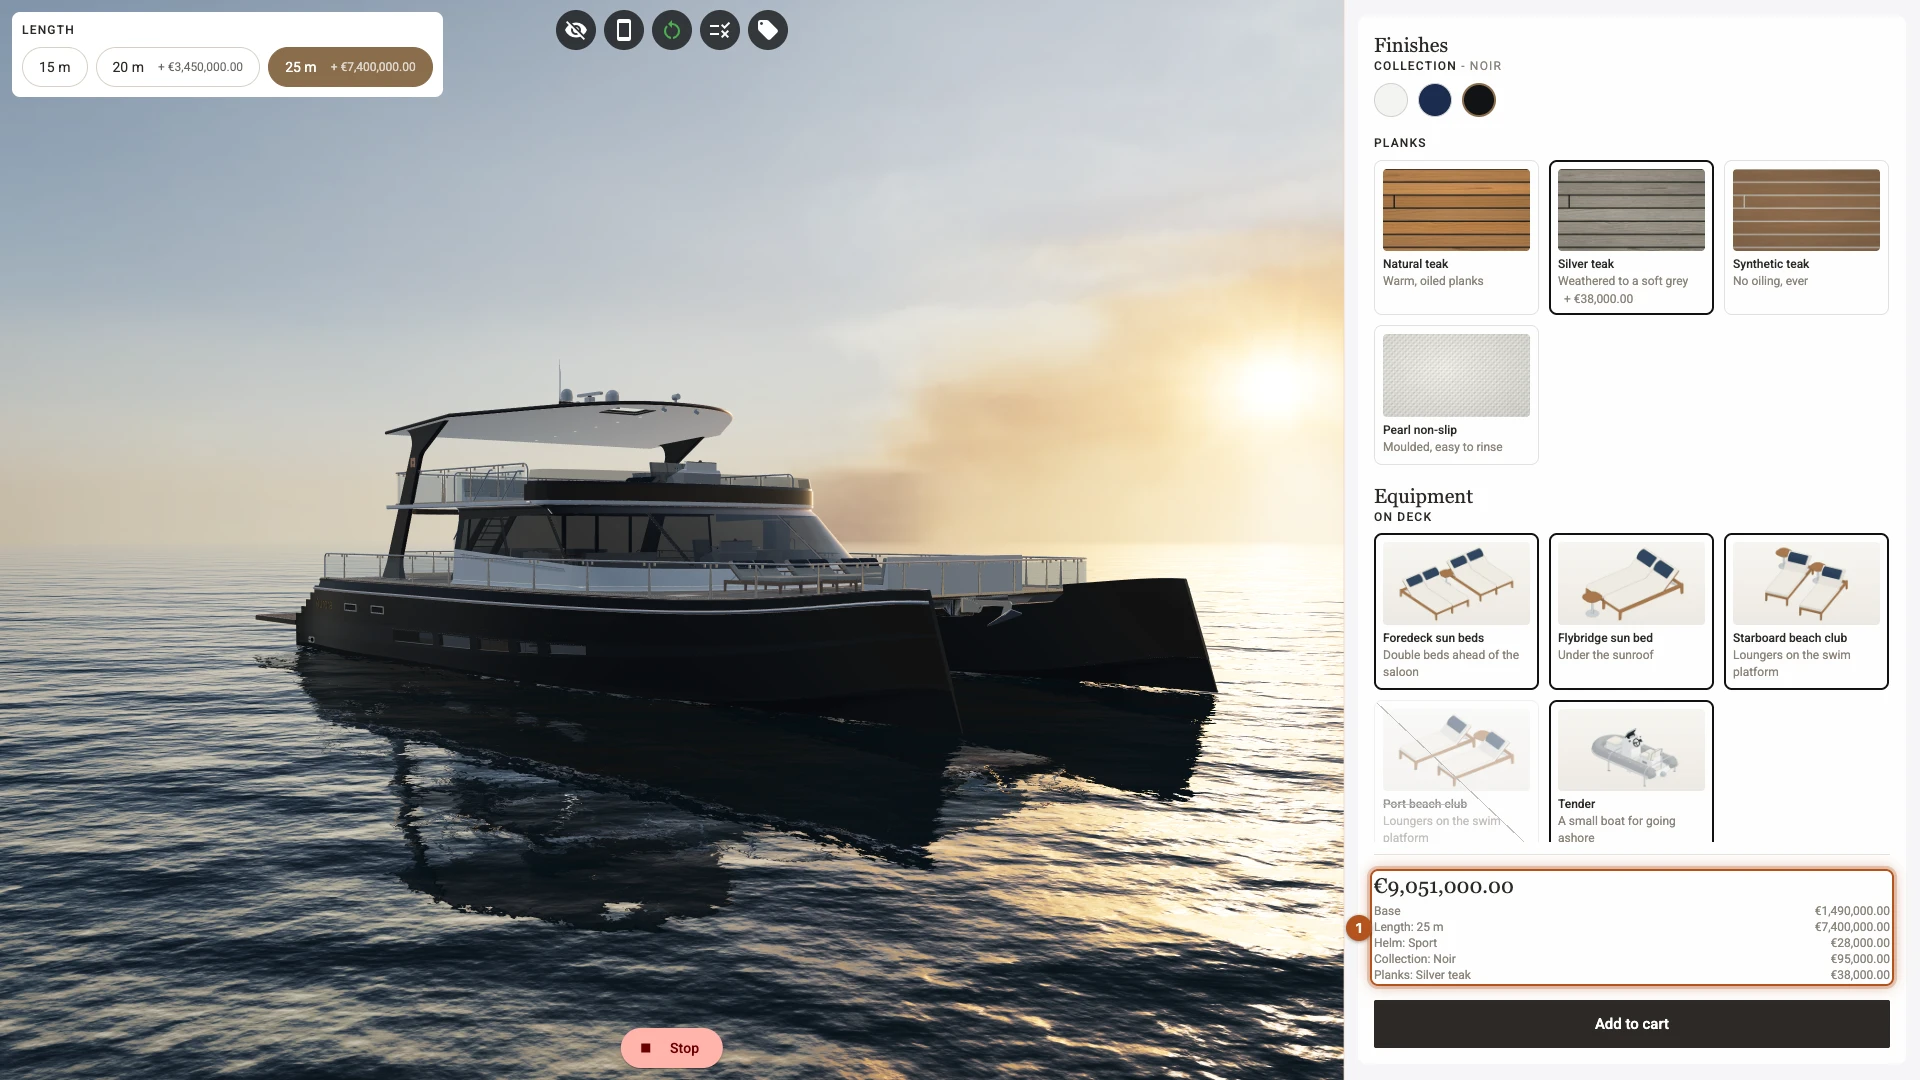
Press Play and use the panel the way a shopper would. The boat opens at 20 m with the Sport helm, so the total starts at 4968000: the base price, 3450000 for the length and 28000 for the helm. Pick 15 m and the Classic helm, and it drops to the base price alone, 1490000. Pick 25 m, Noir and Silver teak with the Sport helm, and it comes to 9051000, with each charge on its own line of the breakdown 1.
To compare the agent's work with the tutorial's, load chapter 8's file. It also holds the linked extras and the PDF, which this brief leaves out.
Download the file this chapter starts from (53 KB)From here, publishing works as it does for any configurator, as Publish it shows. Before the first publish, give your product the base price in Shopify, as Price it explains.
On your own product
Downloading your configuration
Open your project in Composer and press Download scene config (.json). Composer may ask two questions first.
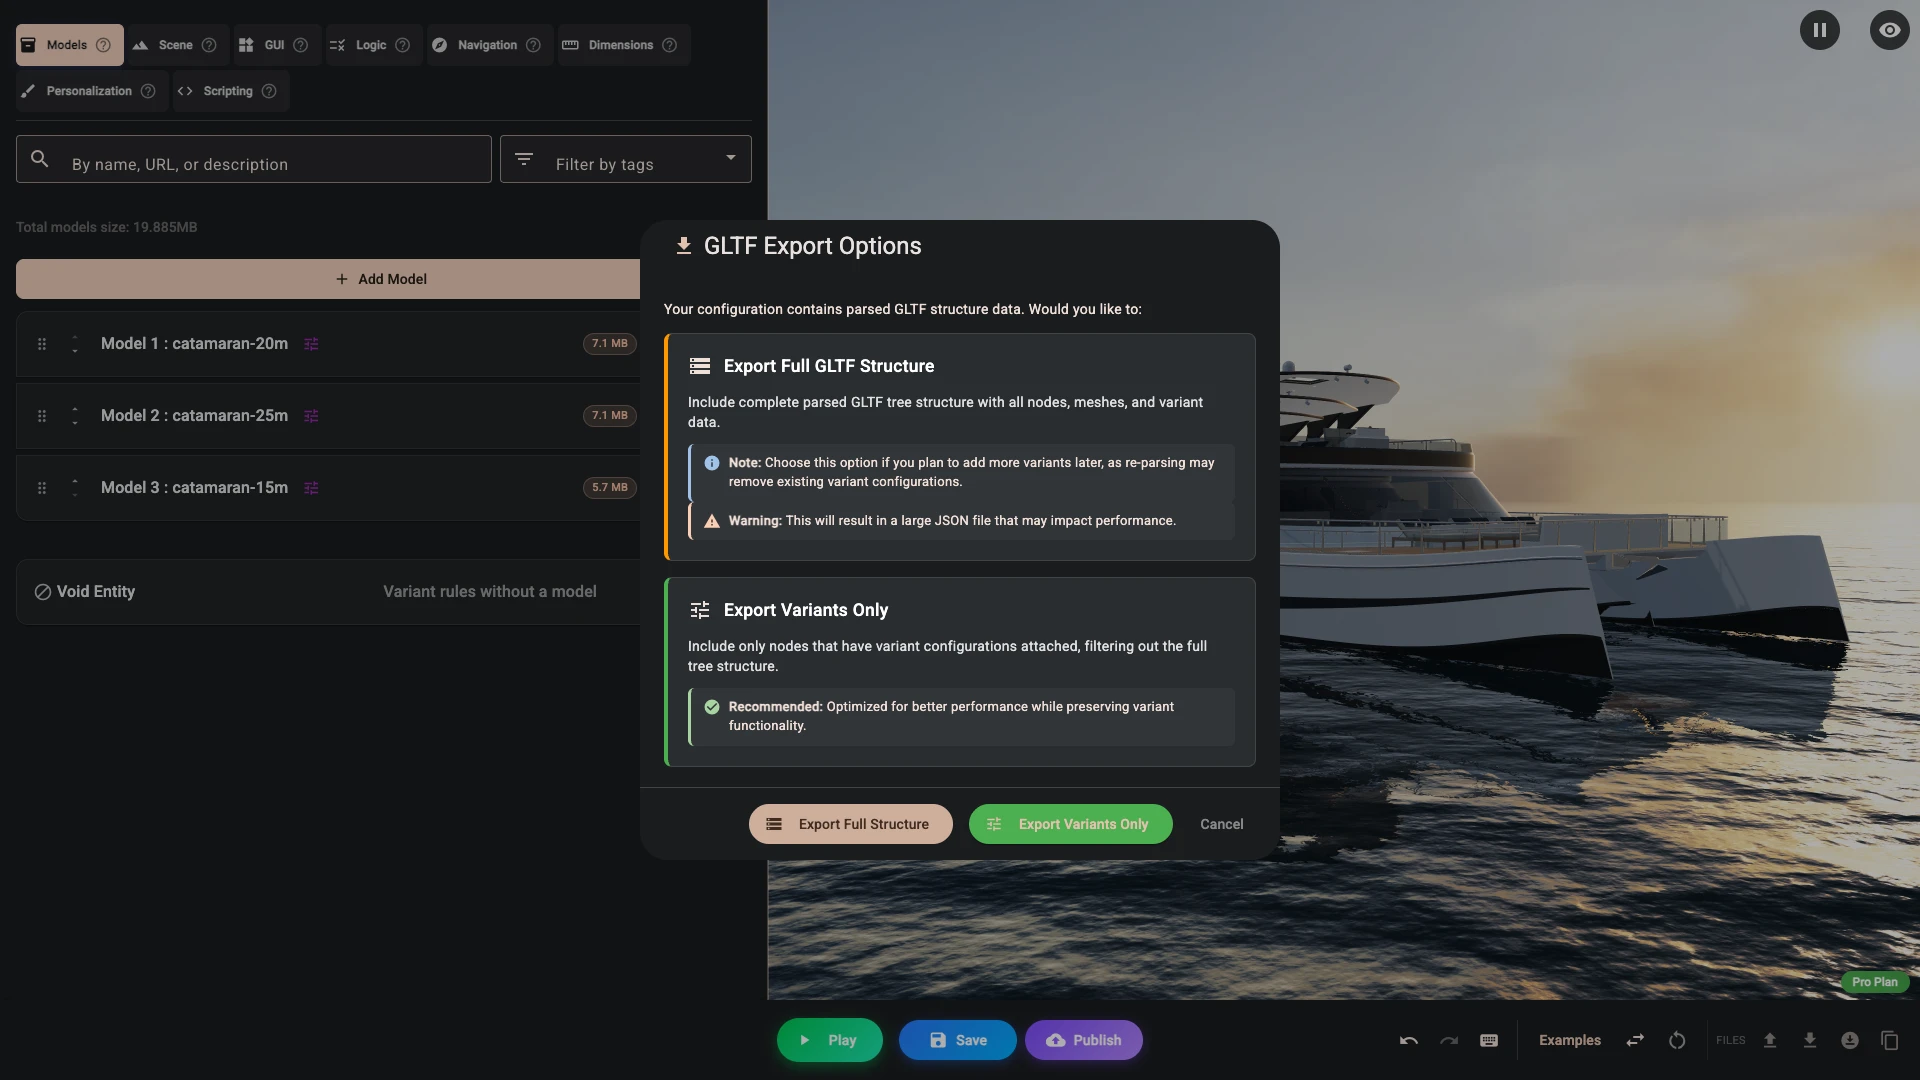
If your models carry a parsed structure, it asks how much of it to include. Choose Export Full Structure when the file is coming back. Export Variants Only keeps only the parts of the structure that carry a show-and-hide condition, so the import would lose any part that has only a position, rotation or scale, and the agent could not see the names of the parts it might want to add a condition to.
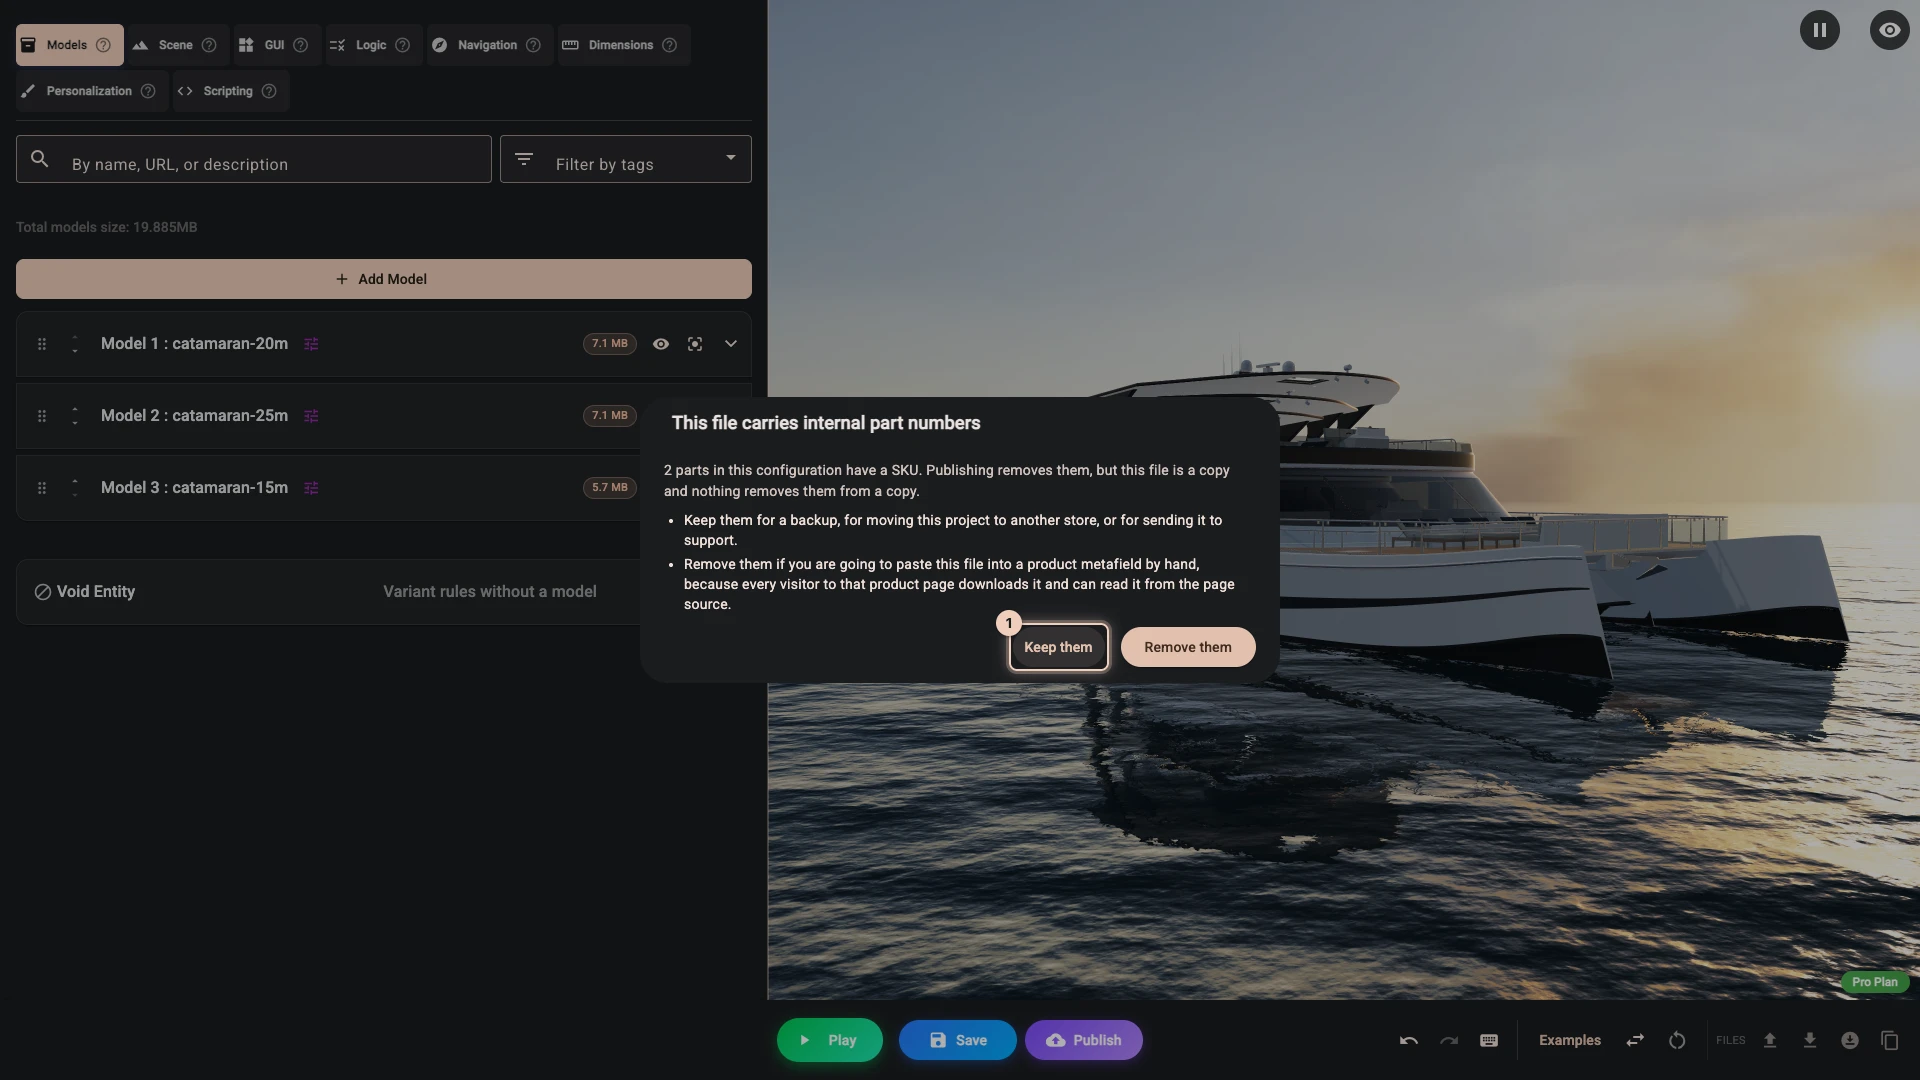
If your parts carry part numbers, it offers to remove them. Choose Keep them 1 when the file is coming back. A file without them, imported, leaves your parts without their part numbers.
Writing your own brief
Start from the catamaran's brief and keep its rules. Then:
- Name controls and options the way the panel shows them, and let the agent find them in the file.
- Put numbers in a table: prices, quantities, part numbers.
- Describe conditions in words, as the brief does with the anchor: "included only when the length is 25 m".
- Give it one job per round, keep each version of the file, and read the list of changes before you import.
Products from your store
Linked products are stored by Shopify's own ID for each product variant, not by SKU or name, so an agent working from your SKU list cannot fill them in. Link each product once in Composer, with the link button and Shopify's product picker, as in Price it. The agent can then reuse that link on other options or parts, and the brief should forbid it from typing an ID of its own.
If an ID or a price in the file is wrong anyway, publishing checks every linked product against your store and names each option whose product is missing, not on sale or priced differently from what the file says. See Linked Products.
Parts lists
Parts need the Pro plan, and they suit an agent well: give it your parts list as a table, with the label, the part number, the quantity and when each part is included, and it writes the parts and their conditions. Part numbers stay yours. Publishing removes them from what the product page receives, so no shopper can read them. Afterwards, open Parts in Composer and read the list through once.
What to check yourself
Everything the agent changed, every time, before you publish. These are the places a mistake costs the most:
- Prices. In Play, walk through the combinations that matter and read the breakdown. Checkout charges what the configuration says, so a wrong price in the file is a wrong price in your store.
- Addresses. Any link, picture or model address in the file should be one you gave the agent.
- Rules and conditions. Try each one in Play, as the shopper would meet it.
What stays in Composer
- Anything you judge by eye: camera views, positions, lights, materials and the panel's look.
- Models and pictures. Upload them in Composer and parse a model's structure there. The agent never sees inside a model file, only the names the configuration already lists.
- Scripts. A script is code that runs on your product page. Change it in Composer's own editor, which compiles it, and keep the agent out of
scriptingin the file. See Scripting. - Adding a language. The file carries only the strings that already have a translation, so an agent cannot see which ones are missing. Add the language in the Translations tab, as Style and Translations describes. An agent can still review translations you already have.
Verified against the product in November 2026