Environment: sky, lighting and ground
The Environment group in the Scene section, on every plan, sets up what surrounds your product in three steps, each building on the one above:
- Sky - what is behind your models and what they reflect.
- Lighting - how the scene is lit.
- Ground - what your models stand on.
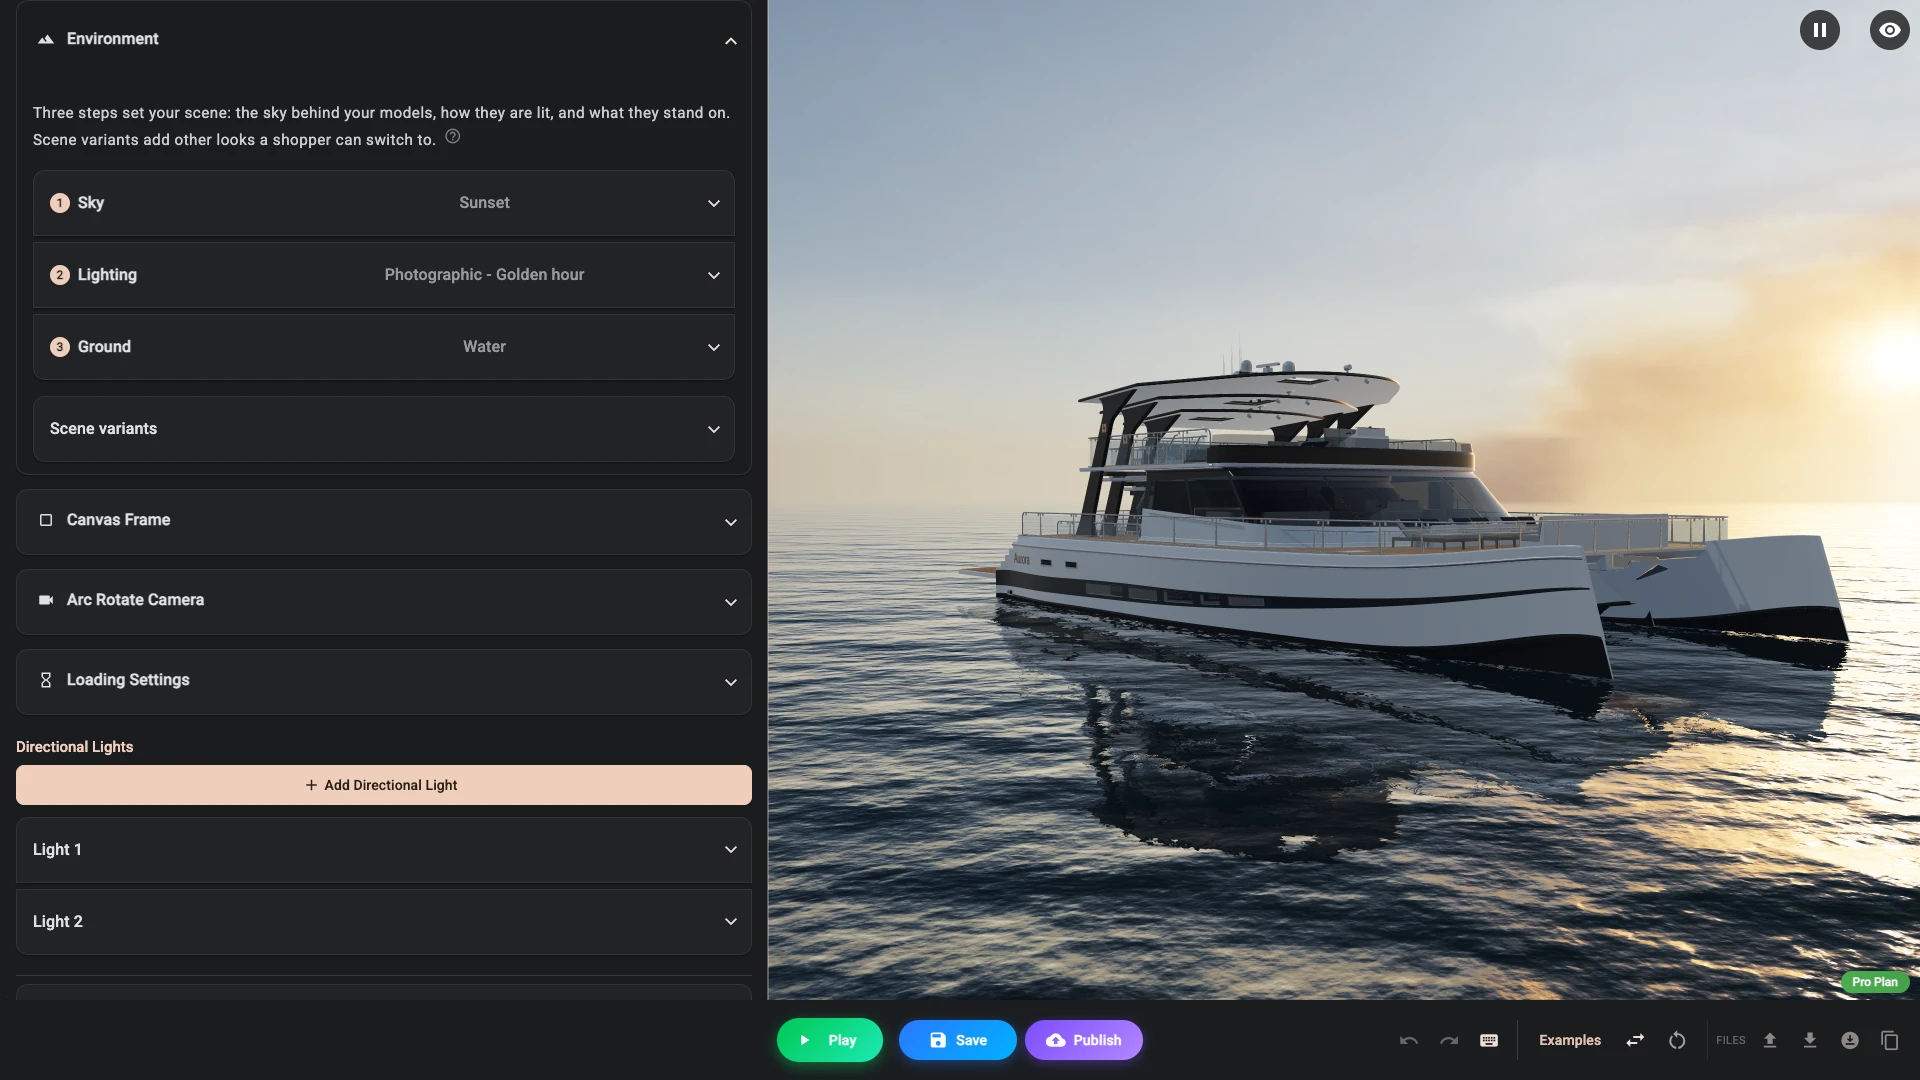
Nothing changes a step above it. A lighting look leaves your sky as it is, and water works under every sky and every look. Where a step uses something from above, it says so in a line, and a field another step has taken over is hidden with a line saying what sets it. Each step's title shows what it is set to while it is closed. The surroundings goes through the three steps on the catamaran: Sunset, Golden hour and Water.
Sky
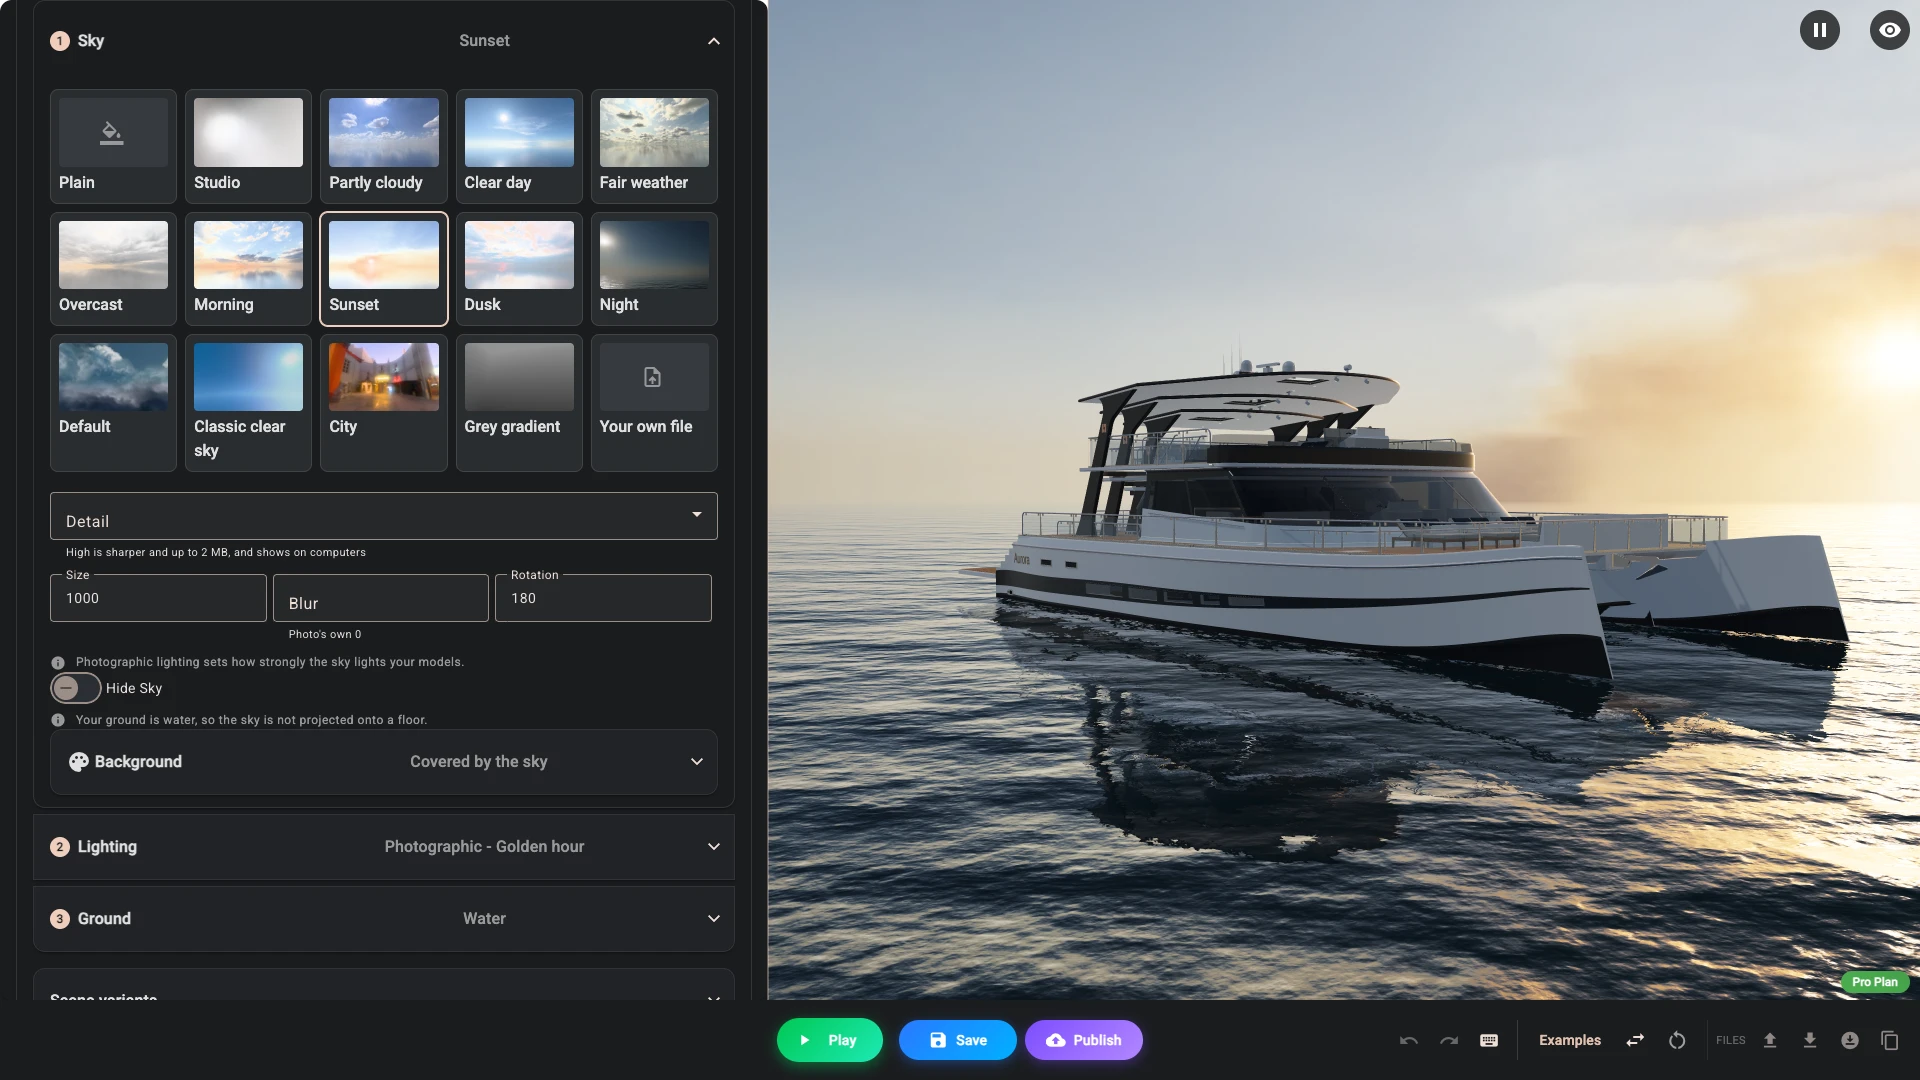
Pick a card. Plain is no sky at all: your background shows behind the product, and the Background panel opens under the cards. Picking it removes the sky you had, and asks first when that is your own file. Every other card is a sky, each showing what it looks like, with its settings under the cards: see Skybox.
Nine of the cards are photographed skies - from Studio and Clear day to Overcast and Night. With one of them, photographic lighting's sun stands exactly where the photograph's sun is, takes its colour, and turns with the sky's rotation. Under a sky that hides the sun, Overcast most of all, the sun is weaker too.
Lighting
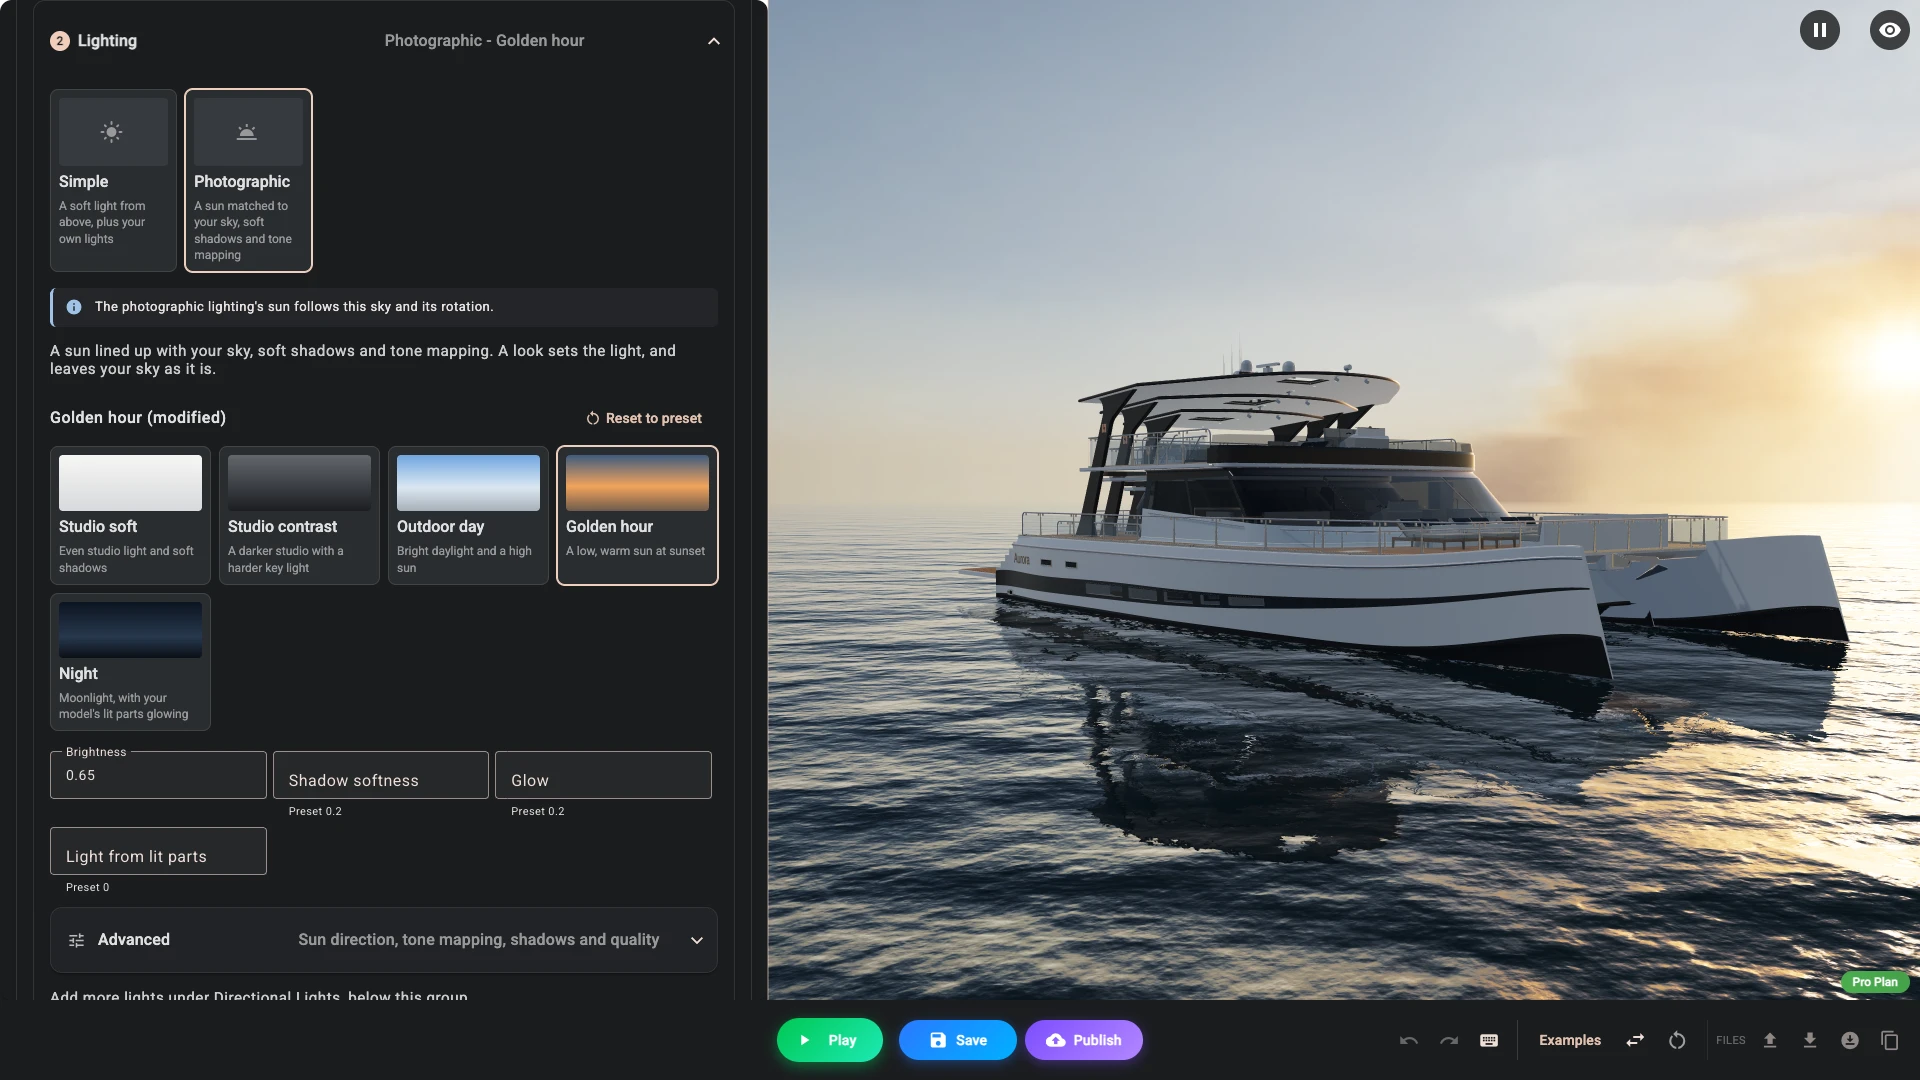
Simple is a soft light from above, plus your own directional lights. You can dim it or switch it off here.
Photographic gives your configurator photographic lighting with one choice: a sun lined up with the sky, soft shadows under the product, and tone mapping that keeps bright light from washing out the colours. You pick the look; it sets the dozen values that make it work together. Switching to it starts on Studio soft. Going back to Simple removes the look's settings and the ground, and asks first if you picked another look or changed anything; your sky stays.
Looks
| Look | What it looks like | Made with |
|---|---|---|
| Studio soft | An even studio light and soft shadows. | Studio, hidden, so your background shows behind the product |
| Studio contrast | A darker studio with a harder key light, for products that should look dramatic. | Studio, hidden |
| Outdoor day | Bright daylight and a high sun. | Partly cloudy |
| Golden hour | A low, warm sunset sun and long shadows, with a slight glow on lit parts. | Sunset |
| Night | Moonlight and a dark sky, with your model's lit parts glowing and lighting what is near them. Add water under Ground for a dark sea. | Night |
Pick a look by clicking its card. It sets the light and leaves your sky alone. Each look was made with one sky, and when yours is a different one a line names that sky, with Use that sky to set it, keeping your rotation. A scene on Plain is still lit by the look's own sky, which never shows and stays out of the Sky step. With a sky of your own file, aim the sun with Sun direction.
The name above the cards says which look you are on, and "(modified)" once you have changed any of its values; Reset to preset puts them all back. The ground has settings of its own and stays as it is.
The dials
- Brightness scales the look's exposure: 1 keeps it, 0.5 halves it, 2 doubles it.
- Shadow softness sets how far a soft shadow spreads away from where it starts, from 0 (nearly sharp) to 1 (very soft). It has no effect where the Low quality level draws soft shadows sharp (see Quality below).
- Glow puts a soft halo round your model's lit parts, the ones whose material is emissive, such as LED strips and lamps: 0 is none, 0.3 a slight glow, 1 strong. Anything standing in front of a lit part hides its glow, as it would in real life.
- Light from lit parts makes those same parts light what is near them: a deck under its downlights, a wall beside its LED strip. There is nothing to set up, because 3D Bits places the lights from the parts themselves, at any size of model. 0 leaves them unlit, and 1 is the Night look's strength. Each light moves with the part it came from, so a turning part carries its light. A part lit through a picture, an emissive map, glows but adds no light, because its colour alone cannot say where on the part the light is. In water, a reflection shows the lit parts themselves but only some of the light they throw.
Left empty, these fields use the look's own value, and a model with no emissive materials shows neither. So a lit model only needs its glTF to mark its lights as emissive.
To turn the light round to the side of the product your camera sees, turn the sky: its Rotation on the Sky step turns the sky and the sun together.
Advanced
- Sun direction: Azimuth and Elevation aim the sun by hand, in degrees. Left empty, the sun stands where a photographed sky's sun is - with Studio, at the studio's main light and the height the look chooses - and for any other sky where the look puts it, turned with the sky's rotation. Fill them in when your own sky has its sun somewhere the look does not know.
- Tone mapping: Neutral - true colors keeps product colours true and suits most catalogues. Filmic (ACES) is moodier, but shifts saturated colours. Standard is Babylon's plain curve.
- Shadows: Soft shadows are sharp where an object touches the floor and soften further away. Sharp are evenly filtered and cheaper on phones. None turns the sun's shadow off. On the Low quality level a soft shadow is drawn sharp.
- Shadow tuning: most scenes never need this. Shadow offset and Surface offset push shadows away from the surfaces that cast them: raise one if a surface shows stripes or speckles, lower it if shadows lift away from where objects touch or thin parts lose their shadow. Both are multiples of the automatic amount, so left blank they are 1 and the same value works at any model size. Shadow resolution overrides the size of the shadow map that Quality picks. Larger is sharper and uses more memory.
- Quality: Automatic, by device picks a level by device - High on computers, Medium on recent phones and tablets, Low on older phones - so desktops get the best shadows and phones lighter ones. Force High, Medium or Low to use one level everywhere. Low has no soft shadows: it turns Soft shadows into Sharp ones, so on Automatic, by device older phones show sharp shadows. The level also decides whether a skybox's Detail on High is used.
Ground
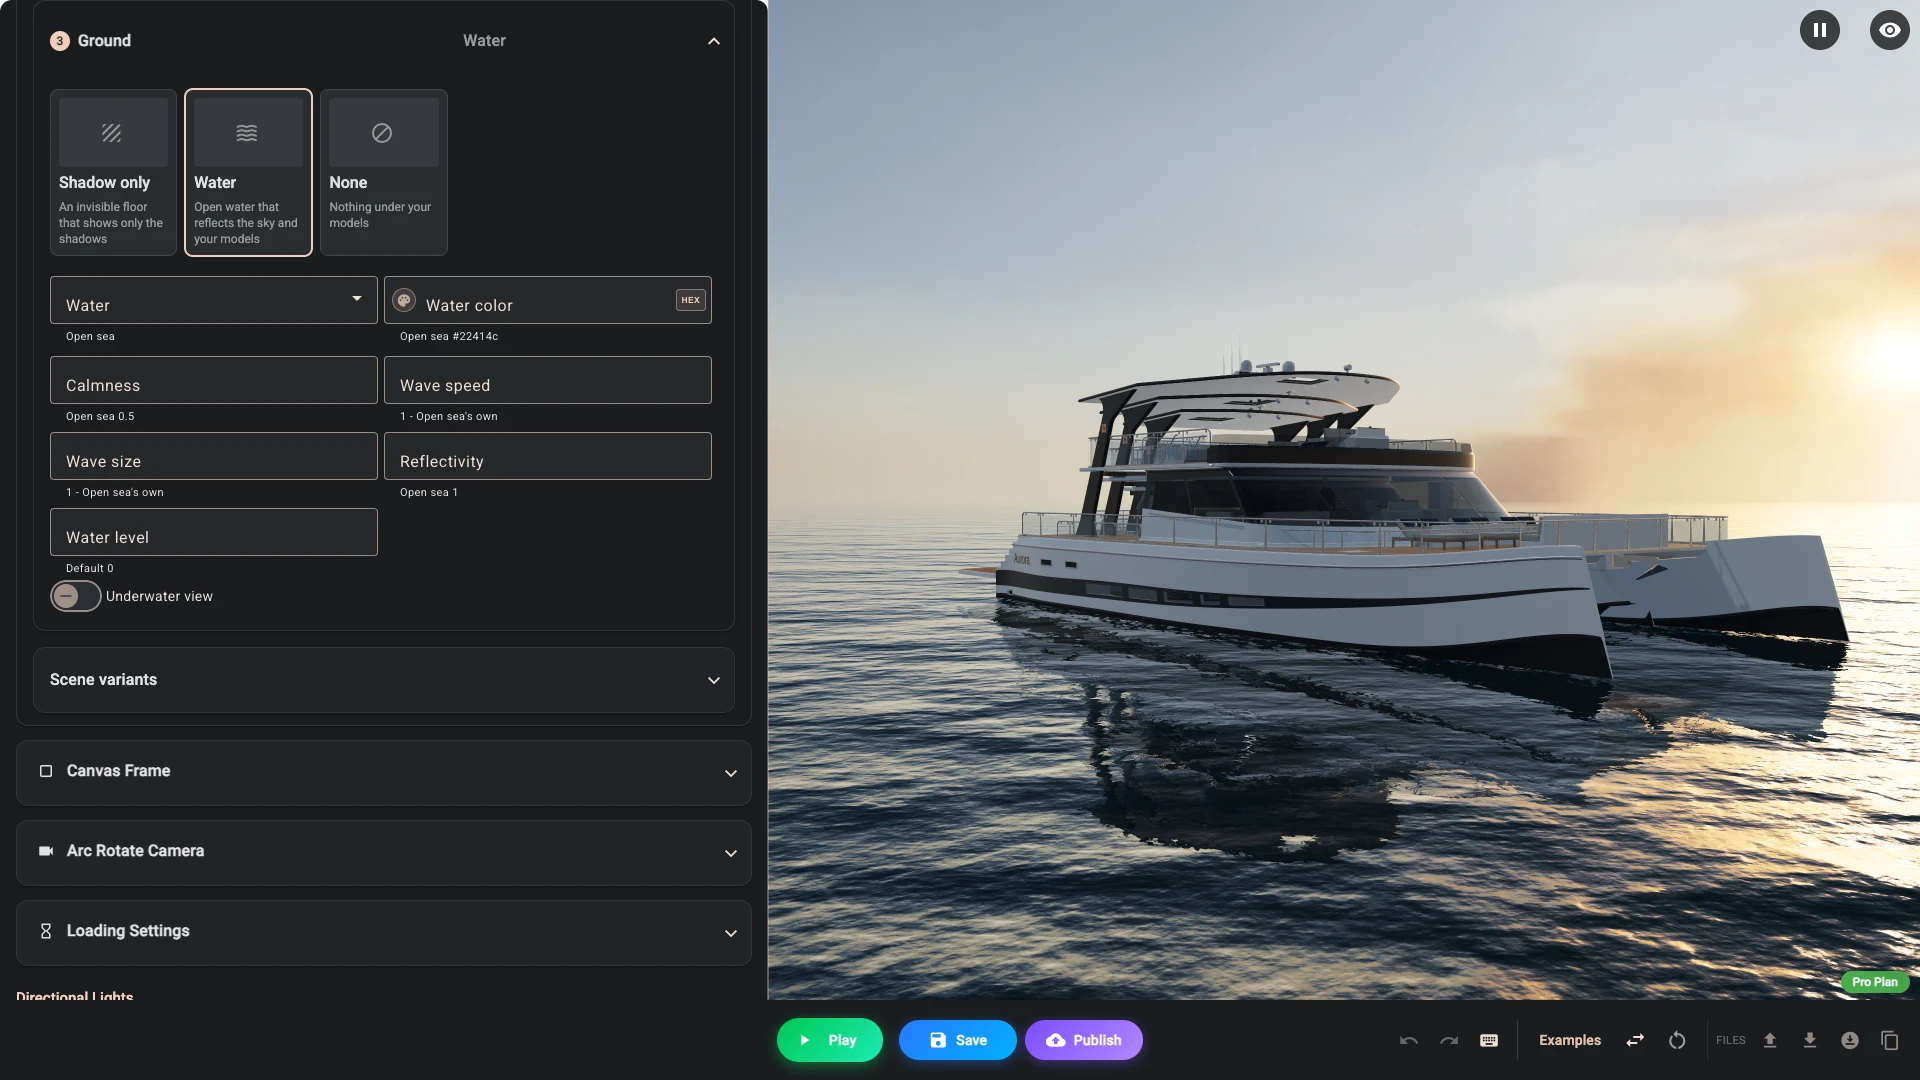
The ground comes with photographic lighting. On Simple its cards wait, with Switch on photographic lighting beside them, which starts on Outdoor day and leaves your sky as it is.
- Shadow only is an invisible floor that shows only the shadows falling on it, and sits under the lowest point of your models. Every look starts here.
- Water lays water under your models.
- None leaves the product floating.
Water
Pick Water and the product floats on open water: it ripples, mirrors your models and the sky, and catches the sun's glint. It works with every sky and every look, so a golden hour over water is two choices, Golden hour on the Lighting step and Water here. These fields then show, and an empty one names what applies, such as Open sea 0.5:
- Water: Open sea is deep blue-green water with a moderate ripple. Harbour is darker, greener, sheltered water that is calmer, so its reflections are sharper.
- Water color: the colour of the water itself, what you see looking straight down into it. Toward the horizon the reflections cover it more and more, as on real water.
- Calmness: from 0, choppy water whose ripples break the reflections up and spread the sun's glint, to 1, nearly glassy water with clear reflections and a small bright glint. Left empty, the Water you picked decides.
- Wave speed: how fast the ripples travel, against that water's own pace: 1 keeps it, 2 doubles it, 0.5 halves it, and 0 holds the water still - the light rippling over your models underwater stands still with it. Left empty, the Water you picked decides: a harbour's water moves slower than the open sea's.
- Wave size: how large the ripples are, against that water's own size: below 1 they are finer, above 1 broader, like a swell. The size also follows your models, so a small product and a boat ripple alike. Left empty, the Water you picked decides.
- Reflectivity: how strongly the water mirrors the sky and your models, from 1, as real water does - faint looking straight down, strong toward the horizon - to 0, not at all, so only the water's own colour and the sun's glint show. Left empty, the Water you picked decides.
- Water level: the height of the surface in your scene's units. 0, the default, is the waterline of a boat modelled with its origin on the waterline; everything below the level is under water and hidden.
- Underwater view: off, the default, the camera always stays above the water, however the shopper turns it. On, the camera may dive, and below the surface the scene turns underwater (see below).
- Clarity: shown once Underwater view is on. How far you see underwater, from 0, murky water where the far end of your models already fades, to 1, clear water that shows them whole. Left empty, the Water you picked decides: open sea is clear, a harbour murkier.
The water reaches far past your models and fades into the sky at the horizon, so no line shows where one meets the other. The sky in it is the one on the Sky step, so the water turns with that sky's rotation and changes with the sky you pick. On computers and recent phones your models are mirrored in it too; older phones (the Low quality level) reflect only the sky. The water casts no shadow and shows none: the sun's shadow falls on your models only.
Underwater
With Underwater view on, a shopper can turn the camera below the surface to see what is under the water, such as a hull's antifouling, its propellers and rudders. Below the surface:
- the water closes in with distance in its own colour, darker below and brighter toward the surface;
- the sunlight bends into the water and falls in soft shafts, and lights your models in rippling caustics that their own shadows break;
- reds fade with depth before blues and greens, as in real water;
- looking up, the surface shows the sky through its bright window, with your models' parts above the water at its edge, squeezed and rippled as through real water, and mirrors the water beyond it.
Near the surface the view splits, as a camera with a dome port shows it half in and half out of the water: the air above a rippling waterline, the water below it, the line sweeping up the picture as the camera descends. Stop the camera there for an over-under shot of the product. The sizes follow your models, so a small product underwater looks like a large one. Order snapshots and PDF views below the surface are drawn underwater too. A scene on the WebGPU engine draws all of this but the caustics and the fading reds. On Low quality the window shows only the sky and the camera passes through the surface without the split view.
Scene variants
Scene variants let shoppers switch how the scene around your product looks. The catamaran's Scene control offers Sunset, Daytime and Studio. Sunset is the scene the steps above built, so it needs no variant, and the other two are variants: a clear day over the same water, and a plain studio with no water. Show it off builds them.
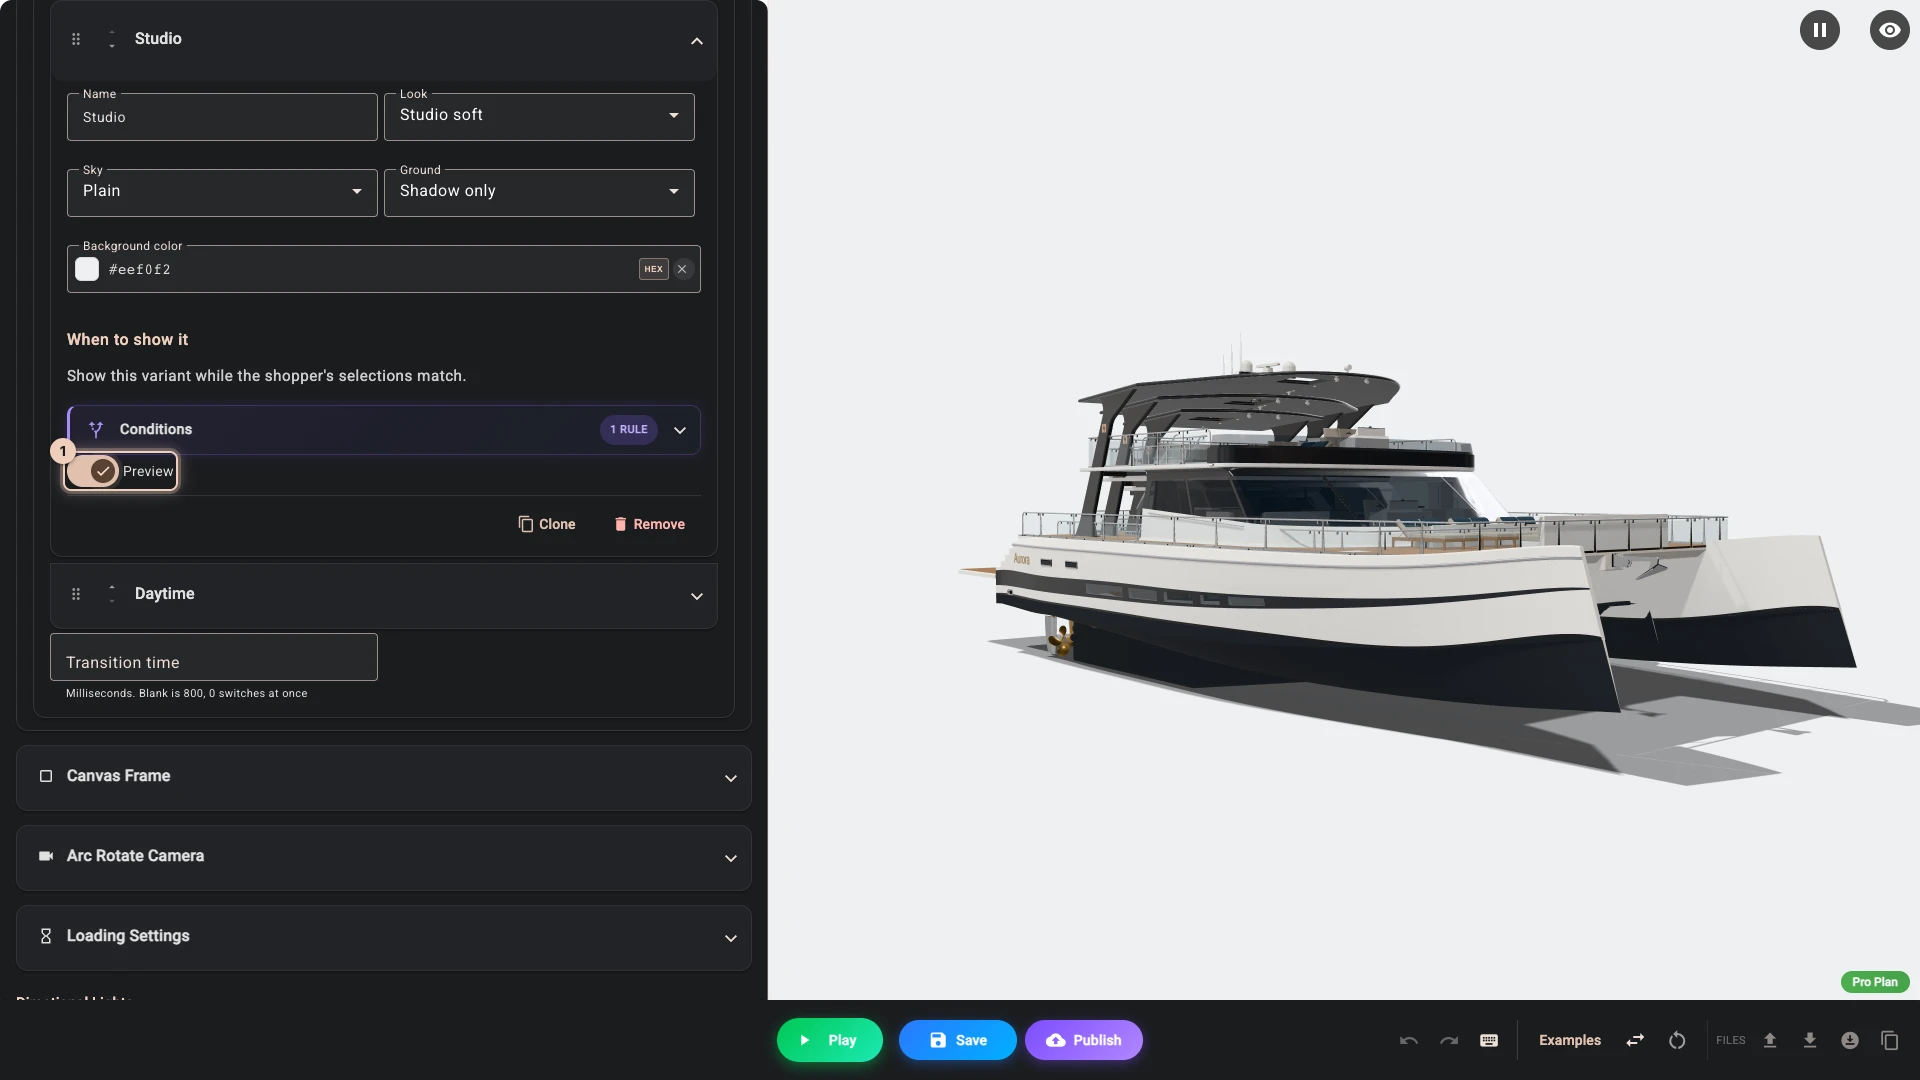
Add them under Scene variants at the end of the Environment group, with Add Scene Variant. Each one changes only what you set, and everything else stays as the steps above set it, so most changes to the base scene reach every variant.
- Look, Sky, Ground and Background color are the parts a variant can change. Plain takes the sky away, a Ground other than Water takes the water away, and a Background color replaces a gradient or image on the base scene as well. Picking another sky leaves behind what belonged to the old one, such as a hidden sky, its blur or its own file.
- When to show it works like the conditions on your models and lights: pick the control and value that select this variant, such as Scene, Daytime. With no condition a variant never shows. If several match, the first in the list wins, so drag the most specific to the top. If none match, the base scene shows. The list warns about a variant with no condition.
- Preview 1 shows a variant while you edit. It changes nothing in your saved scene.
- Transition time is how long the old look takes to dissolve into the new one, in milliseconds. It is 800 when left blank, and 0 switches at once. Shoppers who asked their device for reduced motion get an immediate switch.
The first time a shopper picks a variant, its sky downloads while the current look stays on screen. The last few skies seen switch straight away.
A variant changes only the surroundings. To change something else with the same choice, give it a condition on the same control:
- Directional lights and models keep their own conditions. A light can be switched on or off this way, so for a warm sunset light and a cold night light, add one light for each.
- A camera view can move with the same control, using a focal.
Untick Save the selected value on the order (line item property) on a control that only changes the view, so the choice stays out of the cart.
How it works with the rest of the Scene section
- Photographic lighting takes the place of the soft light from above. The sky stays the sky and lights the product, with the strength the look chooses, so the sky's Environment intensity is hidden while it is on.
- Your directional lights stay, as extra lights beside the look's sun. They are a list of their own, below the Environment group.
- Your background shows wherever the sky is hidden or Plain.
- The sky's Ground projection is a ground of its own, so it gives way to Water: while the ground is water the sky is not projected, and the Sky step says so. Your projection settings stay for when the ground changes.
Performance
The photographed skies are prefiltered files of about 0.2 to 0.6 MB (about 0.5 to 1.9 MB with the sky's Detail on High), ready in a fraction of a second, and lighting the product from them costs almost nothing per frame. The soft shadows are the expensive part, which is why phones get a lighter version on Automatic, by device. A large .hdr file you upload yourself on the Sky step is far heavier; convert it to .env there first.
Glow draws your model a second time each frame, a small cost on a computer. Light from lit parts uses up to 96 lights on High and 24 on Medium, drawn together so that many lights stay cheap; Low has neither, so older phones show lit parts without glow or light.
Water adds a 0.25 MB ripple texture. Mirroring your models draws them a second time each frame, so on Medium the mirror is smaller and redrawn every other frame, and on Low there is none. Underwater there is no mirror to draw. The caustics are the costly part there: Medium draws one layer of them and half the light shafts, and Low draws neither.
Credits
The photographed skies are CC0 photographs from Poly Haven: Studio Small 09 (Studio), Kloofendal 48d Partly Cloudy (Pure Sky) (Partly cloudy), Qwantani Sunset (Pure Sky) (Sunset), Autumn Field (Pure Sky) (Clear day), Sunflowers (Pure Sky) (Fair weather), Overcast Soil (Pure Sky) (Overcast), Kloppenheim 06 (Pure Sky) (Morning), Citrus Orchard Road (Pure Sky) (Dusk) and Qwantani Moonrise (Pure Sky) (Night). The water's ripples come from the three.js project's water normal map, under the MIT license.
Verified against the product in November 2026