Model Properties
Each model in your scene has its own set of properties. Open a model's accordion item in the Models section and the left panel shows everything you can set for that file.
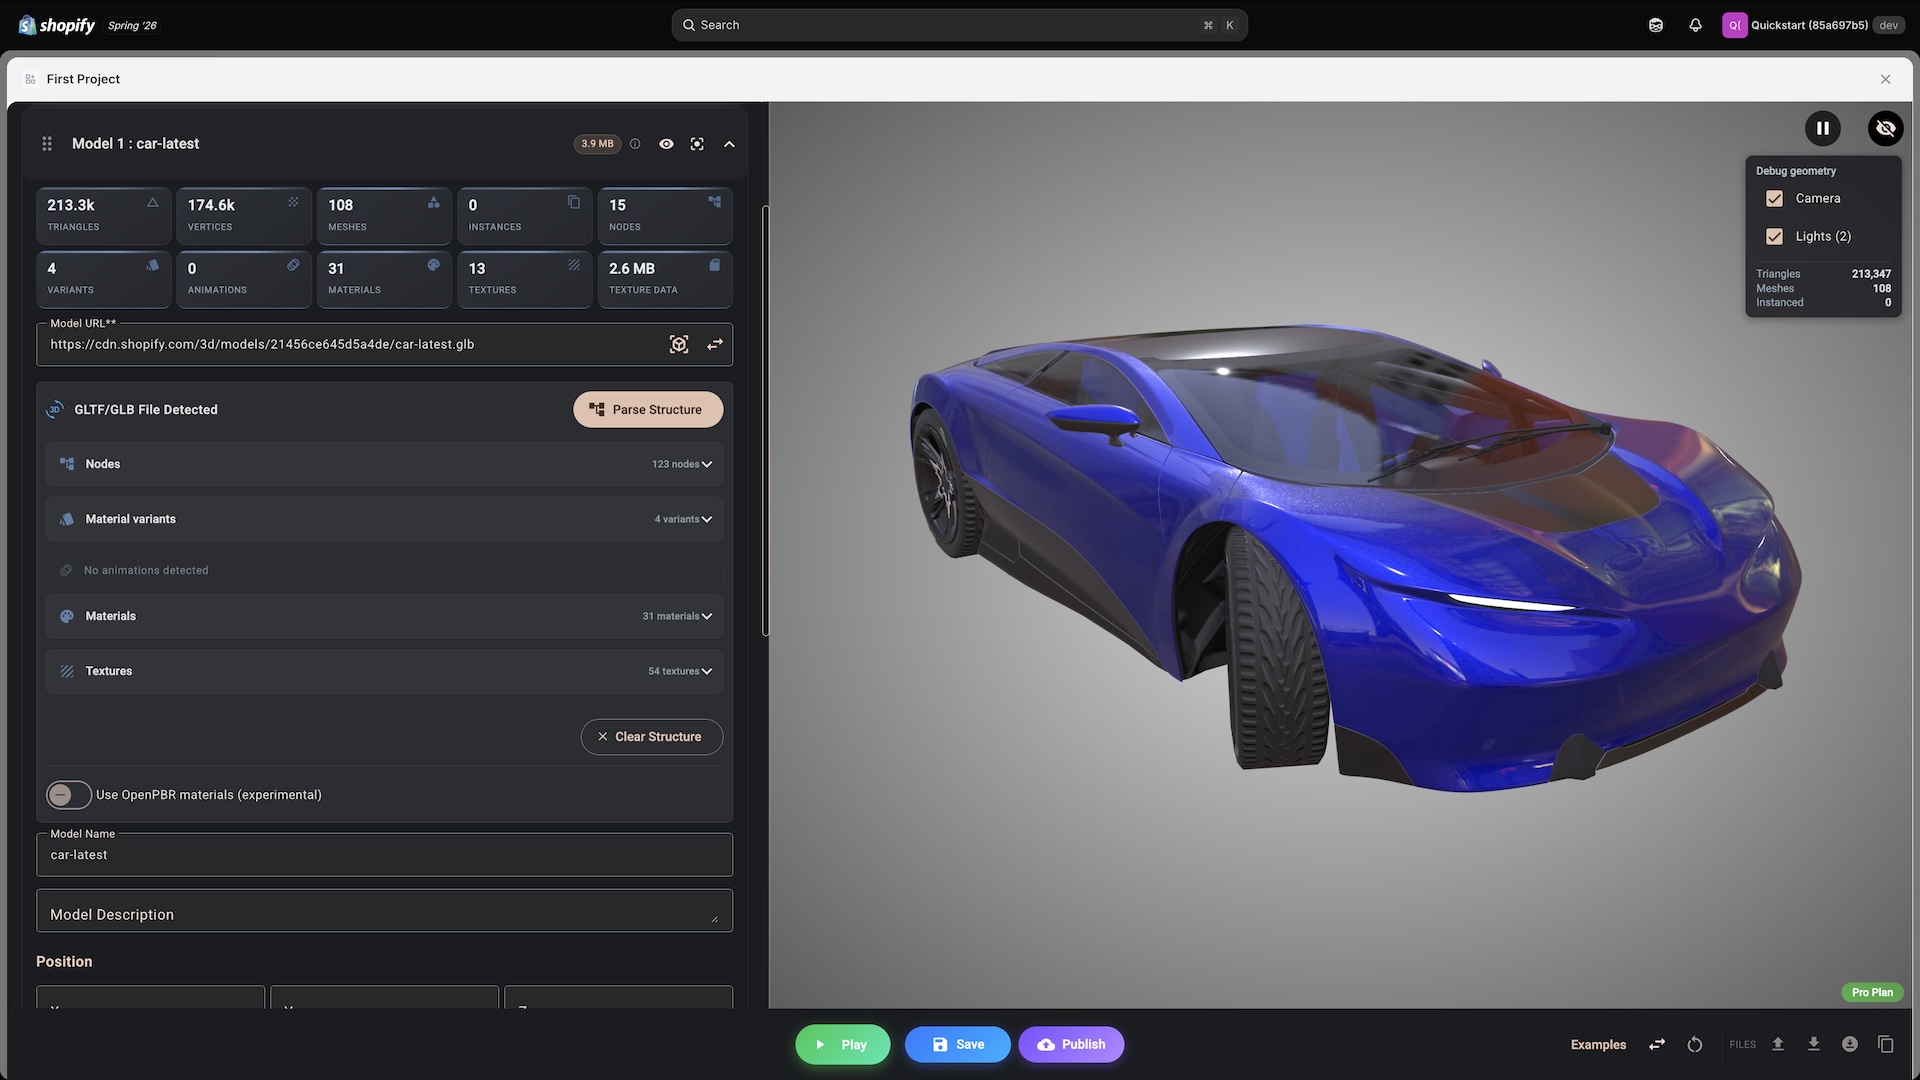
The examples on this page use a car model, because a car has the parts a configurator normally needs: a body that changes colour, wheels that swap, doors that open, and separate trim pieces.
Model statistics
For glTF and GLB files, the first time you open a model's panel Composer analyses the file and shows a row of tiles above the settings. You will briefly see "Analyzing model..." while it works, and the result is remembered for as long as the model uses that URL.
| Tile | What it counts |
|---|---|
| Triangles | Total triangles across the file. The single best predictor of how heavy the model is to render. |
| Vertices | Total vertices. |
| Meshes | Renderable meshes, the things that can be shown and hidden. |
| Instances | Meshes the file itself reuses through instancing. |
| Nodes | Transform nodes, the empty containers that group other nodes. |
| Variants | Material variants declared with KHR_materials_variants. |
| Animations | Baked animation clips. |
| Materials | Distinct materials. |
| Textures | Source images stored in the file. This counts images, not slots, so a file with one image used twice shows 1 here and two entries in the Textures panel below. |
| Texture data | Total size of the texture image data. Usually the largest part of a heavy file. |
Reading these tiles is not the same as parsing the file. The tiles come from a quick read of the file itself and appear on their own; the panels described below only exist once the structure is parsed.
Tiles with an arrow are links. Once the structure is parsed, clicking one opens the matching panel below, so Materials takes you to the materials list and Texture data to the textures list.
The tiles are the fastest way to judge whether a file is suitable before you build anything on it. A model with one mesh and no nodes cannot have its parts controlled separately no matter what rules you write.
Model URL
The public URL of your hosted 3D file, normally on Shopify CDN.
When Composer is open inside the 3D Bits app, two buttons sit at the end of the field:
- Choose from your asset library picks a file you already uploaded through 3D Bits.
- Upload a file (or Replace with an uploaded file when the field is filled) uploads from your computer and fills the URL in for you.
You can also paste a URL directly. See Adding Models for hosting requirements and Asset Security for what public hosting means for your files.
Composer reads a new URL for you only while a model has no parsed structure yet. Once there is one, editing the URL does not re-read the file: everything you configured against the old file - node conditions, transforms, material variant rules, colours, texture swaps, animation rules - stays in the panel and now describes a file that is no longer loaded.
Press Parse Structure after changing the URL. Because the model is already configured, Composer asks GLTF Structure Already Parsed and offers two options:
- Re-parse and Preserve Variants matches your existing configuration onto the new file. Node settings are matched by their path in the tree, and material, texture, animation and material variant settings by name. Anything whose path or name changed is dropped.
- Re-parse and Replace throws the old configuration away and starts from the new file.
If the new file is a substantially different export, adding a second model and configuring it fresh is safer than editing the URL, because your working setup stays intact as a fallback.
Structure of a glTF or GLB file
When the URL points at a .gltf or .glb file, Composer shows a GLTF/GLB File Detected panel with a Parse Structure button.
Parsing reads the inside of the file and gives you five panels: Nodes, Material variants, Animations, Materials and Textures. They open one at a time, and everything that makes a single file react to a shopper's choices is configured in them.
Most of the time this has already happened. Composer parses for you in two places: the Add Model dialog parses the file before it inserts the model, and typing or pasting a glTF link into Model URL parses a model that has no structure yet. So the button is really a re-parse button - reach for it when a model arrived without a structure (a project you loaded, or the file you dropped on the start screen) or when the file behind the URL has changed.
If a panel is missing but the file has something in it, Composer says so on the spot - "3 material variants found in the file - re-parse the structure to manage them" - and clicking that line re-parses. That happens when the file gained variants, animations, materials or textures after the structure was saved.
You need a parsed structure when you want to:
- Show and hide individual parts, such as one wheel set instead of another
- Switch between material variants baked into the file
- Give a material a different colour for a given option
- Replace a texture image for a given option
- Play an animation clip when an option is chosen
- Move, rotate or scale a part of the model rather than the whole thing
You do not need one when the model is a single unit that is only ever shown or hidden as a whole, or when the file is not glTF or GLB.
Clear Structure discards the parsed structure and everything configured on it. Parse Structure on a model that already carries configuration opens the preserve or replace choice described above; on a model whose structure is untouched it simply re-reads the file without asking.
Parsing itself happens in Composer, not on your shopper's device - the file is read once, here. But the result is not a scratch pad: the whole tree is written into your configuration, and Publish sends it as it stands, including every node you never configured.
For a tidy product export this is invisible. For a CAD export with thousands of nodes it is the single biggest thing in your configuration, and a project can grow large enough that the app refuses to publish it ("This project is too large to publish").
Two habits keep it in hand:
- Clear Structure on a model that turned out to be a single unit. The model, its rules and its transforms stay; only the tree goes.
- Export models with the parts you actually need, rather than the full assembly tree your CAD tool produces. Preparing 3D assets covers how.
Exporting a parsed structure
Download scene config (.json) and Copy scene config to clipboard, the two buttons beside Files in the bottom bar, ask a question Publish does not: GLTF Export Options, with Export Full Structure or Export Variants Only.
- Export Full Structure writes the tree exactly as Composer holds it. Choose this when the file is going back into Composer later and you intend to add more rules to it.
- Export Variants Only keeps just the nodes that carry a condition, plus the ancestors needed to reach them, and drops the rest. It is much smaller, and it is the recommended choice on the dialog.
The filter keeps a node because it has visibility conditions. A node that carries only a base transform or transform variants, and no conditions, is not kept - so a corrected part position or a lid that opens on a plain transform variant is lost from that export. If you have used transforms without conditions, export the full structure.
Publish never shows this dialog. It sends the full structure either way.
The node tree
The Nodes panel is the hierarchy inside your file.
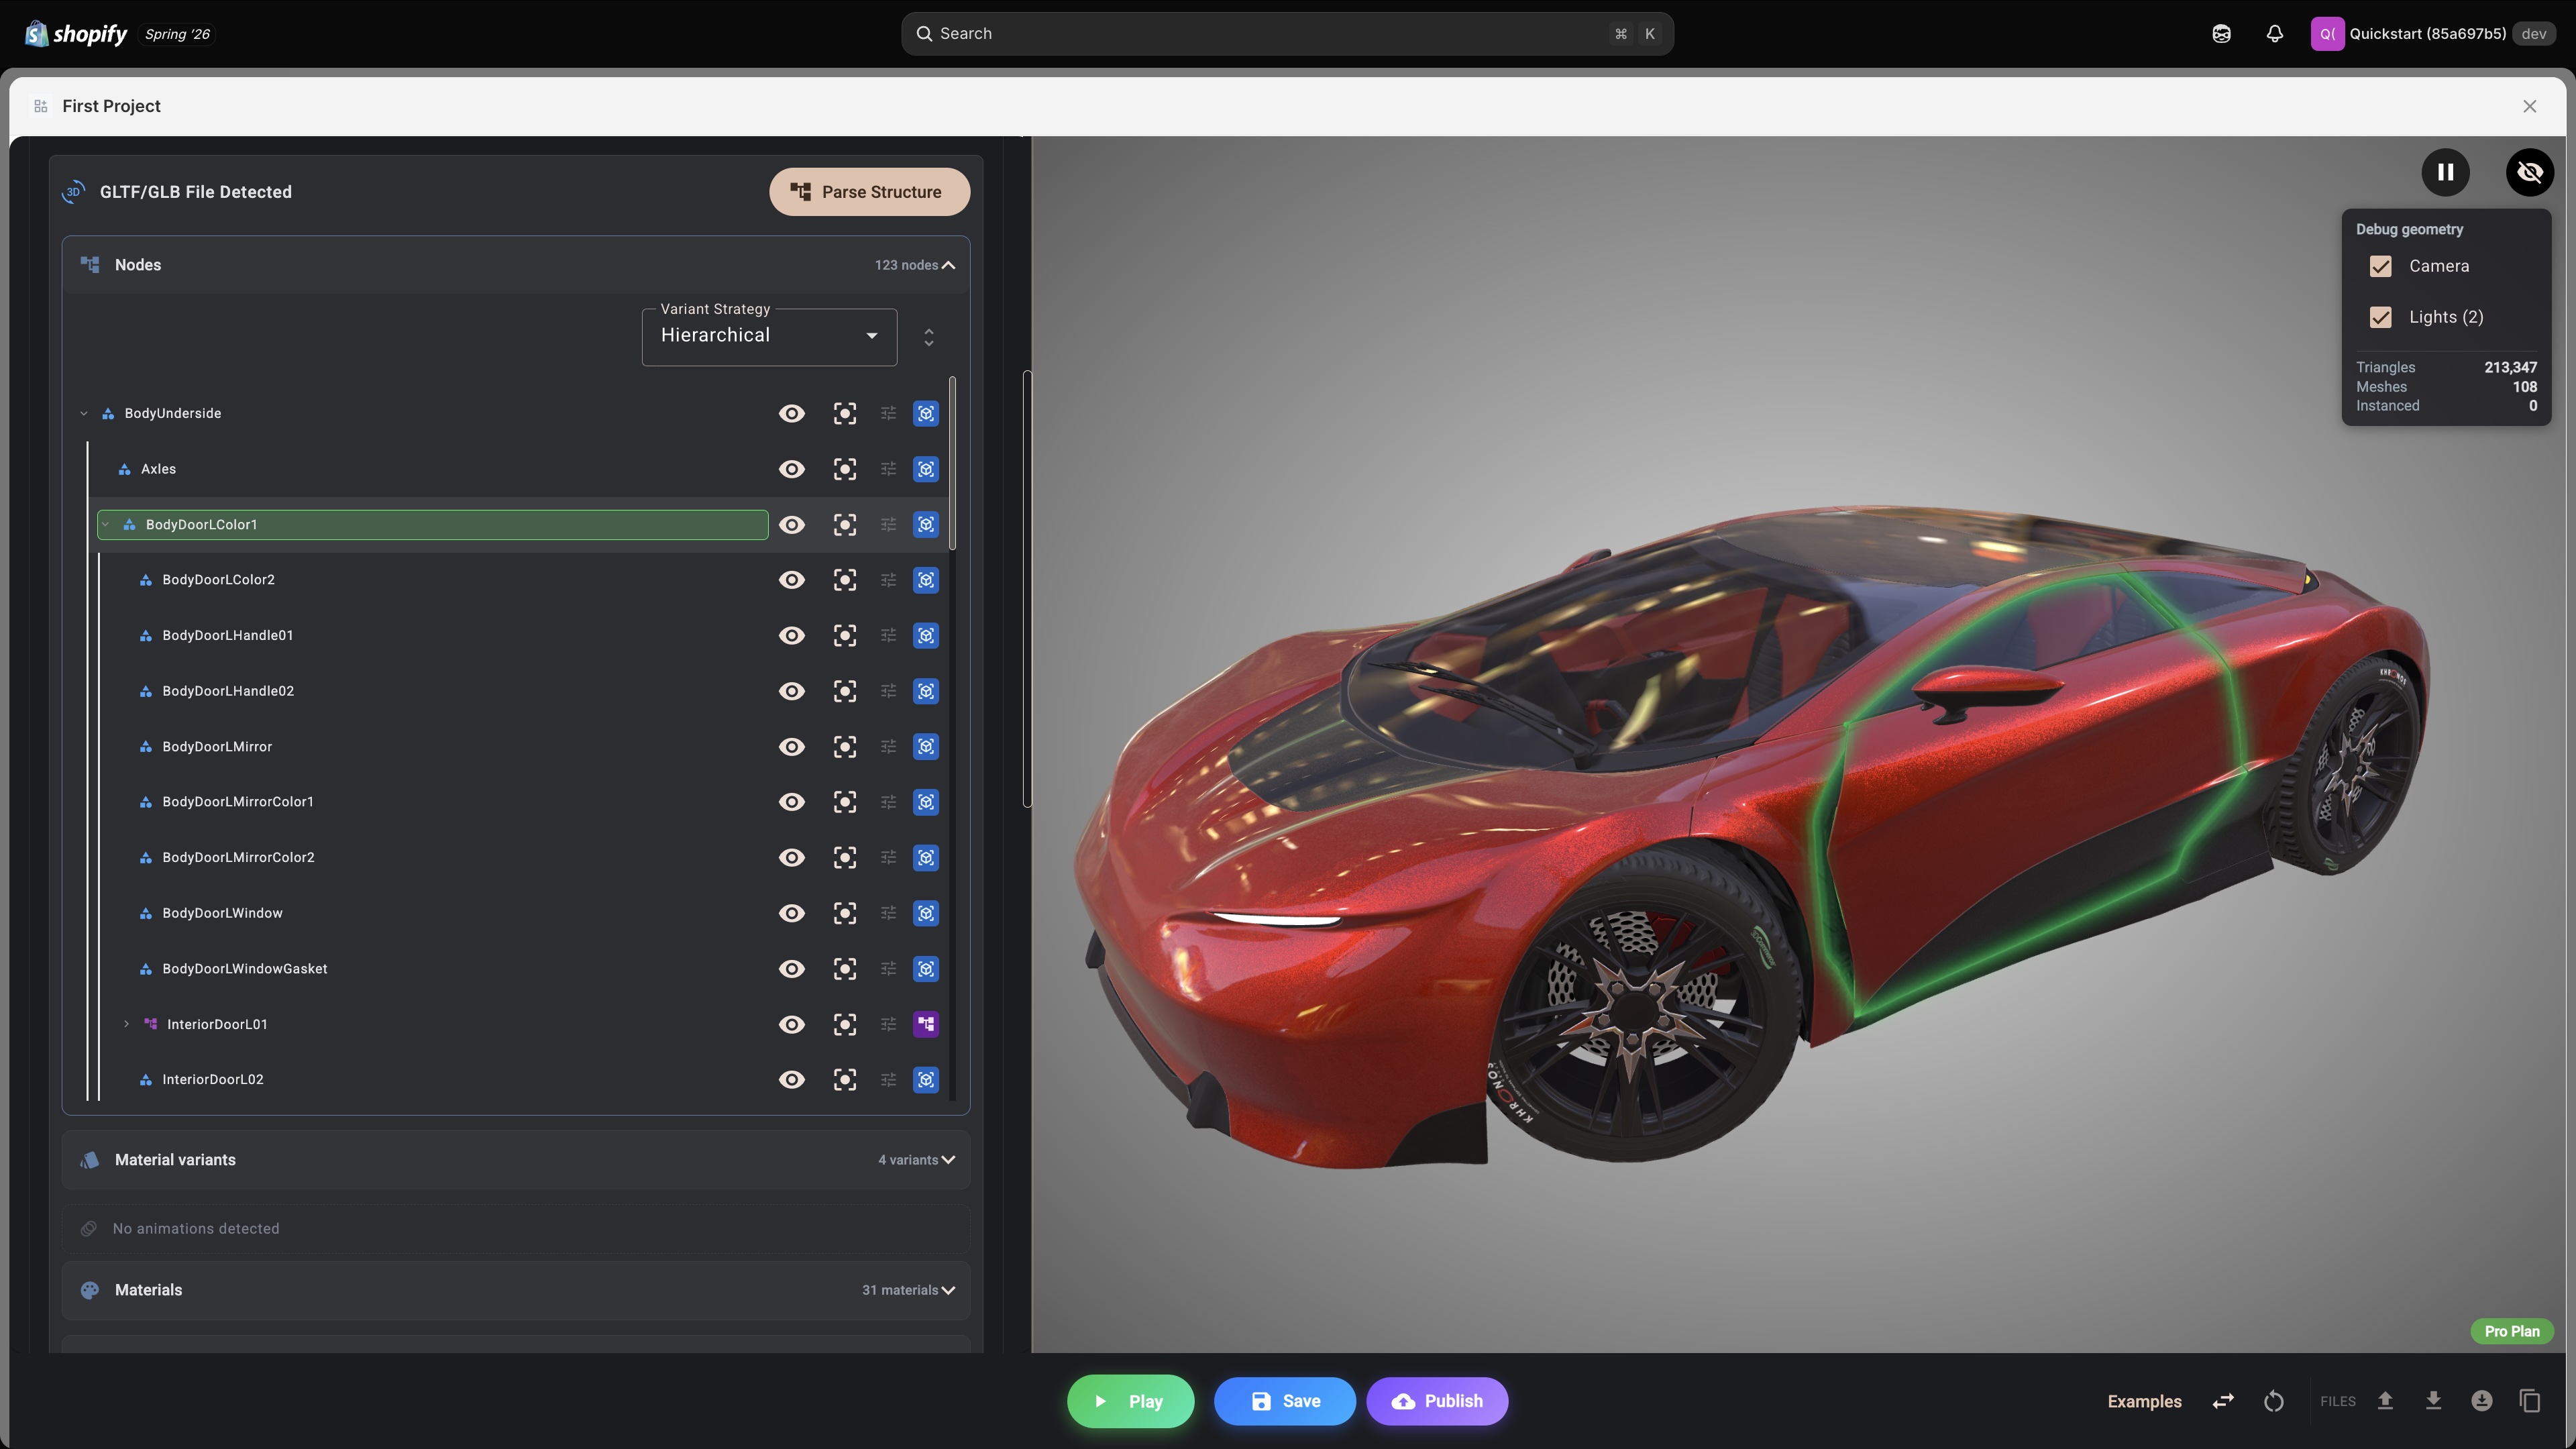
Nodes come in a few kinds, marked with a badge on the right of each row. Hover a badge to read its label:
- Mesh - visible geometry
- Instance - geometry reused from another mesh
- Transform - an empty container that groups other nodes
- Camera and Light - carried in the file, listed for completeness
- Skeleton joint - drives skinned geometry, and cannot be hidden on its own. A joint row carries no buttons at all; there is nothing on it for you to set
Nesting is what makes the tree useful. A car exported properly looks something like this:
BodyUnderside
├── Axles
├── BodyDoorLColor1
│   ├── BodyDoorLColor2
│   ├── BodyDoorLHandle01
│   ├── BodyDoorLMirror
│   └── InteriorDoorL01
└── WheelFrontLRim
Rules can go on any level. Put one on a door's parent node and the handle, mirror and window go with it. Put one on a single rim and only that rim responds.
Each row has three actions:
- Hide this part in the editor temporarily takes it out of view so you can work on what is behind it. This is an editor tool, not a variant rule, and is never published.
- Frame this part in the 3D view moves the editor camera onto it, which is how you confirm you have the right node when names are unhelpful. Double-clicking the row does the same thing.
- Configure visibility conditions and transforms opens the node dialog.
A tune icon on a row means that node has something set on it - conditions, a base transform, or transform variants. A faded one means a node below it does.
Configuring a node
The node dialog has two tabs.
Visibility conditions is the same condition editor used everywhere in Composer. When the conditions match, the part is shown; when they do not, it is hidden. A node with no conditions is always visible, subject to the model's own rule and the variant strategy below.
Transform holds two things:
- Base transform is applied permanently. Tick position, rotation or scaling and the values override what the file specifies for that node. Use it to correct a part that was exported in the wrong place, or to move a part for good.
- Transform variants move the part only while a condition matches. See Transform variants below.
Node transforms are local, meaning relative to the node's parent. Children keep their own placement and travel with the parent, so opening a door moves its handle and mirror with it.
Variant strategy
The Variant Strategy dropdown at the top of the node tree decides how a node's visibility relates to its parent's. Composer sets Hierarchical when it parses a file.
Hierarchical makes visibility flow down the tree. A node is visible when its parent is visible and its own conditions match. A node with no conditions of its own simply follows its parent. Hiding a parent hides everything under it, whatever those children say.
This is what you want when rules sit at more than one level of the same branch. Suppose the car has two complete wheel sets:
WheelsAlloy      (show when wheels = alloy)
├── WheelFrontL
├── WheelFrontR
├── WheelRearL
└── WheelRearR
WheelsSteel      (show when wheels = steel)
├── WheelFrontL
...
With Hierarchical, one rule per set is enough. The four wheels under it inherit the answer.
Standard evaluates each node's rule on its own, without reference to its parent. A node with no rule of its own stays visible. Use it for flat models where the parts are independent, or when you deliberately want a child to be visible while its parent's rule says otherwise.
Leave it on Hierarchical unless you have a reason. Hierarchical gives one predictable answer per part. With Standard, a rule on a parent and a rule on its child both target the same geometry, and which one has the final say is not something you should have to reason about.
Material variants
If the file was exported with the KHR_materials_variants extension, each variant it declares is listed here.
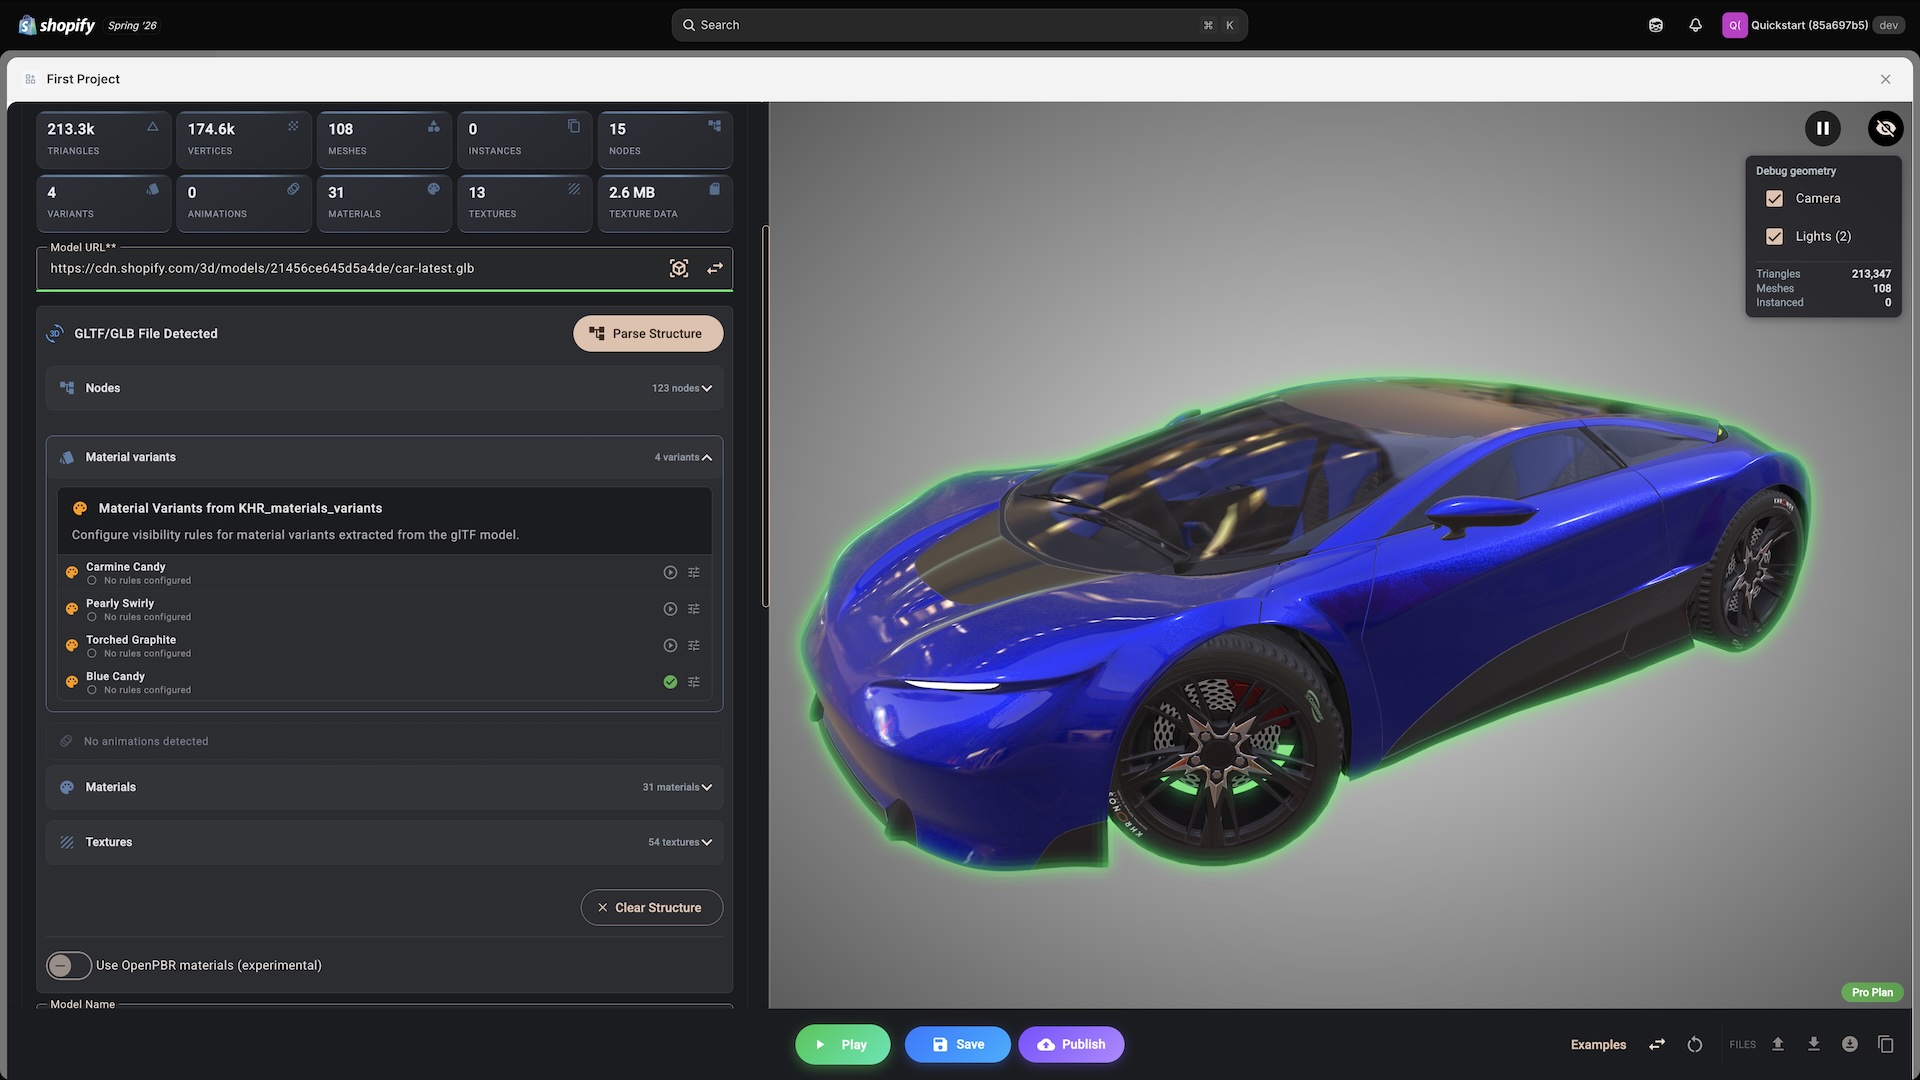
This is the neatest route to colour and finish changes, because the alternatives were defined by whoever built the model: one set of geometry, one download, several complete looks, and switching between them is instant.
Two actions per row:
- Preview this material variant on the model applies it in the editor so you can see which is which. It is an editor preview only. Press it again to reset.
- Configure opens the condition editor for that variant.
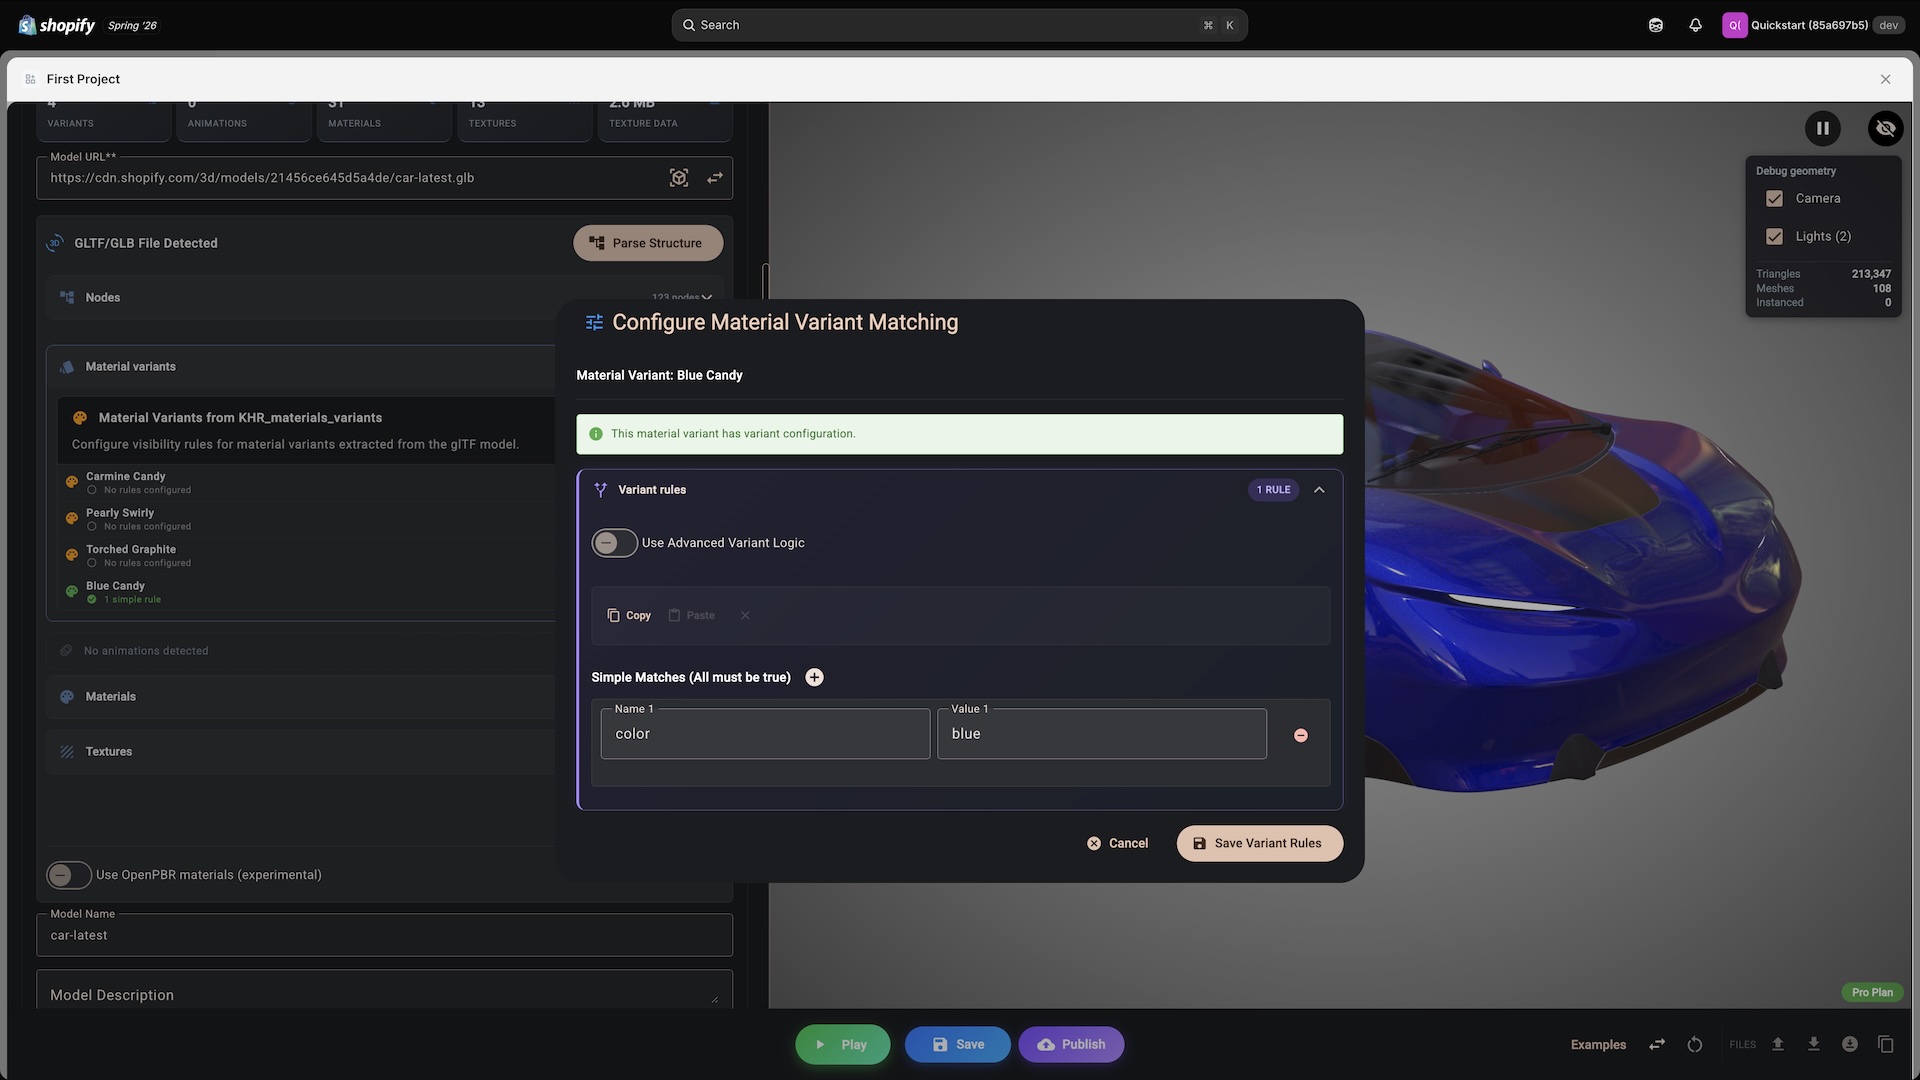
Say your options panel offers a colour choice with the values red, blue and graphite. You map each variant to one of them:
| Variant in the file | Condition |
|---|---|
| Carmine Candy | color = red |
| Blue Candy | color = blue |
| Torched Graphite | color = graphite |
How they are resolved:
- A variant with no conditions never activates. An unconfigured list does nothing.
- Every variant whose conditions match is applied, in list order. If two match and they cover the same meshes, the later one wins. Give each variant a condition that cannot be true at the same time as another's.
- When none match, the model returns to the materials it was exported with.
- Material variants belong to the file, so instanced copies of the same model switch together. See Sharing geometry.
Materials
Every material in the file, with the meshes and textures it touches.
Colours and texture swaps set here, like animations and material variants, apply in Play rather than while you author, which is what the preview buttons in these panels are for. Edit mode and Play is the full table of what runs where.
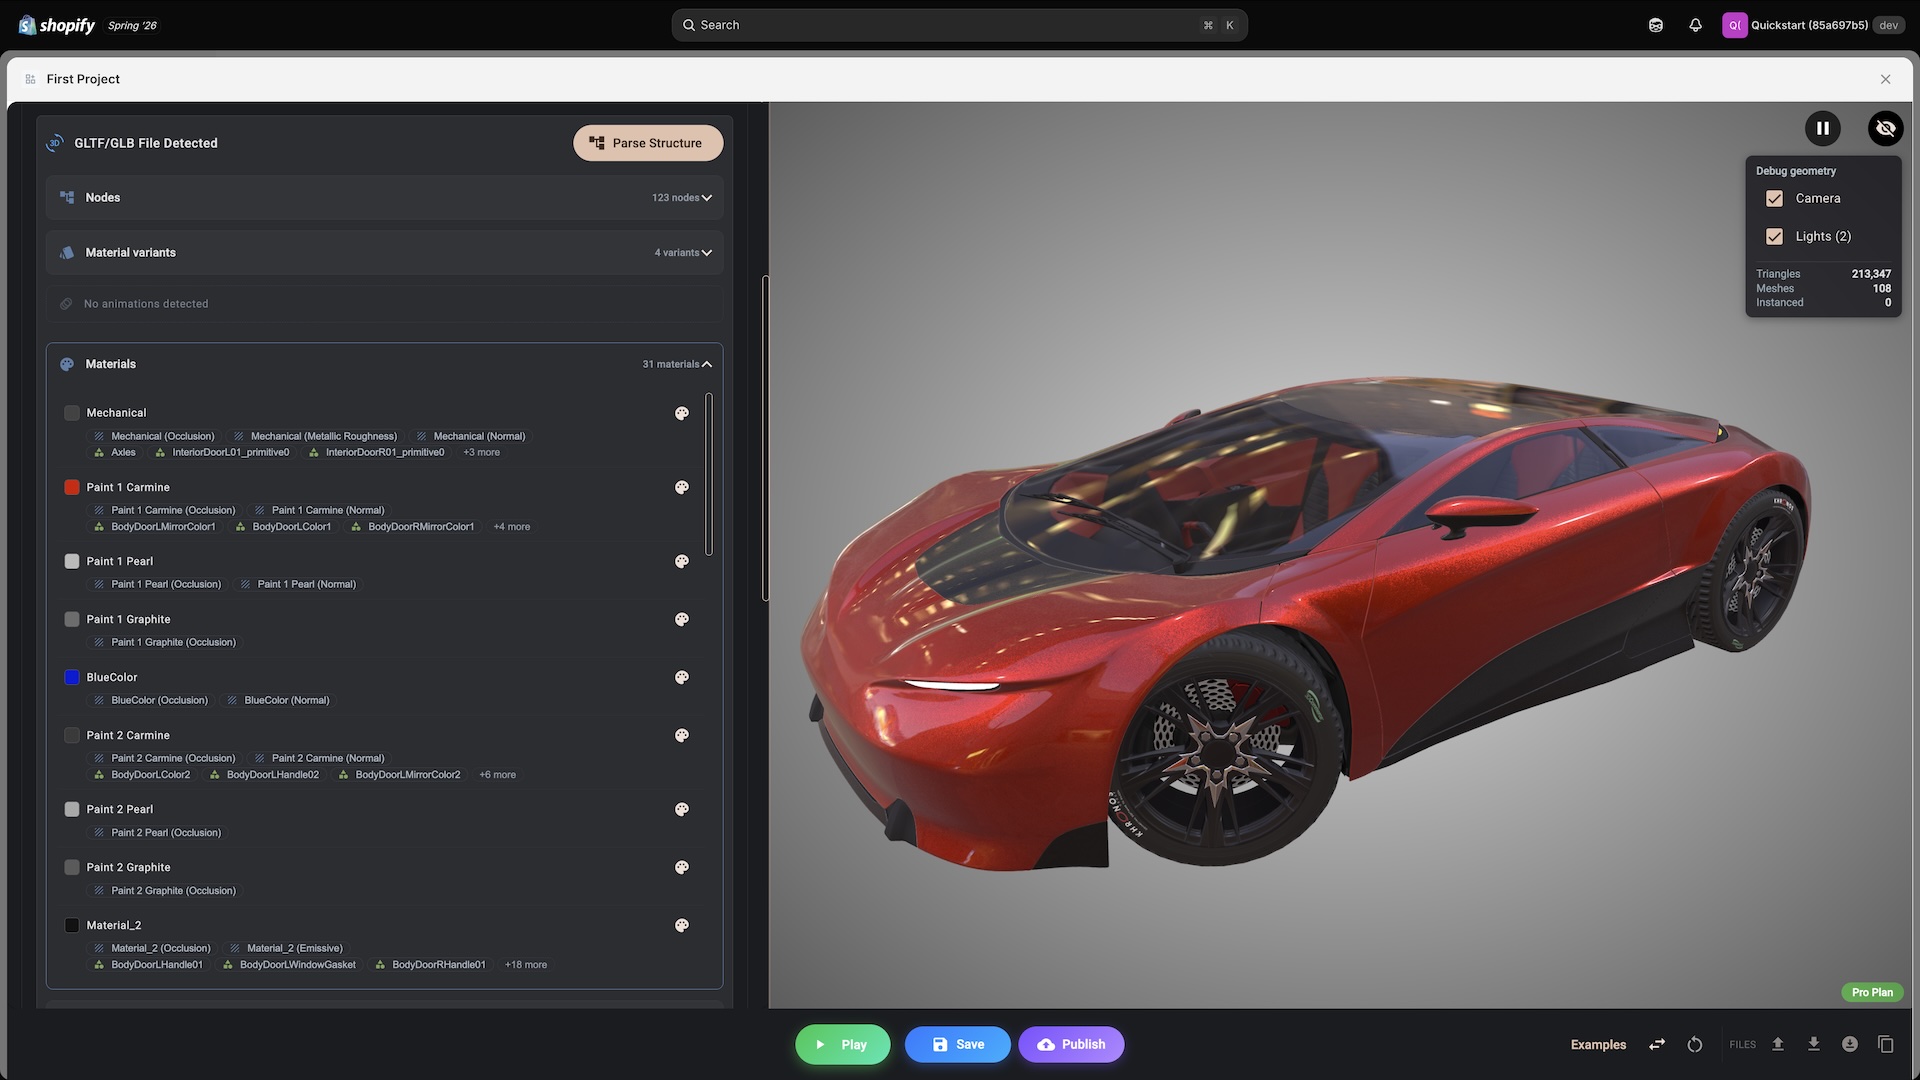
Each row shows:
- A colour swatch with the material's base colour. An empty swatch means the base colour comes from a texture rather than a single value.
- The texture chips the material samples. Clicking one jumps to that texture in the Textures panel.
- The mesh chips it is applied to. Clicking one highlights that mesh in the 3D view, which is the quickest way to find out what a material named
Material_2actually is.
Alternative base colours
The palette button on a material opens Configure Material Colors, where you add colours that apply while a condition matches.
This is the answer when your product comes in many shades and the file does not carry a variant for each. Twenty colours defined here cost nothing in file size, where twenty material variants or twenty models would cost a great deal.
- Each entry has a hex colour, an optional label, and conditions.
- Entries are checked in order and the first match wins.
- An entry with no conditions never activates. Every colour you add needs a rule of its own.
- When none match, the material returns to its original colour.
- Materials belong to the file, so a colour change affects every mesh using that material and every copy of that model. The mesh chips tell you the blast radius before you start.
If a texture drives the base colour, the palette button is not offered, because tinting a textured surface with a flat colour rarely looks like anything you would sell. For those, swap the texture image instead.
Textures
Every texture entry in the file, plus a grid of the source images with their sizes.
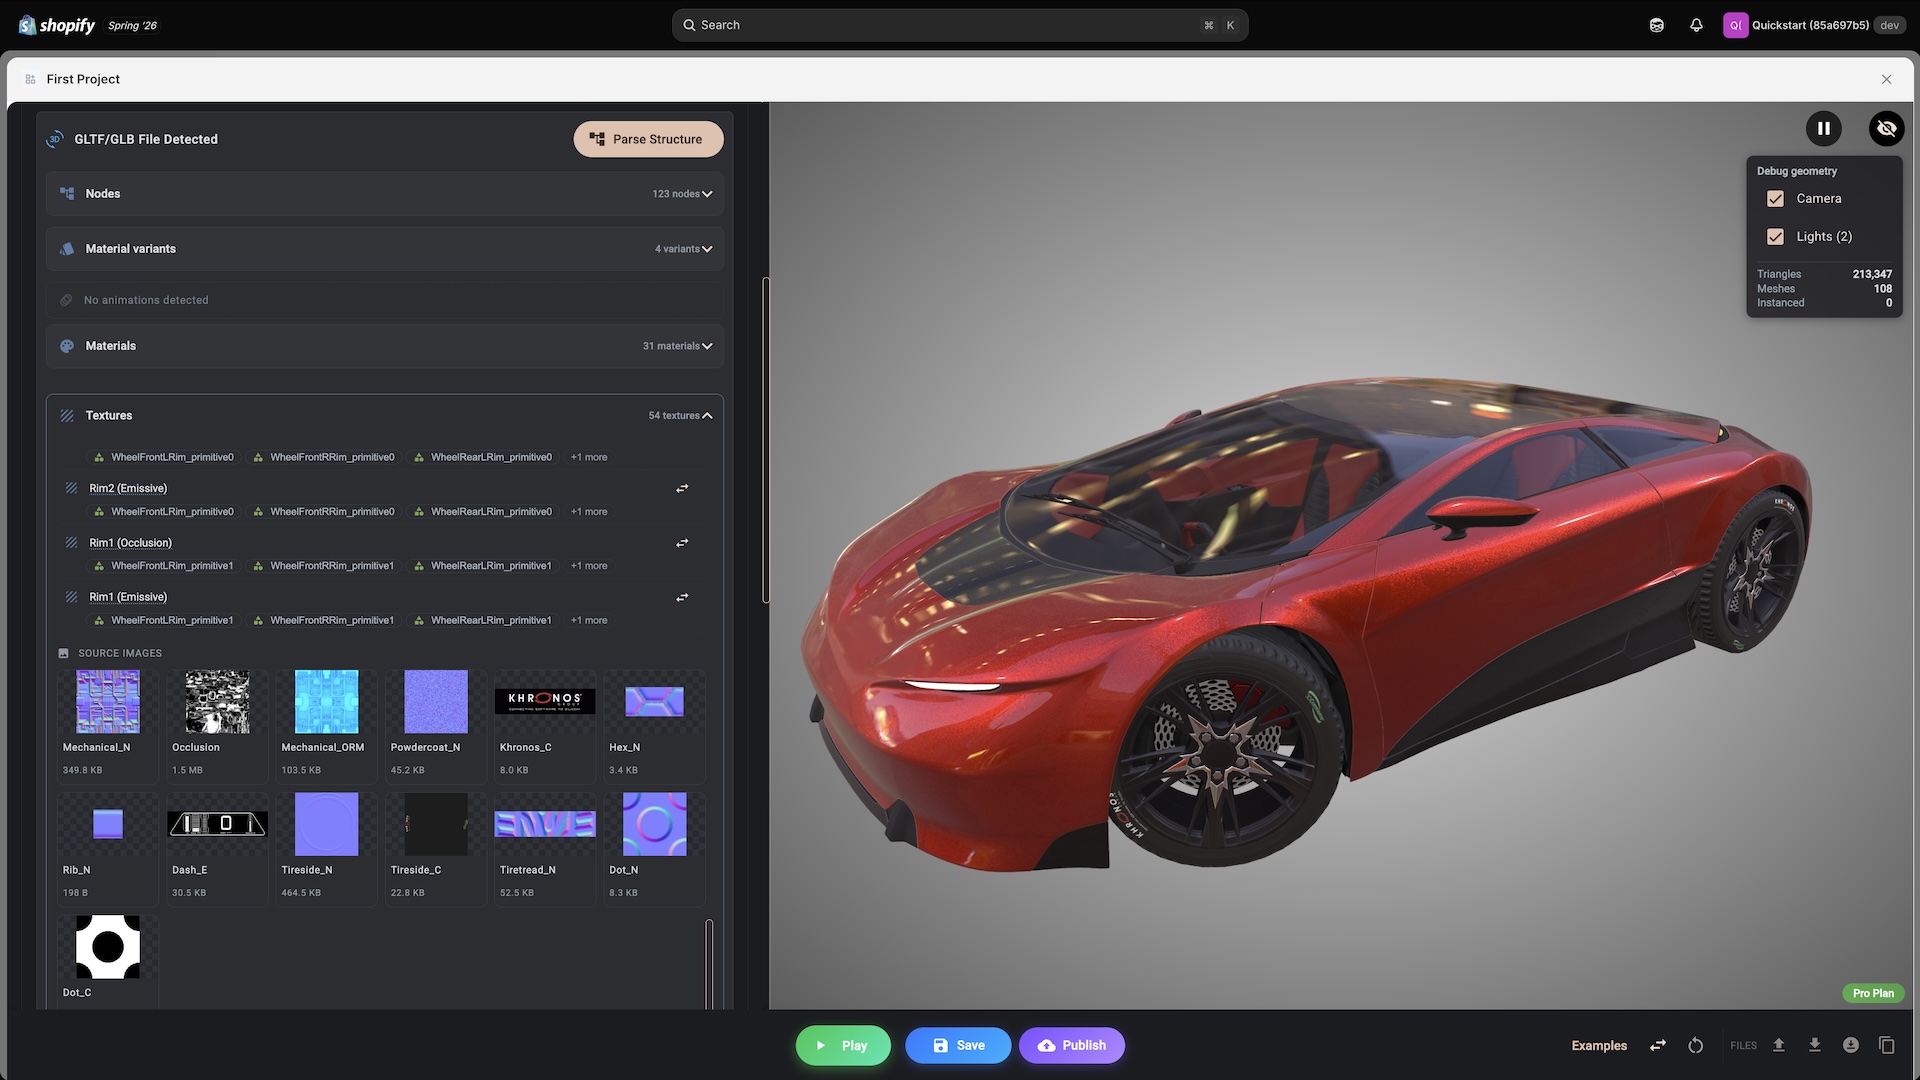
Names come from the file itself and normally carry the slot they fill, so you see entries such as Rim1 (Occlusion) and Rim1 (Emissive). One image used in two slots is two entries. Swapping one changes only that use.
Clicking a texture name scrolls to its source image. Mesh chips highlight the geometry using it. The Texture data figure in the statistics row is the sum of these images, and is where you look first when a file is too heavy.
Alternative images
The swap button opens Configure Texture Alternatives, where you point a texture at a different image while a condition matches. Use it for patterned finishes, printed panels, wood grains, anything where you have the images.
- Each entry has an image URL, an optional label, and conditions. Upload or pick from your asset library with the buttons next to the URL field, exactly as for models.
- Entries are checked in order and the first match wins. An entry with no conditions never activates. When none match, the image bundled with the model comes back.
- The alternative must use the same UV layout as the original, otherwise it lands on the geometry in the wrong place. In practice it should be an export of the same image at the same resolution and orientation.
- The original texture's settings are kept, so wrapping and colour space behave the same.
- The first switch downloads the image, and it is cached afterwards, so moving back and forth between options is instant after the first time.
- Textures belong to the file, so swaps affect every copy of that model.
Animations
Baked animation clips from the file, with their length in seconds.
Playback is driven entirely by the rules you write, and those rules run in Play, not while you author - which is why there is a preview button. A clip with no rules never plays, including clips that auto-played in whatever tool exported them. Composer warns you when it finds animations for the first time for exactly this reason.
The play button previews a clip in the editor.
Each rule on a clip has:
- A trigger. While matching plays the clip for as long as the condition holds. On change fires once, either on the rising edge of the condition or whenever one of the controls you name changes value at all.
- Always play for ambient motion that should run regardless of what the shopper picks.
- Loop and speed.
- A stop behaviour for while-matching rules, deciding what happens when the condition stops holding: return to the first frame, freeze in place and continue from there next time, finish the current cycle first, or play backwards to the start.
- Sequence for on-change rules, which waits for another clip on the same model to finish rather than cutting in.
While-matching rules are evaluated in order and the first match drives the clip. On-change rules fire independently.
OpenPBR materials
A toggle at the bottom of the structure panel loads the file with the OpenPBR material standard instead of the default metallic-roughness materials.
OpenPBR is still under development in the underlying 3D engine. Models loaded this way do not cast or receive shadows. Leave the toggle off for anything that needs them, which is most products sitting on a surface.
The toggle also decides who shares with whom. Two copies of the same file count as the same load only when the URL and this toggle match, so turning it on for one copy and not the other loads that file twice.
Sharing geometry between copies
When two models point at the same URL with the same OpenPBR setting, the file downloads once and a toggle appears: Share geometry with identical models (instancing). It is on by default.
On, the copies share geometry, materials and skeleton. Memory use is minimal and loading is fast, but because the shared parts are literally the same objects:
- Baked animations play on all copies together
- Material variants, material colours and texture swaps apply to all copies together
- Position, rotation, scaling and visibility remain independent per copy
Off, the copy is fully independent, with its own animations and its own material state, at the cost of more memory. The file still downloads only once either way.
So four wheels from one wheel file, each in its own place and each hidden by its own rule, should stay instanced. A pair of doors where one is open and animating while the other is shut needs instancing off on the second one.
The material variants and animations panels of an instanced copy say so, with a link to the original model that controls them.
Name and description
Model Name is what you see in the Models list and in search. Up to 255 characters. Descriptive names pay for themselves the moment you have more than three models: Wheels Alloy rather than Model 3.
Model Description is a note to yourself and your colleagues, up to 600 characters. Where the file came from, what it is for, why it is configured the way it is. It has no effect on the storefront.
Position, rotation and scaling
These place the model in the scene.
| Property | Format | Default |
|---|---|---|
| Position | X, Y, Z in scene units | 0, 0, 0 |
| Rotation | X, Y, Z in degrees | 0, 0, 0 |
| Scaling | X, Y, Z factors | 1, 1, 1 |
X runs left to right and Y runs down to up. Z is depth, and which way it points depends on the right-handed coordinate system toggle in the Scene section.
Clicking into any of these fields brings up handles in the 3D view. Dragging them writes the numbers back into the fields, which is almost always faster than typing. Clicking a model in the 3D view selects it and jumps the panel to its settings.
Rotation is in degrees on each axis. Rotating on a single axis is predictable; combining two or three depends on the order the engine applies them, so if a model ends up somewhere unexpected, reset to zero and change one axis at a time.
Scaling takes a factor per axis. 2, 2, 2 is double size, 0.5, 0.5, 0.5 is half. A negative value mirrors, so a clone of an asymmetric part scaled -1, 1, 1 gives you the left-hand version of a right-hand part. Non-uniform values such as 2, 1, 1 stretch the model, which is occasionally what you want and usually a sign that the file needs re-exporting.
Fix it in the software that made it if you can. Correcting it here works, but every future export of that file needs the same correction applied again.
Transform variants
A transform variant moves, rotates or scales the model while a condition matches. A lid that opens, a shelf that moves up a notch, a component that shifts when a longer frame is chosen, a mirror image for the left-hand build.
Each variant has:
- An optional name, which is what you will read in the list six months from now
- Conditions, using the same editor as everything else
- The channels it overrides. Tick Position, Rotation or Scaling and set values; untouched channels keep the model's base values
- A transition, either Instant or Animated with a duration in milliseconds and an easing curve
How they resolve:
- The first variant in the list whose conditions match wins. Drag to reorder; earlier variants win.
- When none match, the base transform applies again.
- A variant with no conditions never activates.
- Leaving a variant animates back to base using the transition of the variant being left, so a round trip is symmetrical.
- Only the channels you ticked are overridden. A variant that only sets rotation leaves position and scaling exactly as the base transform has them.
They exist on more than models. glTF nodes have them in the node dialog, and there they are local to the parent, so a moved part carries its children with it. Directional lights override direction. Decals, points of interest and dimensions have them too, though those are rebuilt rather than animated and always apply instantly.
A rotation transform variant and Animated Rotations on the same model both write the same rotation, and the combination is not supported. Pick one.
Transform variants are for discrete states: closed or open, position one or position two. To drive a value continuously from a control, such as a slider that stretches a model as the shopper drags it, use Parameter bindings in the Scene section instead.
Animated rotations
A continuous spin, for a product that should look alive on the page. The showroom podium effect.
Add an entry, choose an axis (X, Y or Z) and a speed in degrees per second. Add a second entry for a second axis if you want a tumble rather than a turn.
- Y is the one you want almost always: a horizontal turn, like a turntable.
- X pitches the model front to back, Z rolls it side to side.
- 5 to 15 degrees per second is slow and elegant. 20 to 45 is noticeable without being distracting. Above 60 it is a spectacle, which for most products is the wrong note. At 20 degrees per second a full turn takes 18 seconds.
Use it on showcase and hero placements where the 3D is there to be looked at. Avoid it on a configurator the shopper has to work with, where a moving target makes clicking parts harder, and on a product with a definite front.
To turn the whole scene rather than one model, use Scene rotation in the Scene section, which spins everything including markers, dimensions and decals.
Variant matching for the whole model
Conditions on the model itself decide whether the whole file is shown. This is all you need when a model is one unit: an accessory that appears when it is added, a size-specific part, a background element.
Simple matching is a list of name and value pairs, all of which must be true. Advanced logic lets you nest AND and OR groups, and there is a free text expression form for the rare case neither shape fits. See Variants for the concepts and Logic for rules that go further.
How the model rule and part rules combine
They combine with AND. A part is shown when the model's rule matches and the part's own rule matches. A part with no rule of its own follows the model.
That is the useful behaviour most of the time: a rule on the model gates the whole file, and rules on the parts choose between them inside it.
It goes wrong in one specific way. If the model's rule and a part's rule can never be true at the same time, the part could never appear. Composer detects this, shows a warning on the model, and ignores the model's rule while the contradiction exists, so the part rules alone decide what is shown. The warning has a Remove the model rule button, which is normally the right fix: if the parts already carry the rules, the model does not need one.
Put the rule on the model while the model is a single unit. Move down to the parts when different pieces need different answers. A configuration with rules at both levels for the same distinction is one you will have to re-read to understand.
Copying conditions between things
Every condition editor in Composer has Copy, Paste and a clear button.
Copy takes the conditions from wherever you are, and Paste writes them into any other condition editor: another model, a node, a material variant, a material colour, a texture alternative, a transform variant, a marker. There is one clipboard, holding one set of conditions at a time, and it shows you where the copied conditions came from so you can tell before pasting.
Only the conditions travel. Transforms, names, tags and structure settings do not.
This is the fast way to apply the same rule across many parts, and the safe way to keep them identical rather than retyped.
Tags
Labels for organising models. Up to ten per model, shown on the model's header and searchable from the Models list.
They earn their keep past about ten models. Group by assembly, by product line, by whatever you actually search for: wheels, interior, accessory. Consistent lowercase names, and three to five per model, is plenty.
Hide, focus, clone and remove
Four buttons at the bottom of the panel, with hide and focus also on the model's header.
Hide takes the model out of the editor view without touching any rule. An editor convenience, never published.
Focus frames the model in the 3D view.
Clone Model copies the model, including its URL, transforms, variant rules, tags, description and the whole parsed structure with its node conditions, material variant rules, material colours, texture alternatives and animation rules. The copy is named after the original with (Copy) appended.
Because the clone keeps the same URL, the file is not downloaded twice, and by default the copies share geometry. See Sharing geometry for what that means and when to switch it off. Cloning is how you build a set of four wheels from one wheel file, or a mirrored left-hand part from a right-hand one.
Remove Model deletes the model and everything configured on it: transforms, transform variants, rules, tags and the parsed structure. It asks first, and Undo (Ctrl+Z, Cmd+Z on a Mac, or the toolbar button) puts it back while you are still in the same editing session. That history does not survive closing the editor, so still take a Download project file, beside Files in the bottom bar, before a major clear-out.
Next Steps
- Variants - the five ways a model can react to a choice
- Edit mode and Play - which of these settings you can see while authoring, and which need Play
- Scene - camera, lighting, background and parameter bindings
- Logic - rules that connect choices to each other