Adding Models to Your Scene
Models are the foundation of your 3D configurator. This guide covers everything you need to know about adding 3D assets to Composer.
Quick Start
A new project opens on a start screen rather than an empty editor:
- Create your first project
- Composer opens automatically
- Drop your model on the upload area, or click it to browse. You can select several files at once, and each one is uploaded to your asset library
- Composer opens the editor with camera, lighting and background already tuned to what you dropped
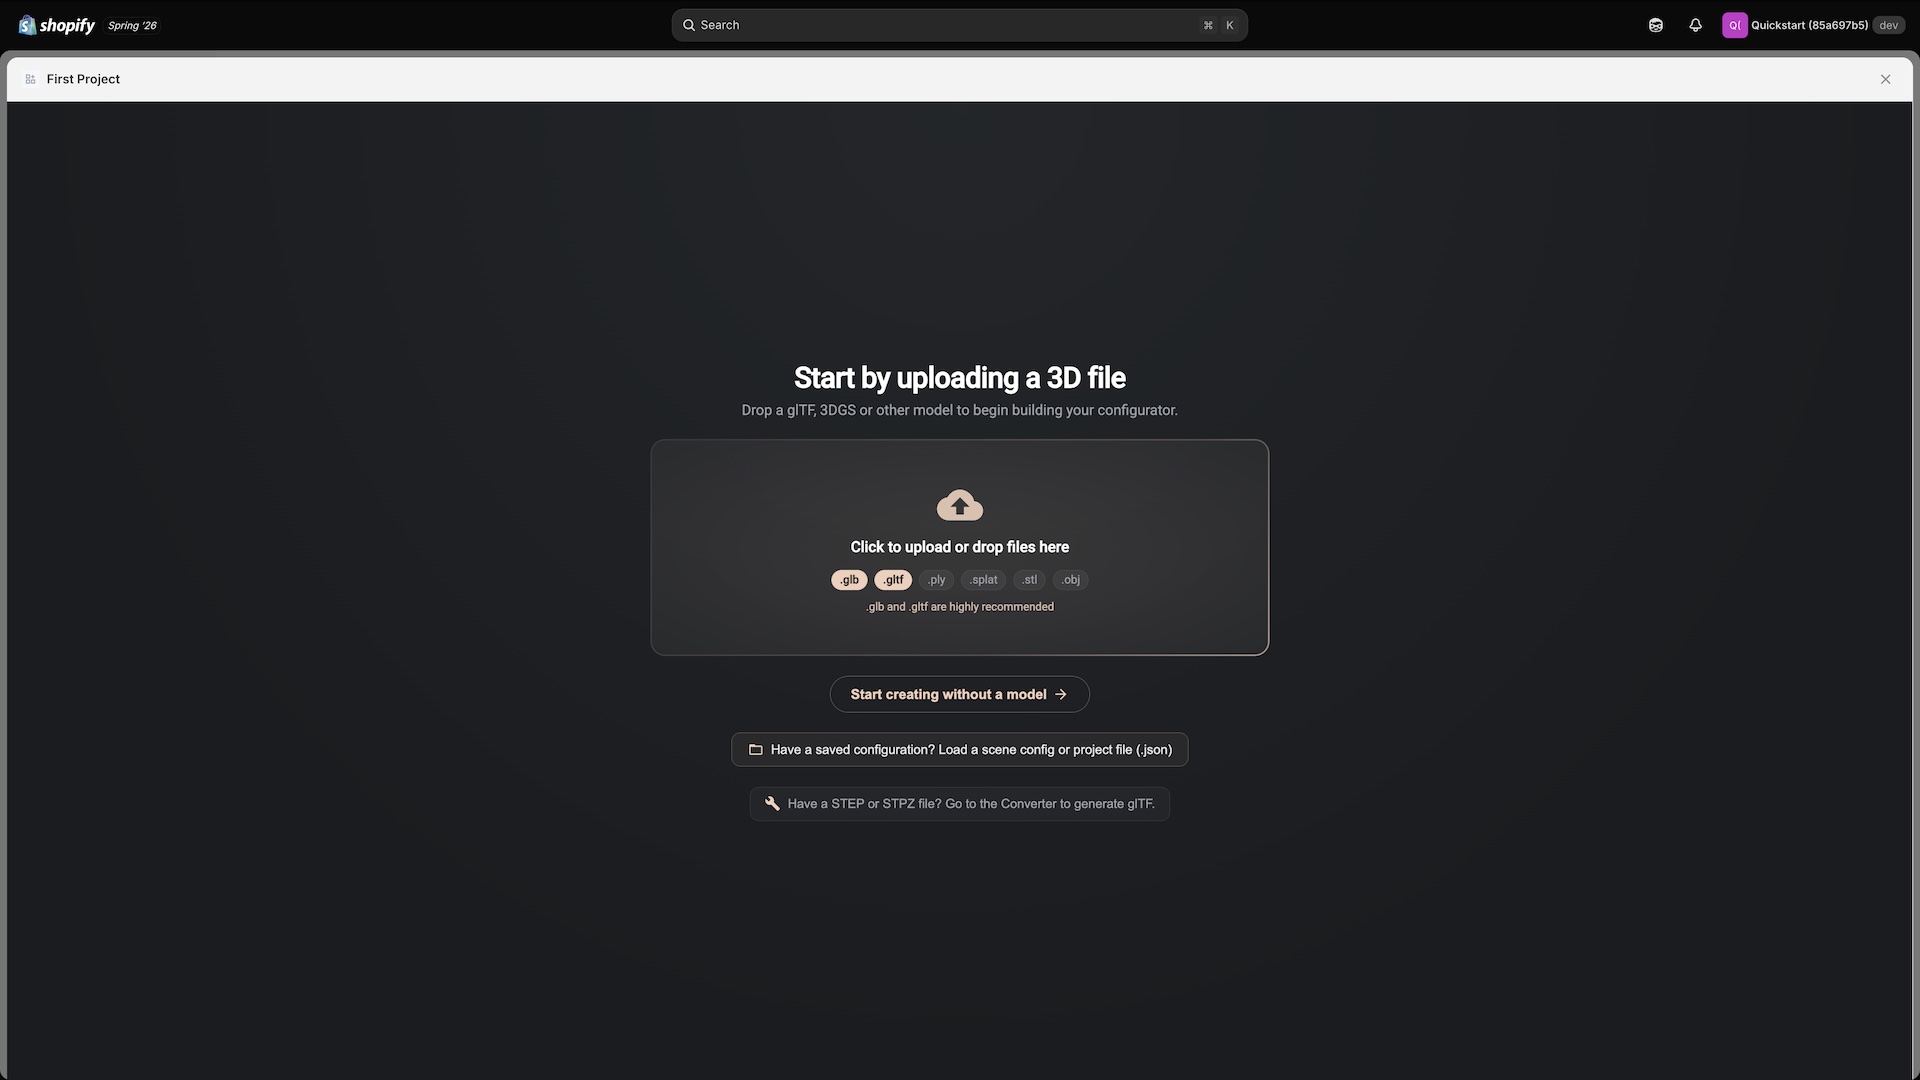
The start screen has three other ways out: Start creating without a model, a .json loader for a scene config or project file you saved earlier, and a shortcut to the Converter if what you have is a STEP or STPZ file.
The model loads in the viewport. Depending on file size and your connection, this may take a few seconds.
To add a second model:
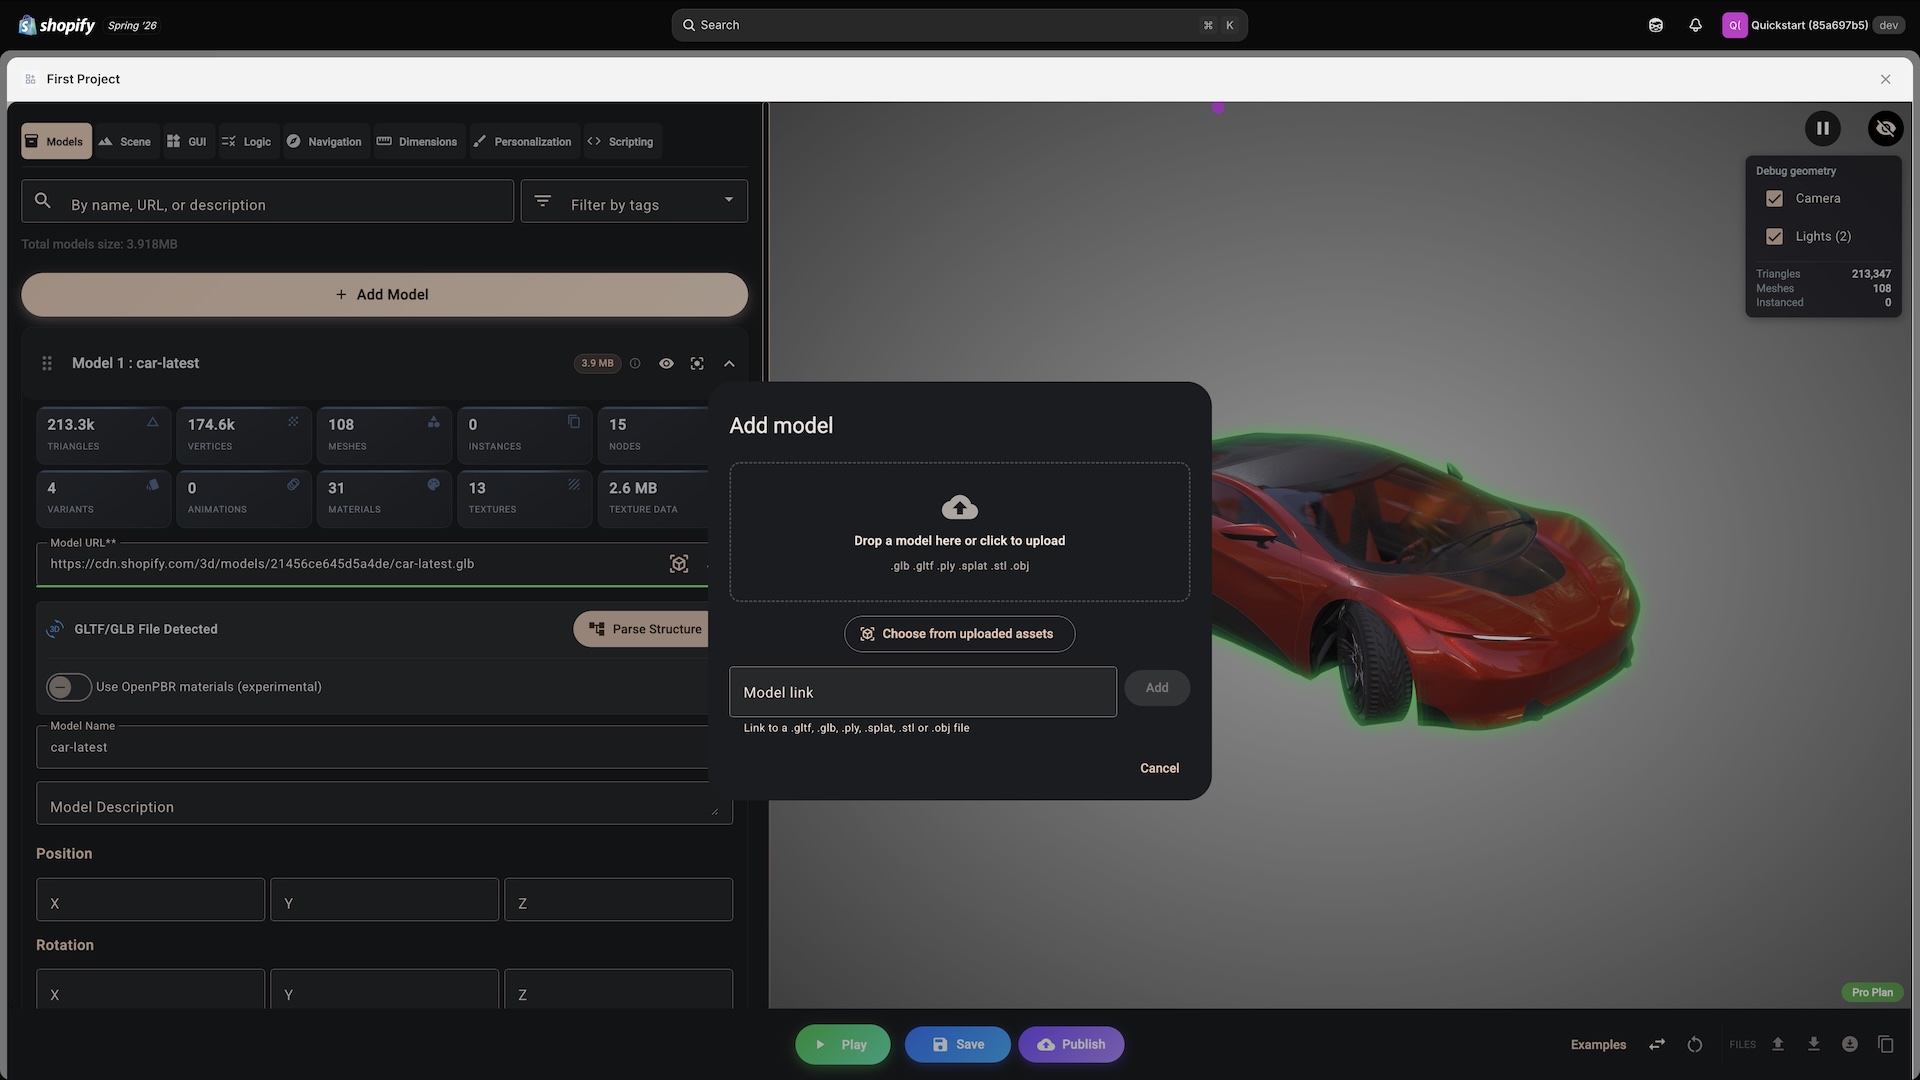
- Click the Add Model button at the top of the Models section
- Drop a file on the upload area, click it to browse your computer, or press Choose from uploaded assets
- Or paste a public URL into the Model link field and press Add
The dialog takes several files at once, and it reads each glTF or GLB before it inserts it - so a model added this way arrives with its structure already parsed and its statistics filled in.
A new model lands at the top of the Models list, not the bottom. Drag it down if the order matters to you.
The model appears in the Models list, where you can name it and set its position, rotation and scaling. See Model Properties.
Opened on its own rather than inside the 3D Bits app, Composer has no asset library to upload into. It accepts a dropped .glb or .gltf so you can look at it, but that file only previews for the session - paste a hosted link to keep a model in a configuration you intend to save.
Working with the models list
Once a scene holds more than a handful of models, the header of the Models section earns its keep:
- Search by name, URL or description.
- Filter by tags, with the tags you set on each model in Model Properties. Clear All resets both.
- Each model shows a size chip. An
ibeside the figure means the server sends the file compressed, and the tooltip gives you both numbers: the real size and what it costs to download. - A link icon on the chip means another model uses the same file, so it is only downloaded once.
- Total models size sits above the list, adding up each distinct file once, with a warning when the scene gets heavy.
- Drag a model, or use the arrows on its row, to reorder. Reordering is disabled while a search or tag filter is on, so clear the filters first.
Hosting Your Models
You need to host your 3D files somewhere accessible. Here are common options:
Shopify CDN (Recommended for Shopify Users)
Advantages:
- Built into Shopify
- Fast global delivery
- No extra cost
- Easy management
If you upload files via Composer in Shopify as shown above, you'll see your assets in 3D Bits Asset overview page too:
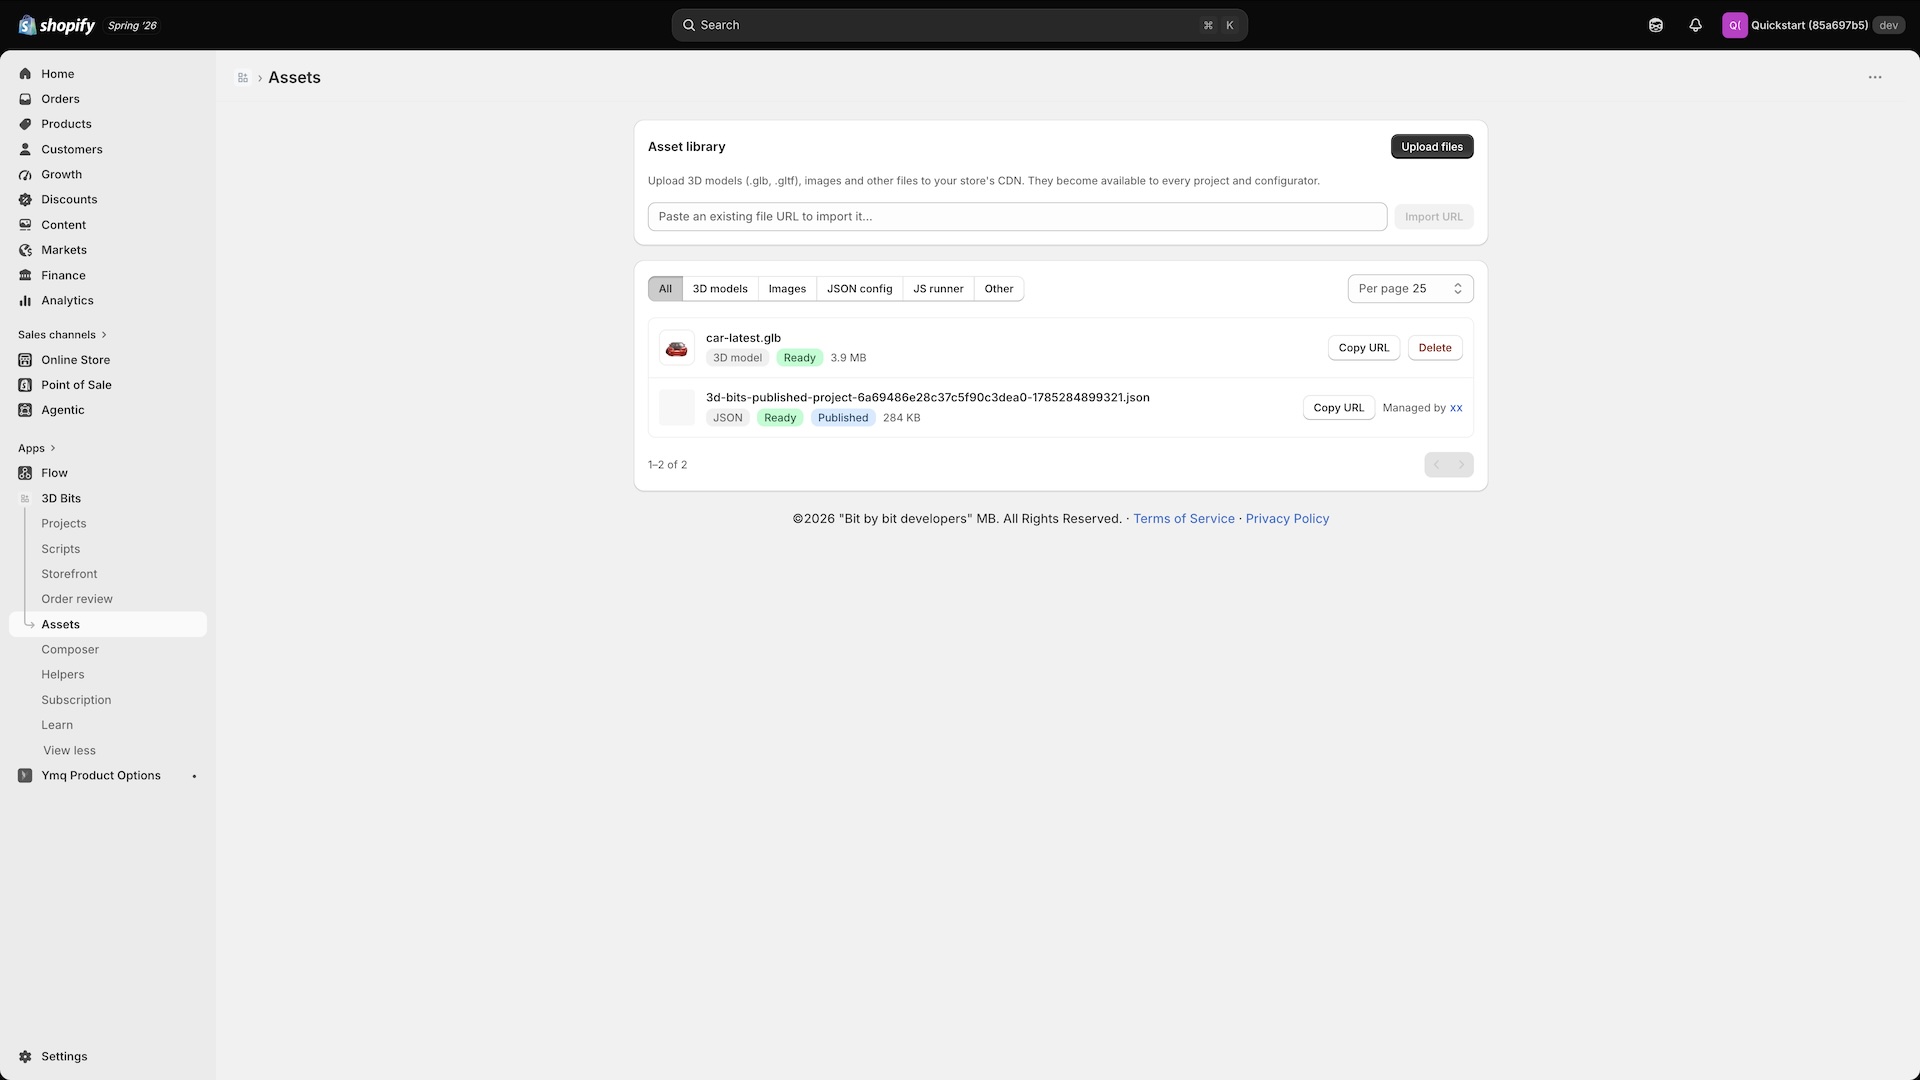
It is also possible to simply paste url from your uploaded Shopify asset and use that:
Steps:
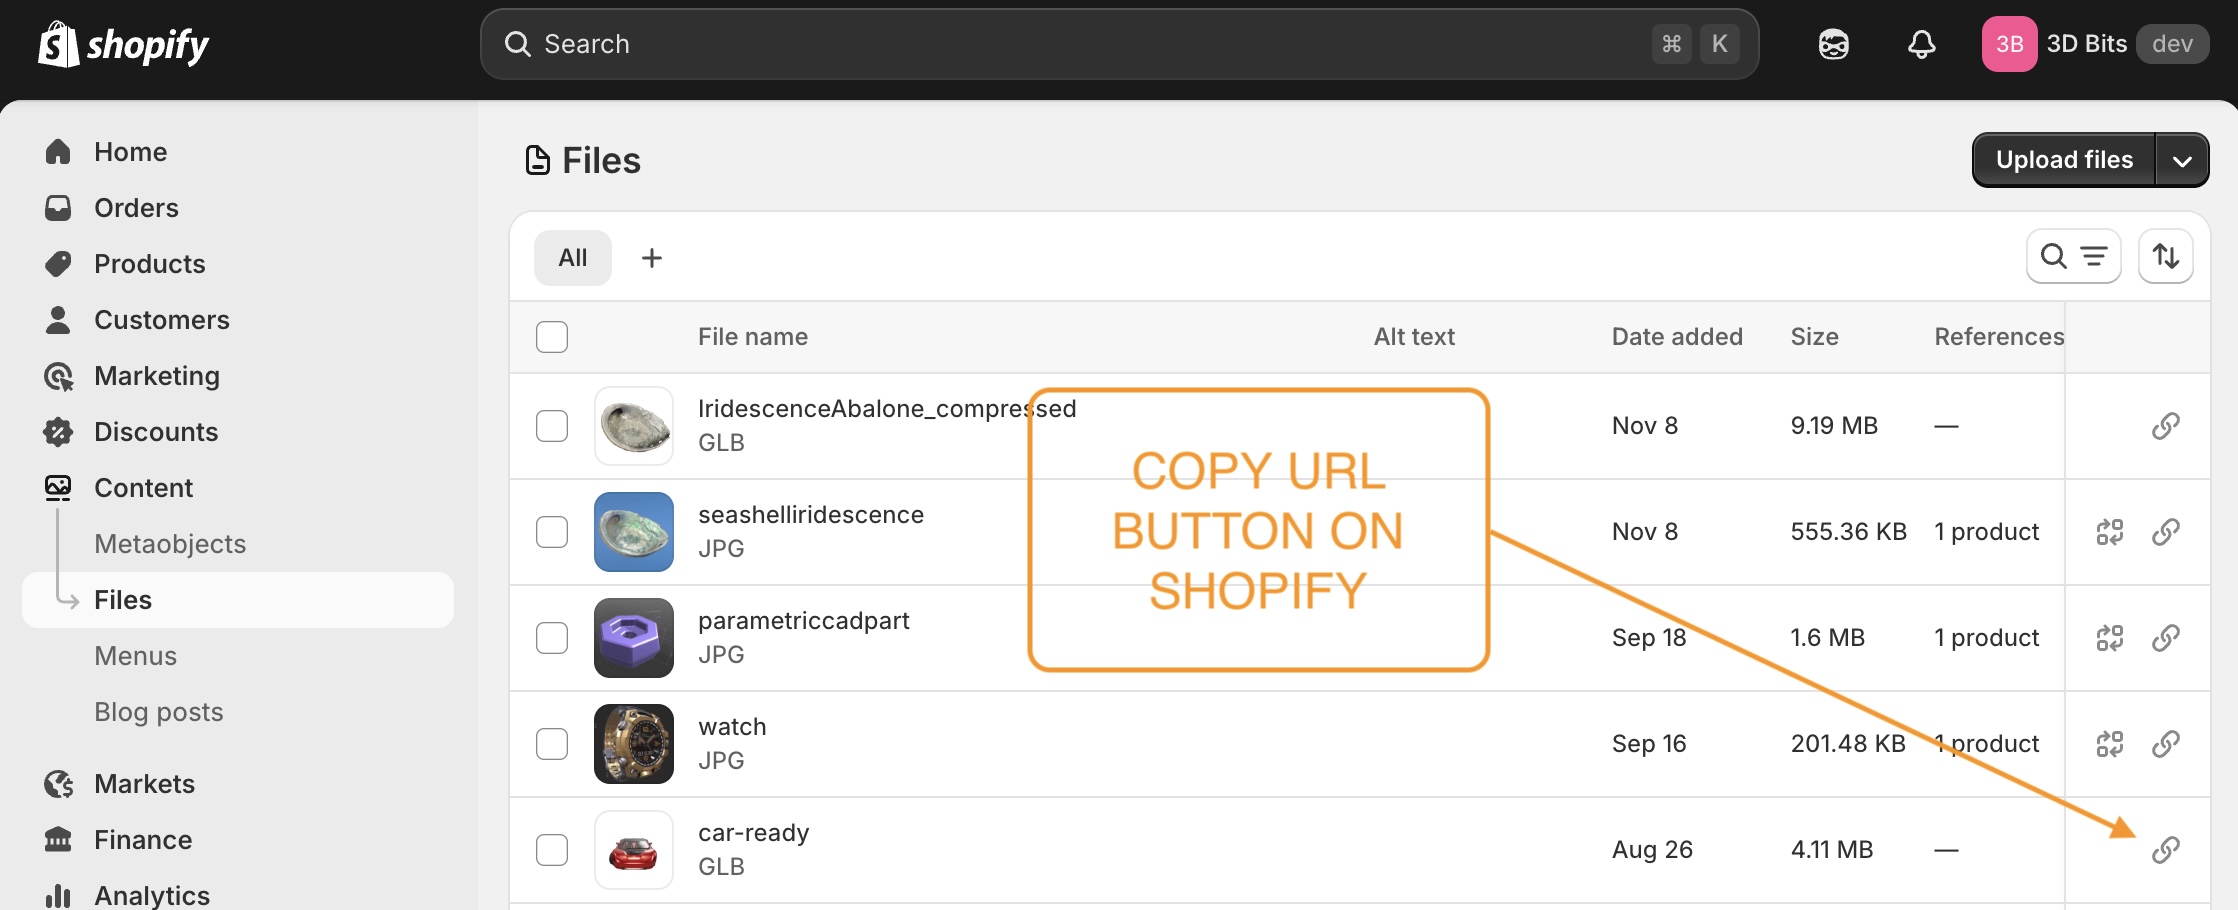
- In Shopify admin, go to Content → Files
- Click Upload files
- Select your GLB/GLTF file
- After upload, hover on the uploaded 3D model item in the list to see copy URL button on the right side
- Paste the URL to Composer and see it in Composer
Files uploaded to Shopify's CDN are publicly accessible by anyone who has the URL. This is necessary for web browsers to load your 3D models, but it also means you should only upload models that are safe to be public. Never upload production CAD files with sensitive engineering data.
Third-Party CDN Services
Popular Options:
- AWS S3 - Highly scalable, pay-per-use
- Google Cloud Storage - Good global coverage
- Cloudflare R2 - No egress fees
- DigitalOcean Spaces - Simple and affordable
Requirements:
- Set CORS headers to allow browser access
- Make bucket/container public or use signed URLs
- Use a CDN distribution for better performance
Your Own Server
You can host on your own web server, but ensure:
- HTTPS is configured
- CORS headers are set correctly
- Bandwidth can handle traffic
- Server has good uptime
Hosting 3D models on your own server can result in significantly slower loading times compared to CDN solutions like Shopify CDN. Here's why:
Geographic Distance:
- Your server may be in one location (e.g., Europe)
- Shoppers worldwide experience delays based on physical distance
- A shopper in Australia may wait 2-5 seconds longer than one near your server
No Global Caching:
- CDNs store copies of your files in data centers worldwide (100+ locations)
- Your server serves from a single location
- Each request travels the full distance to your server
Limited Infrastructure:
- CDNs handle millions of requests simultaneously
- Typical web servers have limited concurrent connections
- Peak traffic can overwhelm your server, causing timeouts
Real-World Impact:
- Shopify CDN: 0.5-2 seconds typical load time globally
- Self-hosted server: 2-10+ seconds depending on shopper location
- Result: Higher bounce rates, lower conversions, poor user experience
Recommendation: Use Shopify CDN (free with your store) or a dedicated CDN service (AWS CloudFront, Cloudflare, etc.) for production stores.
Required CORS Headers:
Access-Control-Allow-Origin: *
Access-Control-Allow-Methods: GET
Supported File Formats
Composer supports multiple 3D file formats:
GLB (Recommended) ⭐
Best For: Production use, eCommerce products
Advantages:
- Single file (geometry, textures, materials all included)
- Smallest file size
- Fastest loading
- Industry standard for web 3D
- Supports PBR materials
- Supports material variants
File Extension: .glb
Typical Size: 1-20 MB for product models
GLTF
File Extension: .gltf
A .gltf is JSON, and it can either carry everything inside itself or point at a separate .bin and separate texture images sitting beside it. Composer takes the self-contained kind. The multi-file kind is not a loader limitation - it is a hosting one. Those companion files have to answer at exactly the relative paths written inside the .gltf, and file storage built for single files gives every upload its own address instead of keeping a folder together. Shopify's Files area and the app's Assets library both work that way, which is why a multi-file export uploaded there loads without its geometry or its textures.
So: export a single .glb, or a self-contained .gltf, unless you are hosting the whole folder yourself on a CDN that preserves its structure.
For production, always use GLB. Convert GLTF to GLB using tools like Blender or Read our Guide to preparing GLTF files.
Other Supported Formats
| Format | Extension | Best Use Case | Notes |
|---|---|---|---|
| SPLAT | .splat | Gaussian splatting, photorealistic captures | Well supported, use compressed files |
| PLY | .ply | Gaussian splat and scanner output | Loads like SPLAT, no materials or variants |
| OBJ | .obj | Legacy models | We advise against using this file type |
| STL | .stl | CAD models | No color or materials, pure mesh, we advise against using this file type |
3DGS is well supported and particularly valuable for stores with fast-changing merchandise that's difficult or time-consuming to model traditionally:
Ideal Use Cases:
- Handmade items - Unique sculptures, pottery, artisan crafts
- Floristic compositions - Fresh flower arrangements, bouquets, wreaths
- Natural products - Stones, crystals, driftwood, organic shapes
- Food products - Cakes, pastries, decorated desserts
- Vintage/antique items - One-of-a-kind pieces with complex details
- Custom artwork - Paintings with texture, mixed media art
Advantages:
- Capture real products with a smartphone camera (60+ photos from all angles)
- Process quickly with tools like Scaniverse, Luma AI or Polycam
- Photorealistic quality captures real textures and lighting
- No 3D modeling skills required
- Update product catalog rapidly
Limitations:
- No variant support (each variation needs separate capture)
- Usually larger file sizes than optimized GLB models
- Hard to modify materials or colors after capture
- Limited to what was photographed
When to Use GLB Instead: Products with predictable variants (colors, materials, sizes) benefit from traditional modeling with material variants.
Here is an example of SPLAT 3D Scanned plant models inside the Composer
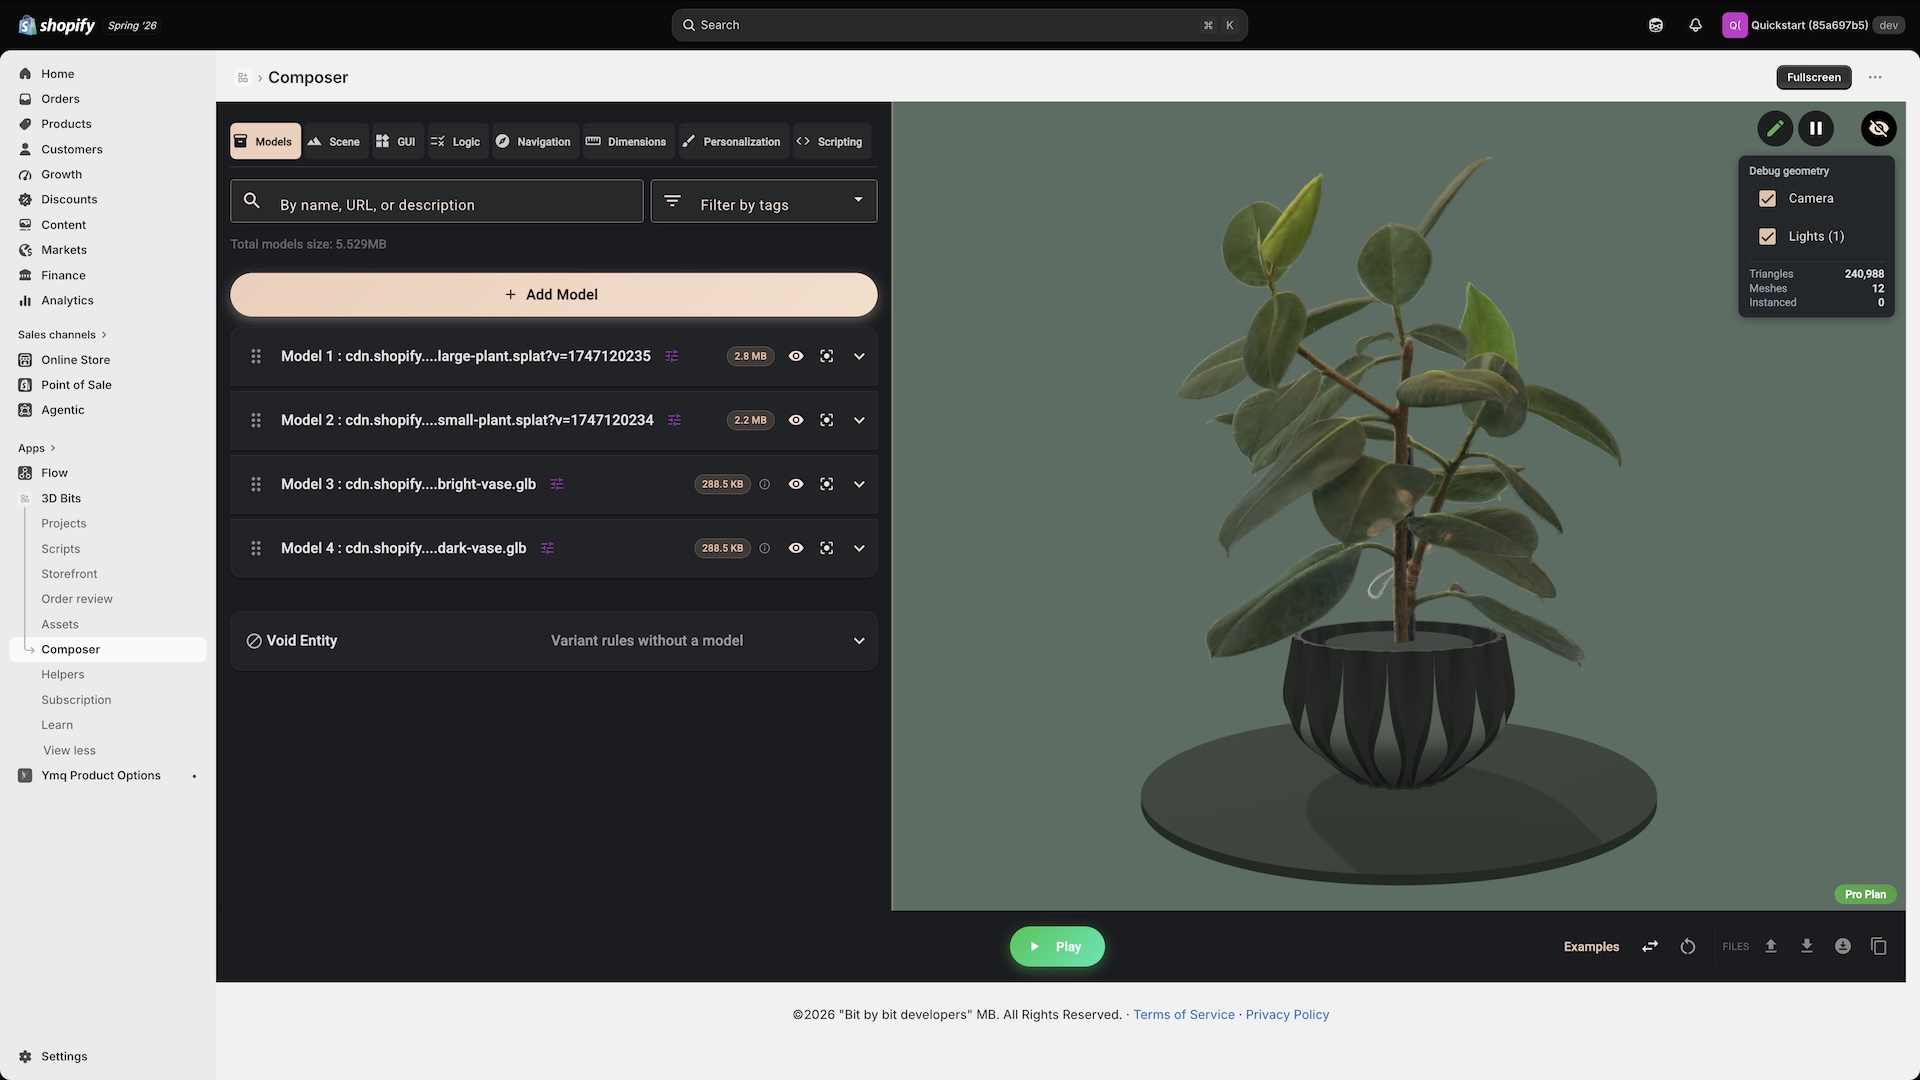
Only .gltf and .glb can be parsed into a structure, so only they give you material variants, per-part visibility, material colours, texture swaps and animations. Everything set at model level still works on any format - showing or hiding the whole model on a condition, its position, rotation and scaling, and its transform variants. Use GLB when possible for configurable products.
Model File Size Guidelines
Four separate limits apply, and they do different things:
| Limit | What it is | What happens |
|---|---|---|
| 20 MB per model | Composer's amber warning band | An amber icon on the model's row, with the size in its tooltip. Nothing is blocked |
| 40 MB per model, and 40 MB total | Composer's red band, and the scene-total notice | A red icon on the row, and a warning above the list once every distinct file together passes 40 MB. Nothing is blocked |
| 30 MB per model | The iPhone Safari hard block on the storefront | That model does not load for those shoppers, and they are told why. See the note below |
| 100 MB per file | The upload limit of the Assets library | The upload is refused: "File is too large - the maximum is 100 MB." |
Aim well under all of them. As a working target: under 2 MB for a simple product, 2-10 MB for a detailed one, and treat anything past 20 MB as a file that needs another pass rather than a file that is finished. Model size and performance limits explains each one in full.
Optimization Tips:
- Compress textures (use JPEG for non-transparent, WebP for transparent)
- Reduce polygon count without losing detail
- Use Draco compression for GLB files
- Remove hidden geometry
- Share materials where possible
Read our Guide to preparing GLTF files
While well-prepared 3D GLTF files run fine on most mobile phones, it's important to take precautions. When preparing 3D models and including them in your webshops, make sure you test the page on the most popular mobile devices too. Large asset files combined with high-resolution shadows may crash mobile phone browsers. Safari browsers on iPhone are the most susceptible to crashes when Random Access Memory (RAM) limits are exceeded. Apple has set a low threshold for websites running on iPhone, and whenever that memory limit is hit, the website will experience something called an "unexpected reload". If you're not careful with your assets, skybox textures, or shadow resolutions, you run the risk of experiencing this error. Desktop browsers, iPads, and Android phones will probably not experience these issues, but we advise you to make the experience lightweight for everyone.
If you're using BITBYBIT VIEWER with Composer, the 3D Bits app on Shopify also takes precautions on iPhone Safari specifically. Before a model loads there, its size is checked, and any single model over 30 MB is blocked instead of being loaded (this is subject to change in the future). The shopper sees a panel headed Models Not Loaded, listing the file and its size, with a Close button; it also clears itself after about twenty seconds.
Two details worth knowing:
- The check is per model, not per scene. Four 20 MB models all load; one 31 MB model does not.
- On the storefront the figure it compares is the size the server reports for the download, not the size Composer shows you. A file the server sends compressed can therefore come in under the line while Composer reports it as larger, and a file served as-is is measured at its full size. Judge your assets by the figure Composer reports, which is the real one, and keep them clear of 30 MB either way.
This safeguard exists because loading extremely large assets on high-traffic pages like homepages without proper testing can crash the browsing experience for iPhone users, potentially affecting sales and shopper experience. On other browsers nothing is blocked on size, so the responsibility for keeping the page fast is yours.
Adding Multiple Models
You can add as many models as needed:
- Click + Add Model for each model, or select several files in one go
- Each appears in the Models List (left panel), newest at the top
- Models are rendered in the order they appear
- Drag to reorder if needed, or use the arrows on a model's row
Use Cases for Multiple Models:
- Different product components (frame + cushion)
- Variant-specific parts (small, medium, large sizes)
- Accessories that appear conditionally
- Background/environment elements
- The need to combine GLB and 3DGS splat files in one environment
For products with multiple material/color options, use a single GLB file with KHR_materials_variants instead of loading separate models for each variant:
Why Single Model is Better:
- Textures load once - Shared textures (like base geometry) are downloaded only one time
- Faster performance - Less memory usage, quicker variant switching
- Smaller total size - No duplicate geometry or texture data
- Smoother experience - Instant material switching vs loading new models
Example: A car available in 5 paint finishes:
- ❌ Inefficient: 5 separate GLB files (each ~5MB) = 25MB total download
- ✅ Efficient: 1 GLB with 5 material variants (~6MB total) = Only shared textures stored once
How to Set Up:
- Use Blender's KHR_materials_variants addon to configure material variants
- Export single GLB file with all material options
- Load once in Composer
- Configure variant matching to switch between materials
When to Use Multiple Models:
- Completely different geometries (not just material changes)
- Different product accessories or add-ons
- Combining GLB with SPLAT files
- Size variants that change shape significantly
Model Naming Best Practices
Give your models clear, descriptive names:
Good Names:
- ✅ "Car Body"
- ✅ "Wheels Alloy"
- ✅ "Table Top Oak"
- ✅ "Leg Assembly"
Poor Names:
- ❌ "Model 1"
- ❌ "Untitled"
- ❌ "glb_export_final_v2"
- ❌ "temp"
Why It Matters:
- Easier variant matching configuration
- Better organization with many models
- Clearer for team collaboration
- Simpler debugging
Model URL Requirements
Your 3D model must be hosted on a publicly accessible URL with these requirements:
URL Format
Two different rules apply, in two different places.
The scheme, enforced by the field. Model URL accepts a link beginning with https://, http://, data: or /. Anything else marks the field invalid with "Start with https:// or /", and an invalid field is not a cosmetic problem: the live preview stops updating and Composer refuses to download, copy or publish the configuration until you fix it.
The extension, enforced by the Add Model dialog. Adding a model through Add Model checks that the file or link ends in .gltf, .glb, .ply, .splat, .stl or .obj, and refuses anything else. Typing a link straight into the Model URL field skips that check - nothing stops you pasting a .fbx link, and what you get instead is a model that will not load.
Beyond those two:
- ✅ Must be publicly accessible (no authentication required)
- ✅ Must point directly to the model file
- ✅ Should use HTTPS. Composer will accept an
http://link, but your storefront is served over HTTPS and browsers block insecure content on a secure page, so the model will fail to load for shoppers - ❌ Cannot require login or API keys
Example Valid URLs
https://cdn.shopify.com/s/files/1/0123/4567/files/car.glb
https://your-cdn.com/models/product.glb
https://storage.googleapis.com/bucket/model.glb
Testing Your URL
Before adding to the editor, test your URL:
- Open it in a web browser
- The file should download automatically
- If you see an error, the URL isn't accessible
3D assets used in web configurators must be publicly accessible, just like product images on your website. Before uploading any 3D models, it's essential to understand the security implications and what this means for your intellectual property.
Handling Load Errors
These are the messages 3D Bits actually prints, so you can search this page for the words in front of you.
"Failed to load model"
A snackbar in Composer, one per model that failed. When more than one fails you also get "2 models failed to load, check if model URLs and formats are correct".
Cause: the file could not be fetched or could not be read - a link that is wrong, private, moved, blocked by CORS, or an extension the viewer does not load.
Fix:
- Open the URL in a private browser window. It should download the file without asking you to sign in
- Check the link ends in a supported extension
- Check HTTPS is used
- If you host the file yourself, check the CORS headers listed above
"Could not load ... check that the link points to a valid, publicly accessible glTF file"
From the Add Model dialog, naming the file: "Could not load Chair. Check that the link points to a valid, publicly accessible glTF file." The link or file was accepted, but the glTF inside it could not be read.
Cause: a corrupted export, a multi-file .gltf whose companion files are missing, or a link that returns a web page rather than a model.
Fix:
- Re-export from your 3D software, as a single
.glb - Check the file is not a multi-file
.gltf(see GLTF above) - Check the link returns the file itself, not a preview or a download page
"The link must point to a .gltf, .glb, .ply, .splat, .stl or .obj file"
Also from Add Model, under the Model link field. Dropping a file it cannot take gives you the same refusal the other way round: "Unsupported file type: drawing.step. Supported: .gltf, .glb, .ply, .splat, .stl, .obj".
Cause: an extension 3D Bits does not load - .fbx, .step, .3ds, .dae and so on.
Fix:
- Convert to glTF first. Helpers → Converters does STEP and STPZ; Blender does most of the rest
- See Supported Formats for the full list
"File is too large - the maximum is 100 MB."
From the upload itself, before anything is stored.
Fix: compress textures, reduce polygon count, use Draco compression, or split the model. In practice a model anywhere near this limit is far too heavy for a product page - see Model File Size Guidelines above.
Model loads but looks wrong
Possible Issues:
- Missing textures
- Far from origin - make sure that your model is positioned on x 0, y 0 and z 0 in Blender or other modeling tools.
- Incorrect materials (verify PBR settings)
- Wrong scale (adjust in Model Properties or in original modeling software)
- Incorrect orientation (rotate in properties)
Loading Time Factors:
- File size (larger = slower)
- Internet speed
- CDN performance
- Browser performance
Placing the Model
A newly added model arrives at the scene origin, unrotated and unscaled. Position, rotation and scaling are set afterwards in Model Properties, either by typing values or by dragging the on-screen handles that appear when you click into one of those fields.
Void Entity
At the bottom of the Models section, below the list, sits a permanent panel called Void Entity - variant rules without a model.
It carries conditions and nothing else: no file, no position, nothing drawn. Its job is to make a "none of the above" value - a None finish, a No engraving choice, a Standard version that adds nothing - visible to the editor's own variant list, so you can author and try that state without importing an empty placeholder model just to hang the value on.
If your options come from the option panel, every value you offer is already declared on the control itself, so a "none" choice needs nothing here - simply write no rule that matches it. Void Entity earns its place in projects that drive the scene from bare variant names instead.
Next Steps
After adding models:
- Model Properties - Configure position, rotation, scaling.